Working with projects»
Once you've created a project and provisioned your first resources, this is the day-to-day workflow for managing Intent projects: exploring them in the UI, governing them with policy, attaching cloud integrations, provisioning and importing resources, and deleting safely.
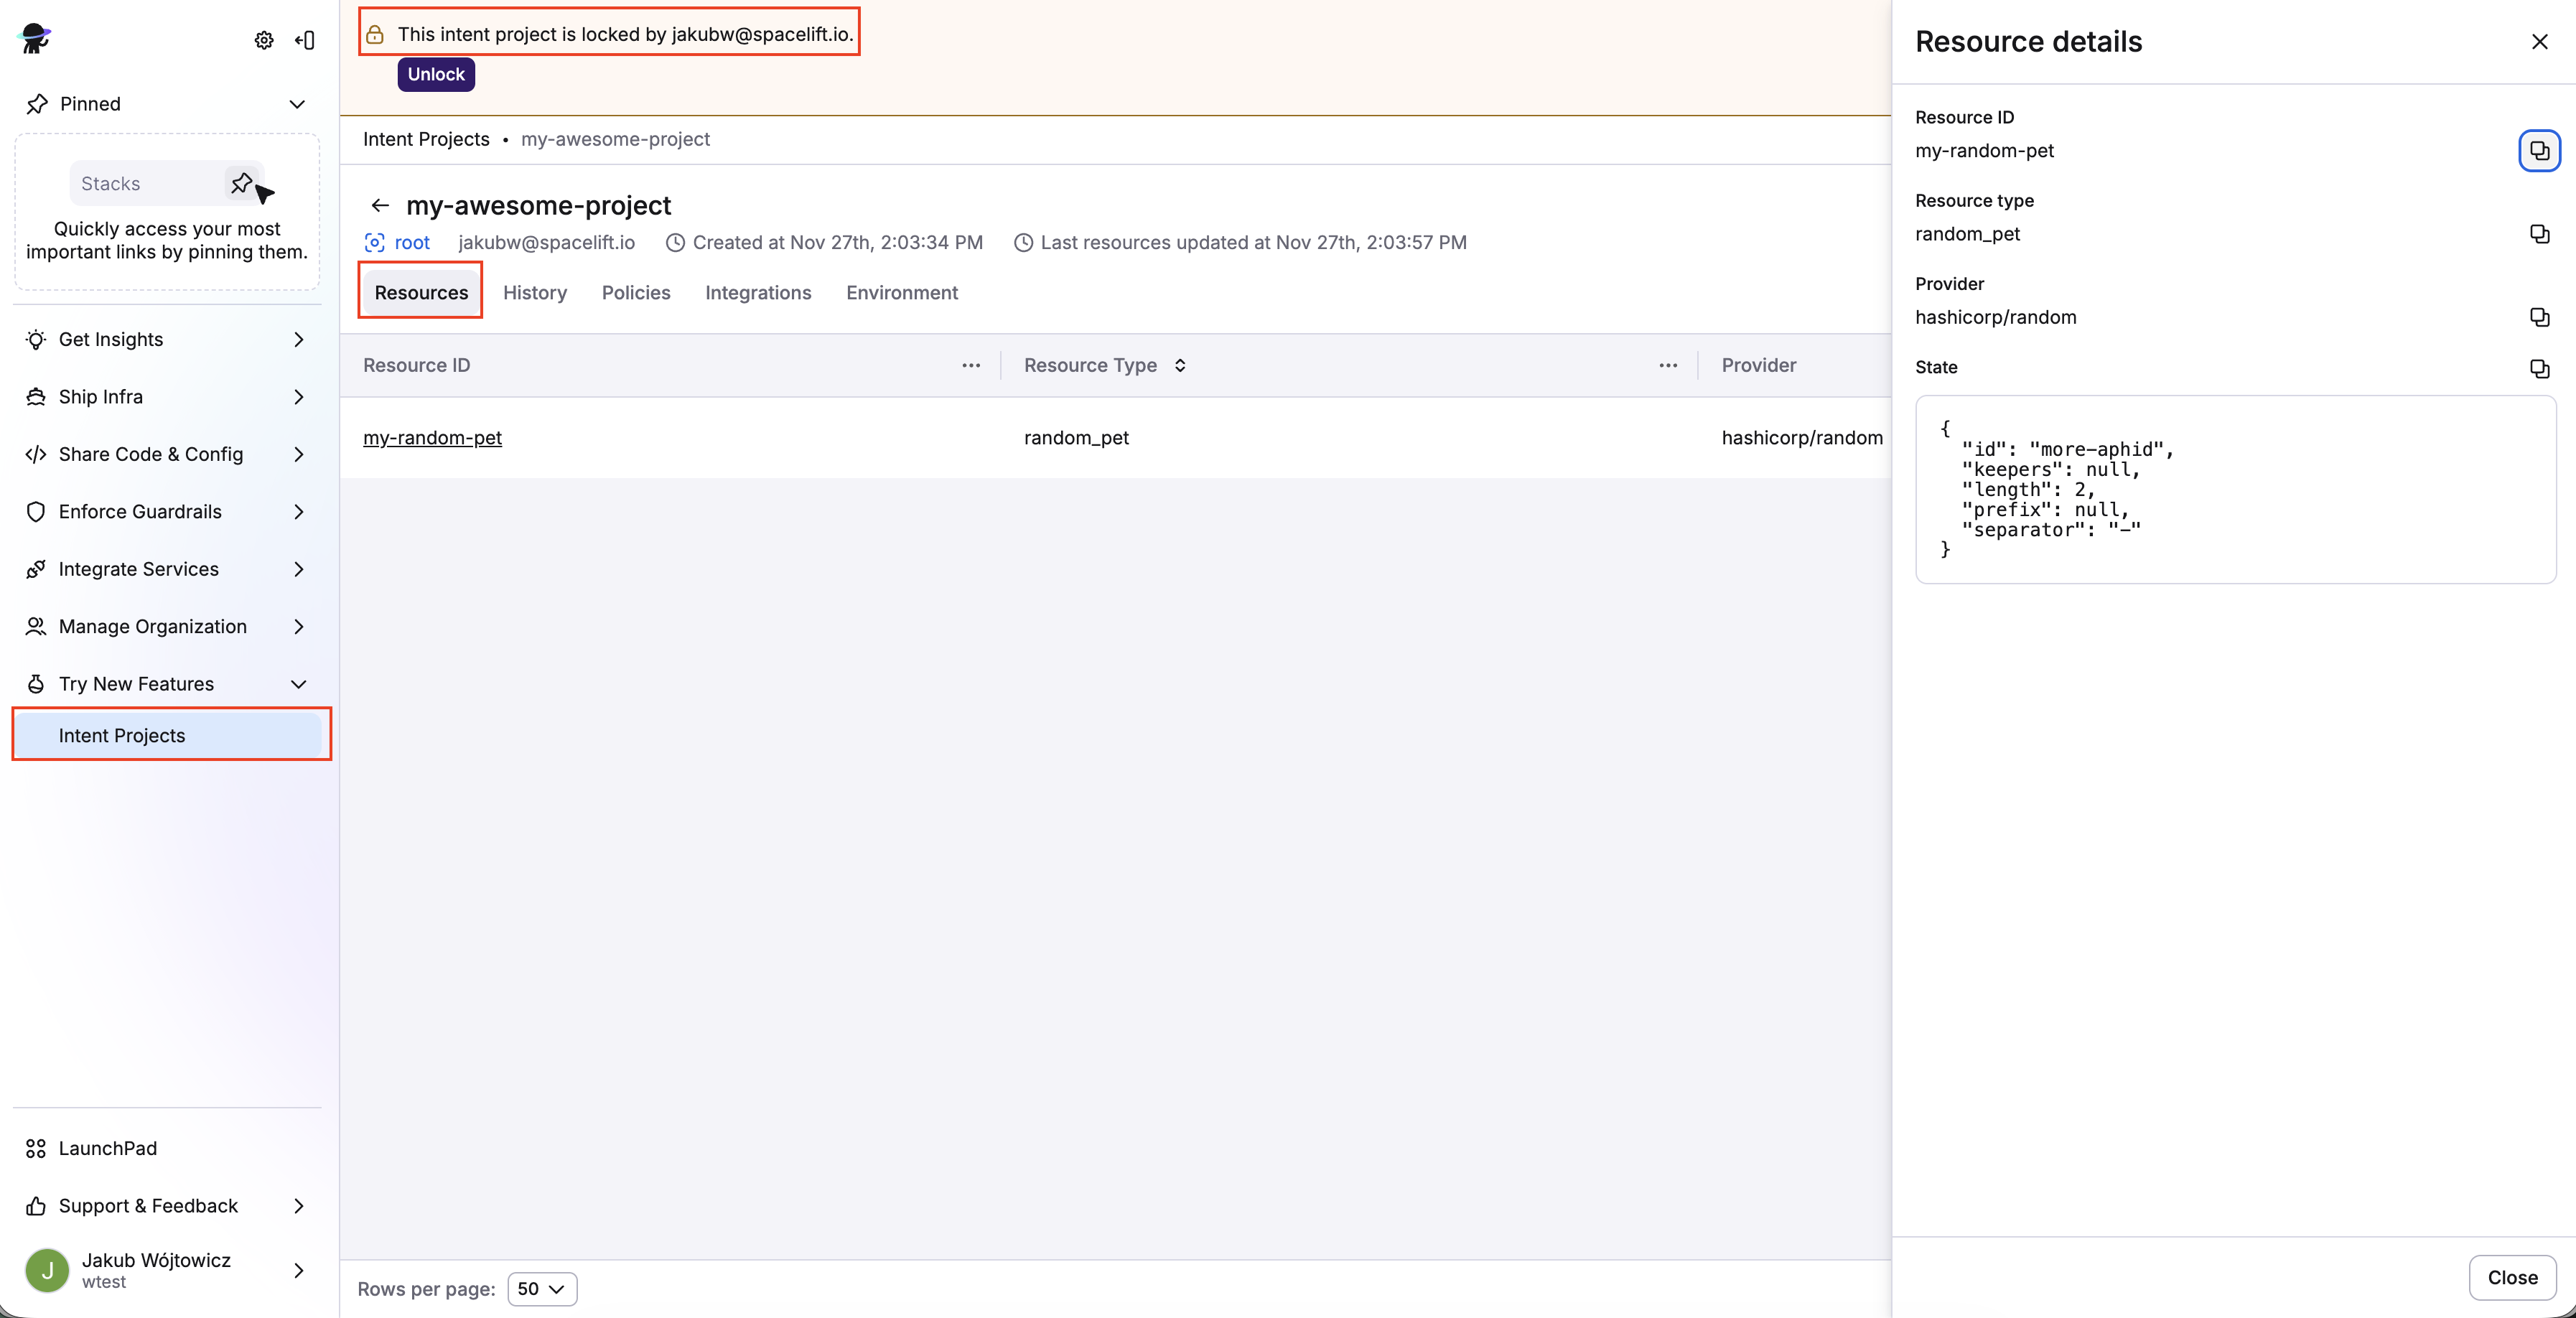
Explore the Intent UI»
In the Spacelift UI, navigate to Try New Features > Intent Projects. When you click on a project (e.g. my-project), you'll see:
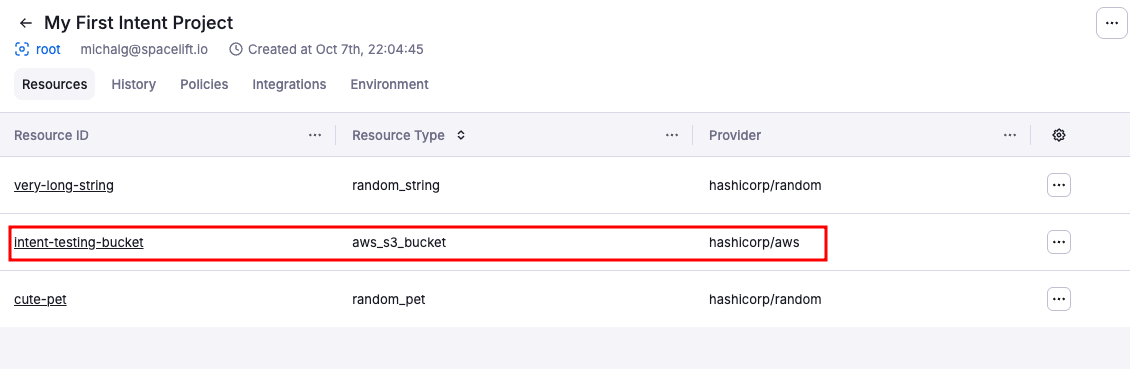
- Resources: Current resources in project.
- History: Timeline of operations (create, update, delete, import).
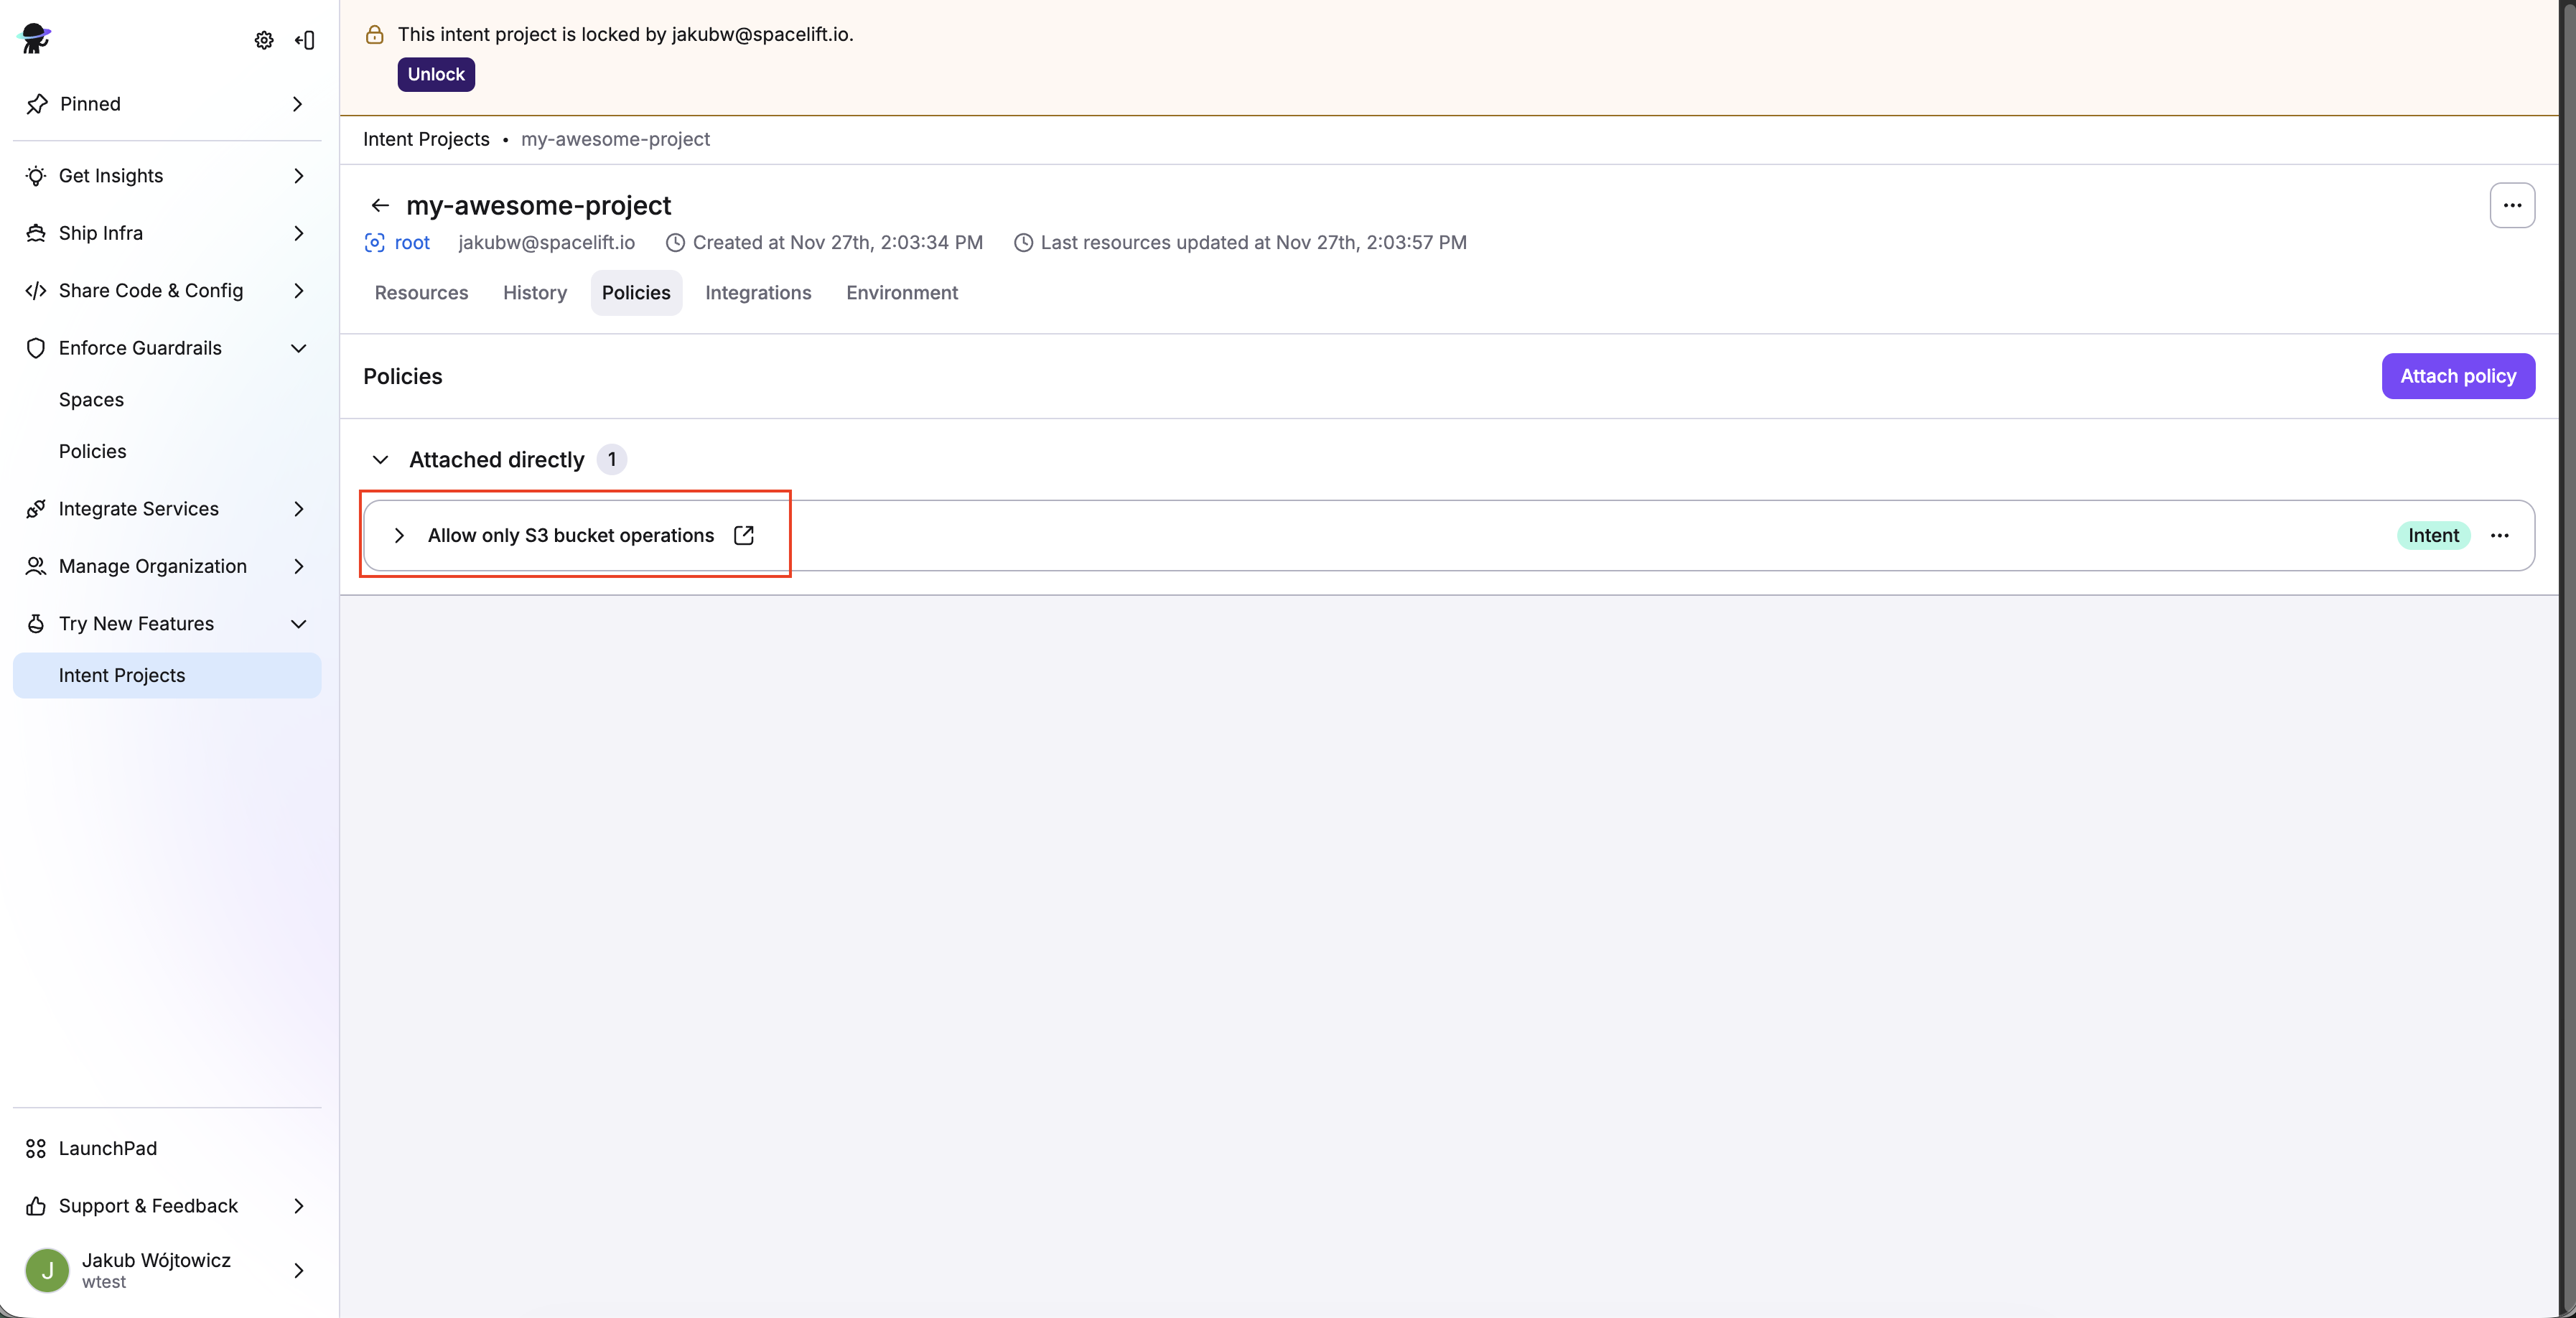
- Policies: Attach Intent policies to govern operations.
- Integrations: Attach cloud accounts (AWS supported today).
- Environments: Environment variables for the project.
You will also see if the project is locked and who locked it.
Create and attach an Intent policy»
Policies are your guardrails.
Create policy»
Create a policy, selecting Intent policy as the policy type, and attach it to your project.
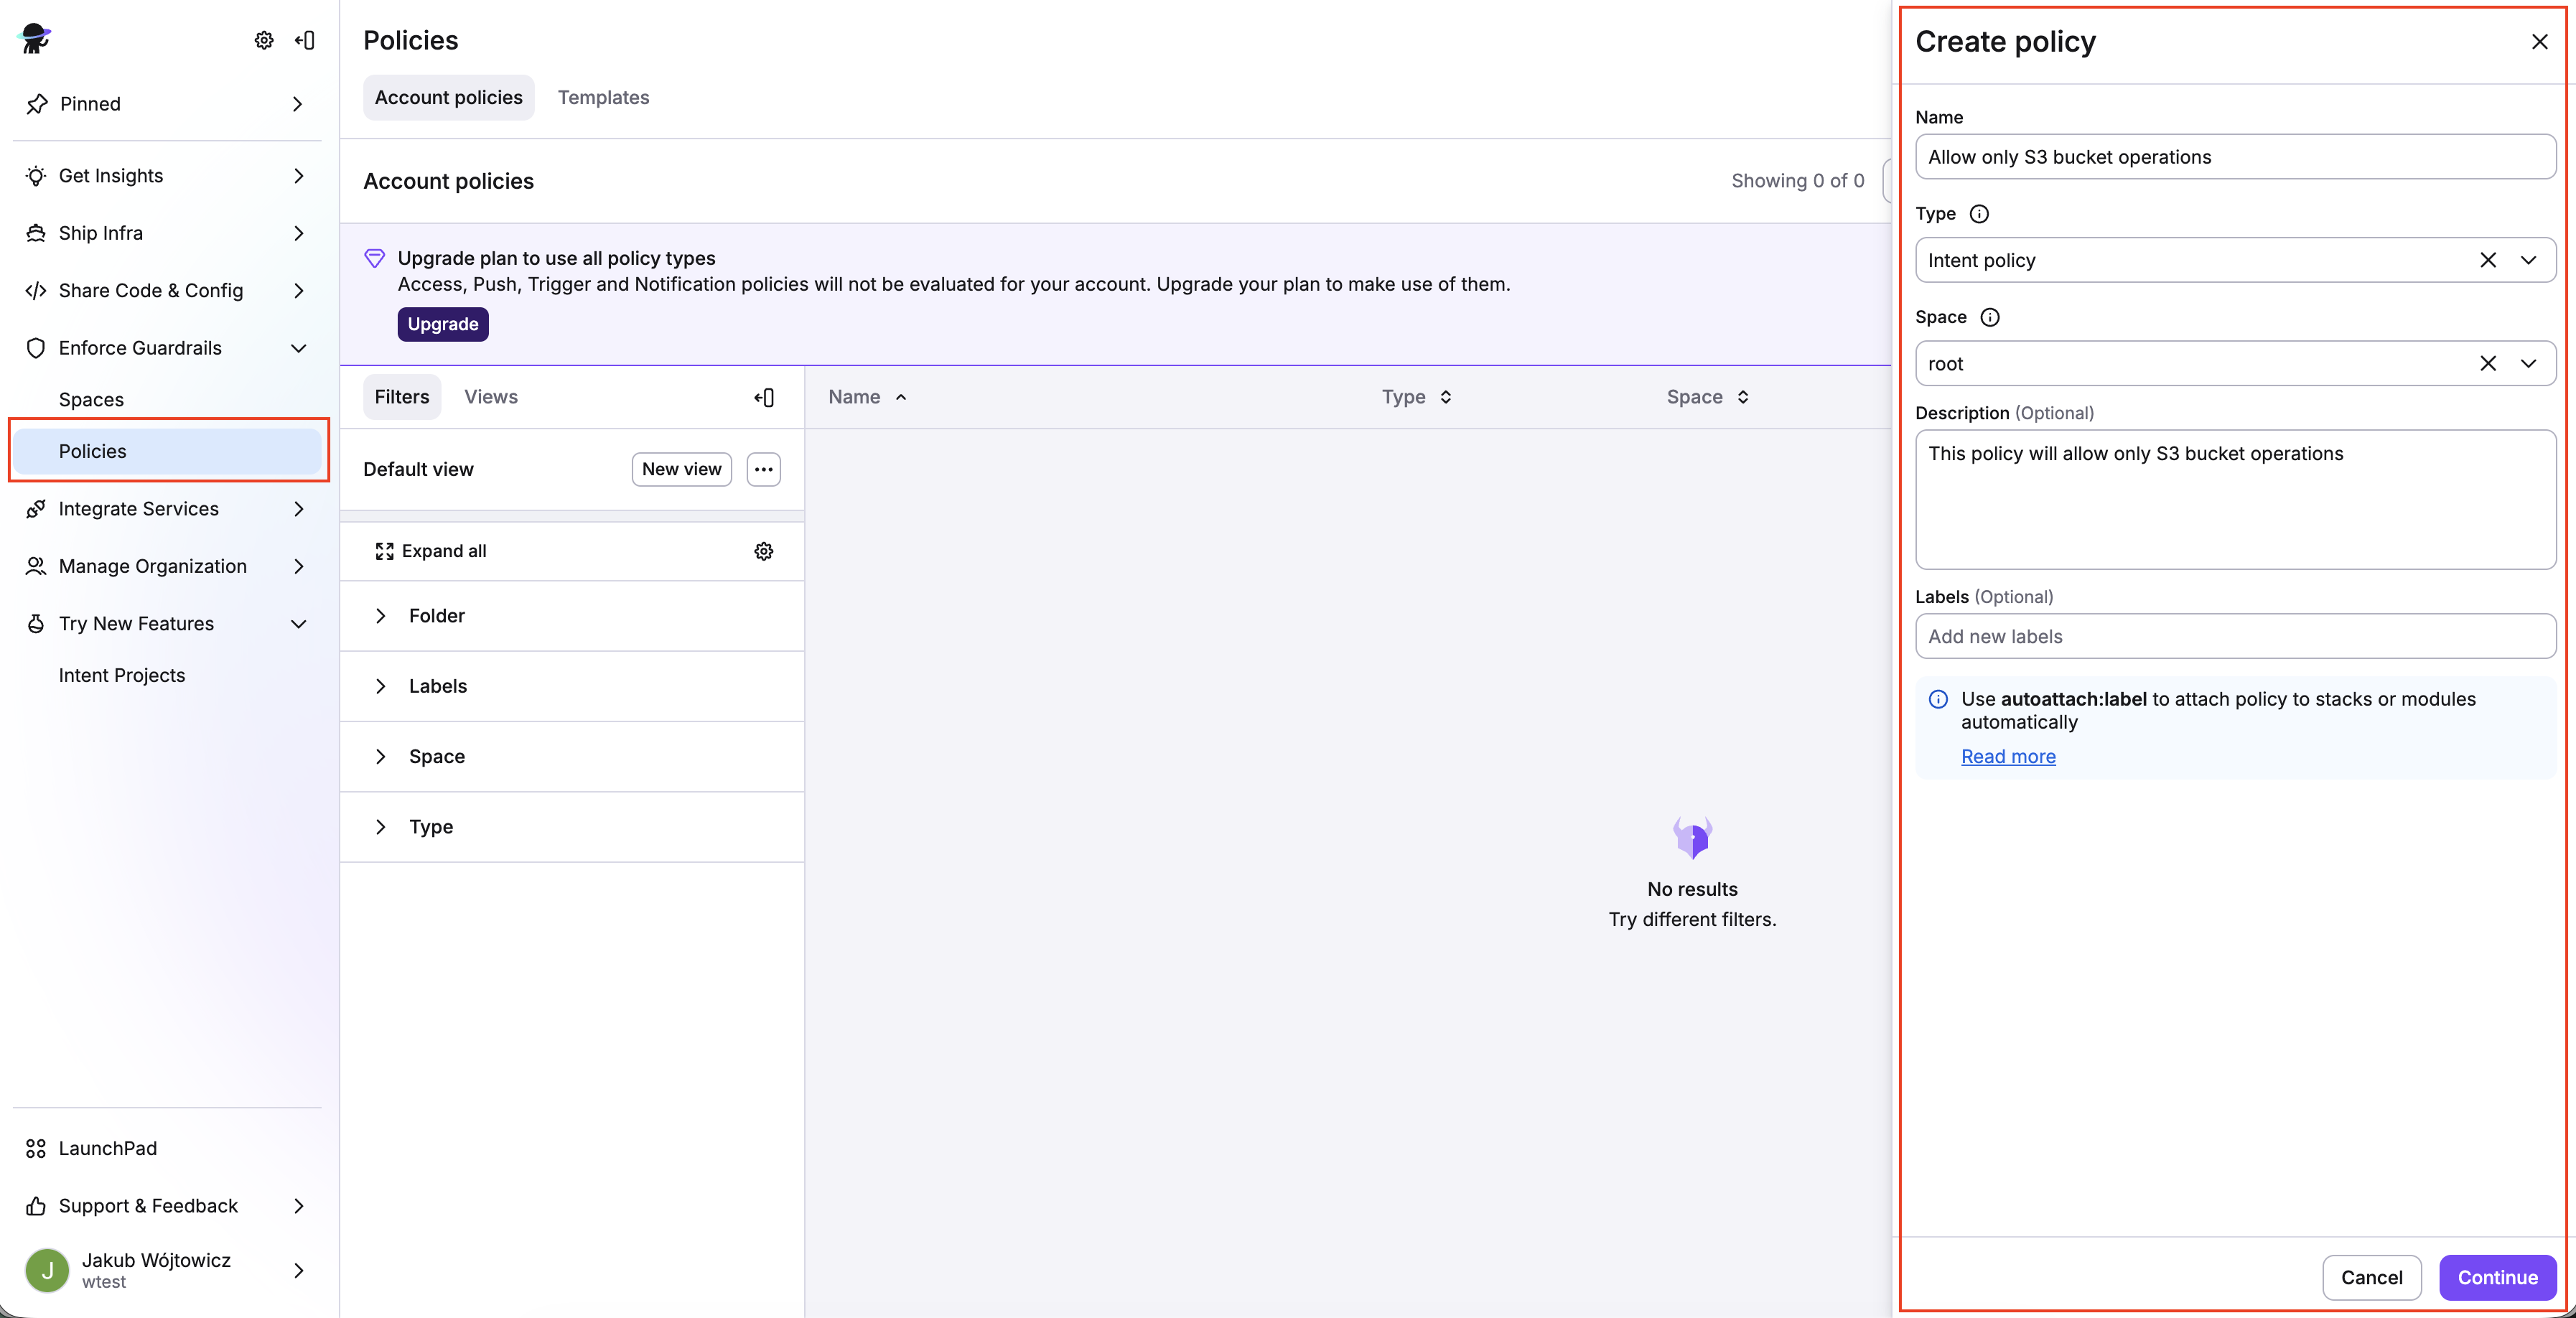
For example, this policy denies any resource that isn't an S3 bucket:
1 2 3 4 5 6 7 8 9 10 11 12 13 14 15 16 17 18 19 20 21 | |
1 2 3 4 5 6 7 8 9 10 11 12 13 14 15 16 17 18 19 20 21 22 23 | |

Attach policy»
Once the Intent policy is created, attach it to your project.
- In the Spacelift UI, navigate to Try New Features > Intent Projects and click on your project (e.g.
my-project). - Click the Policies tab, then click Attach policy.
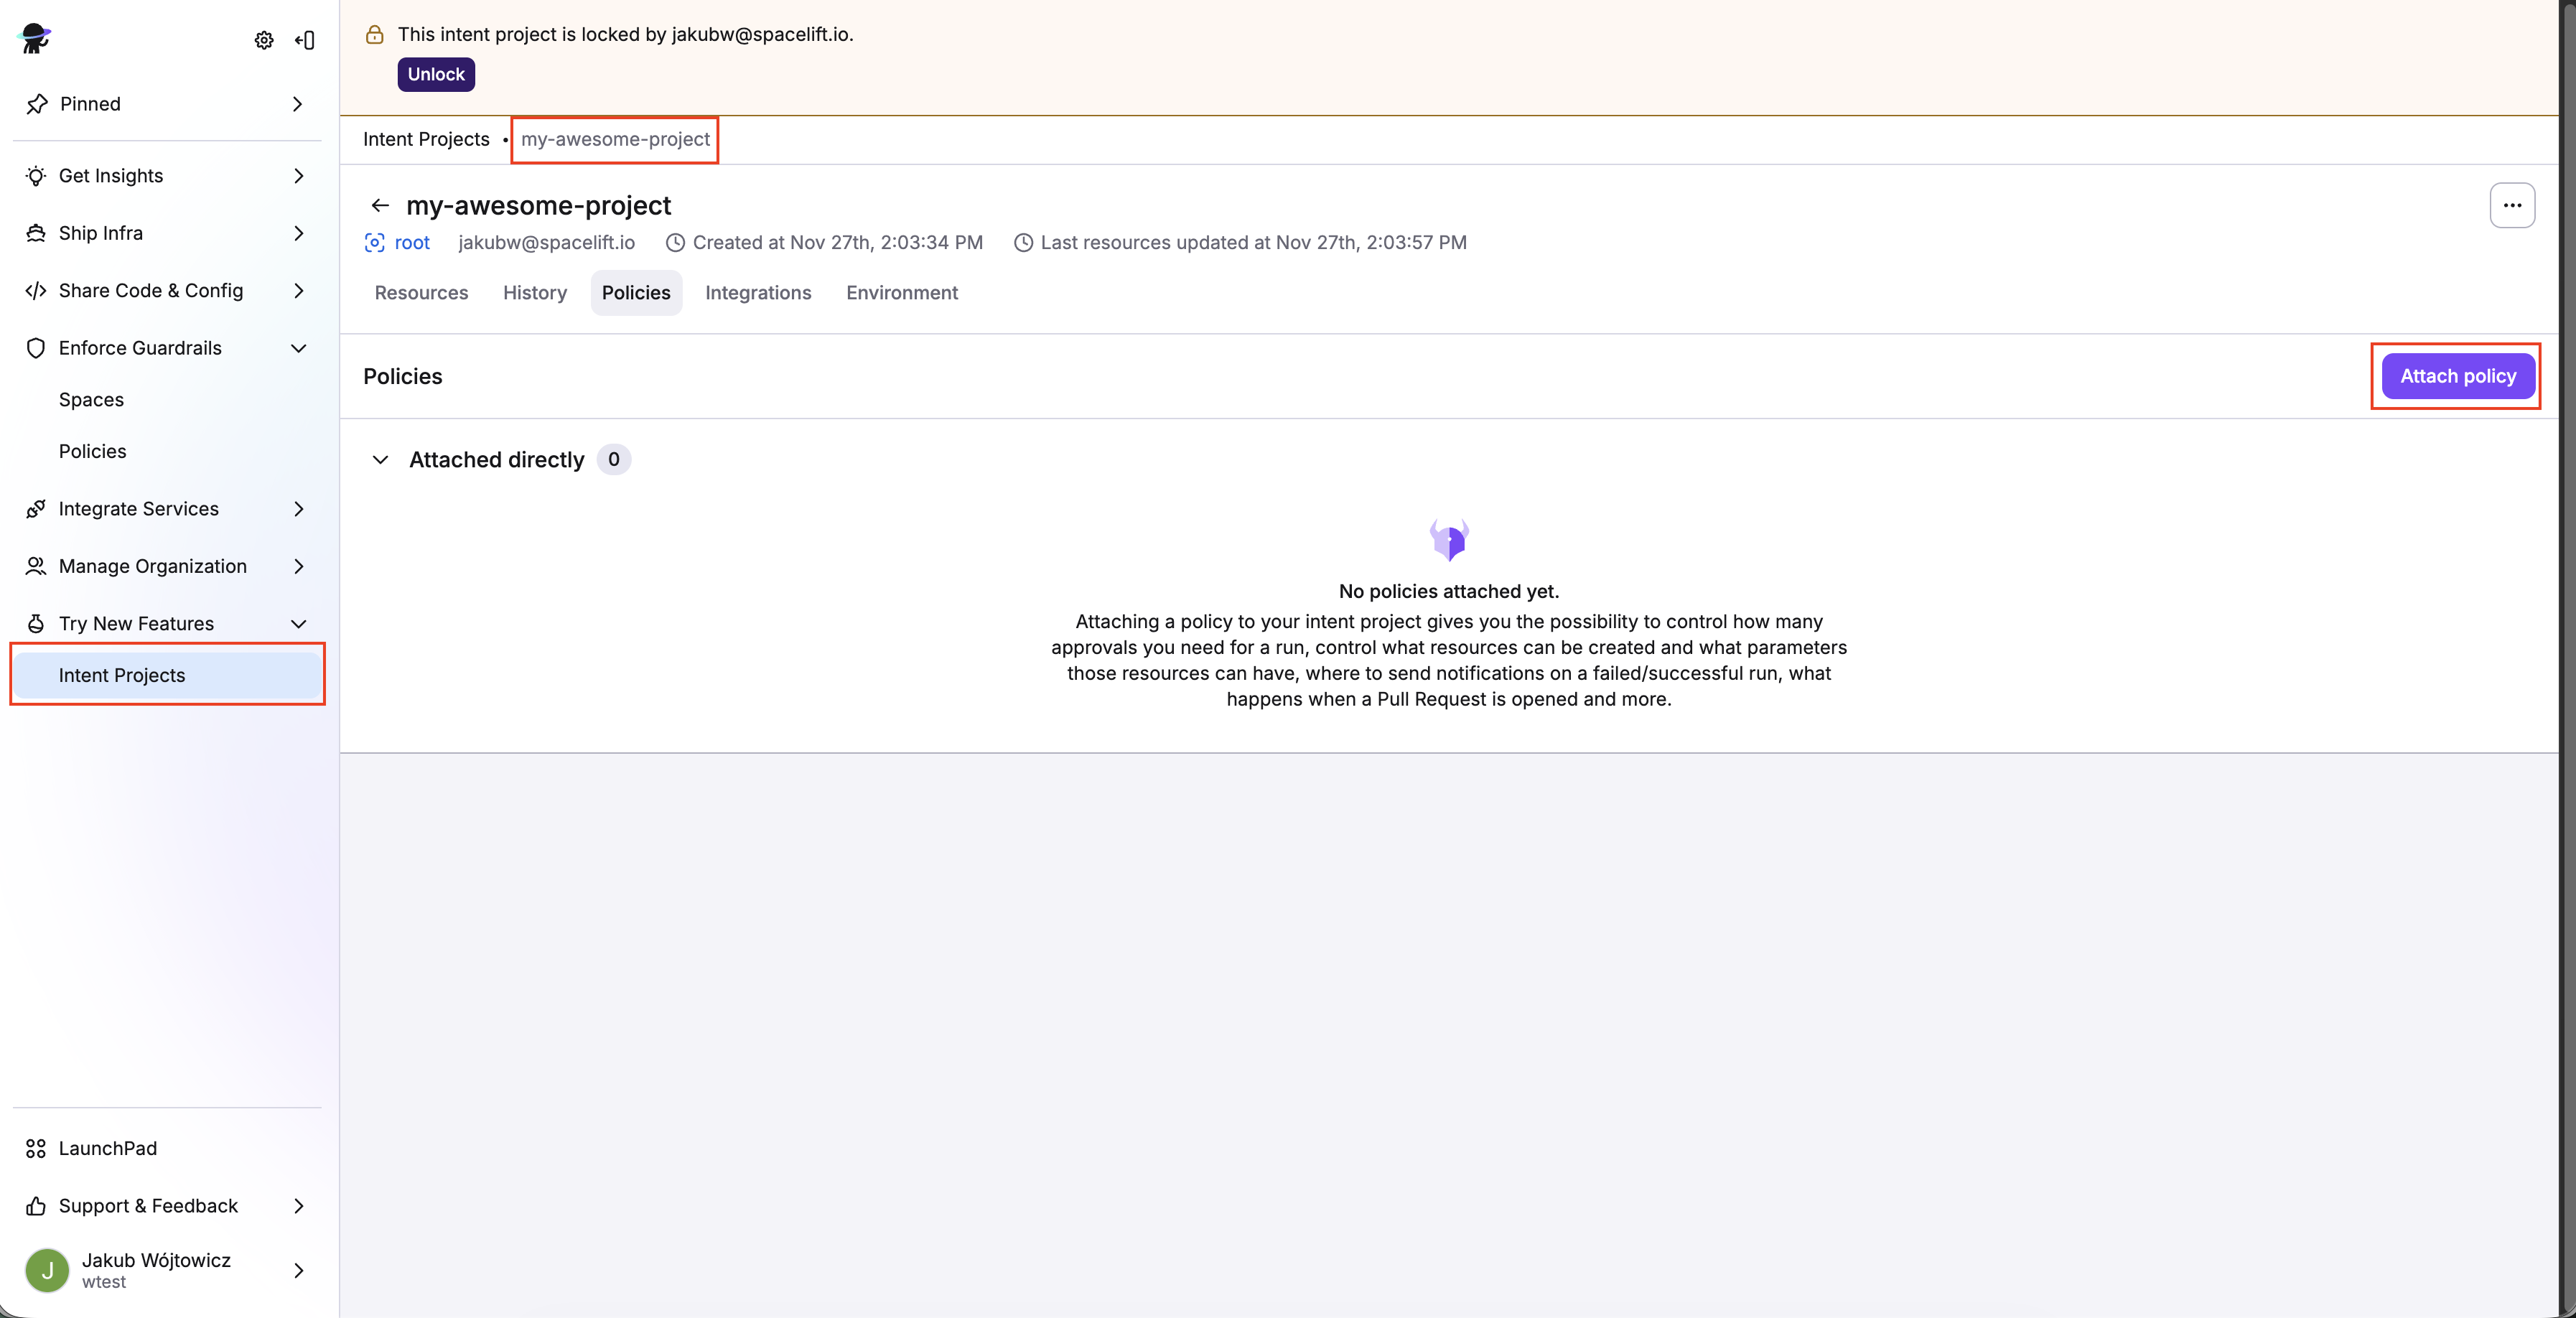
- Select the Intent policy you just created, then click Attach.
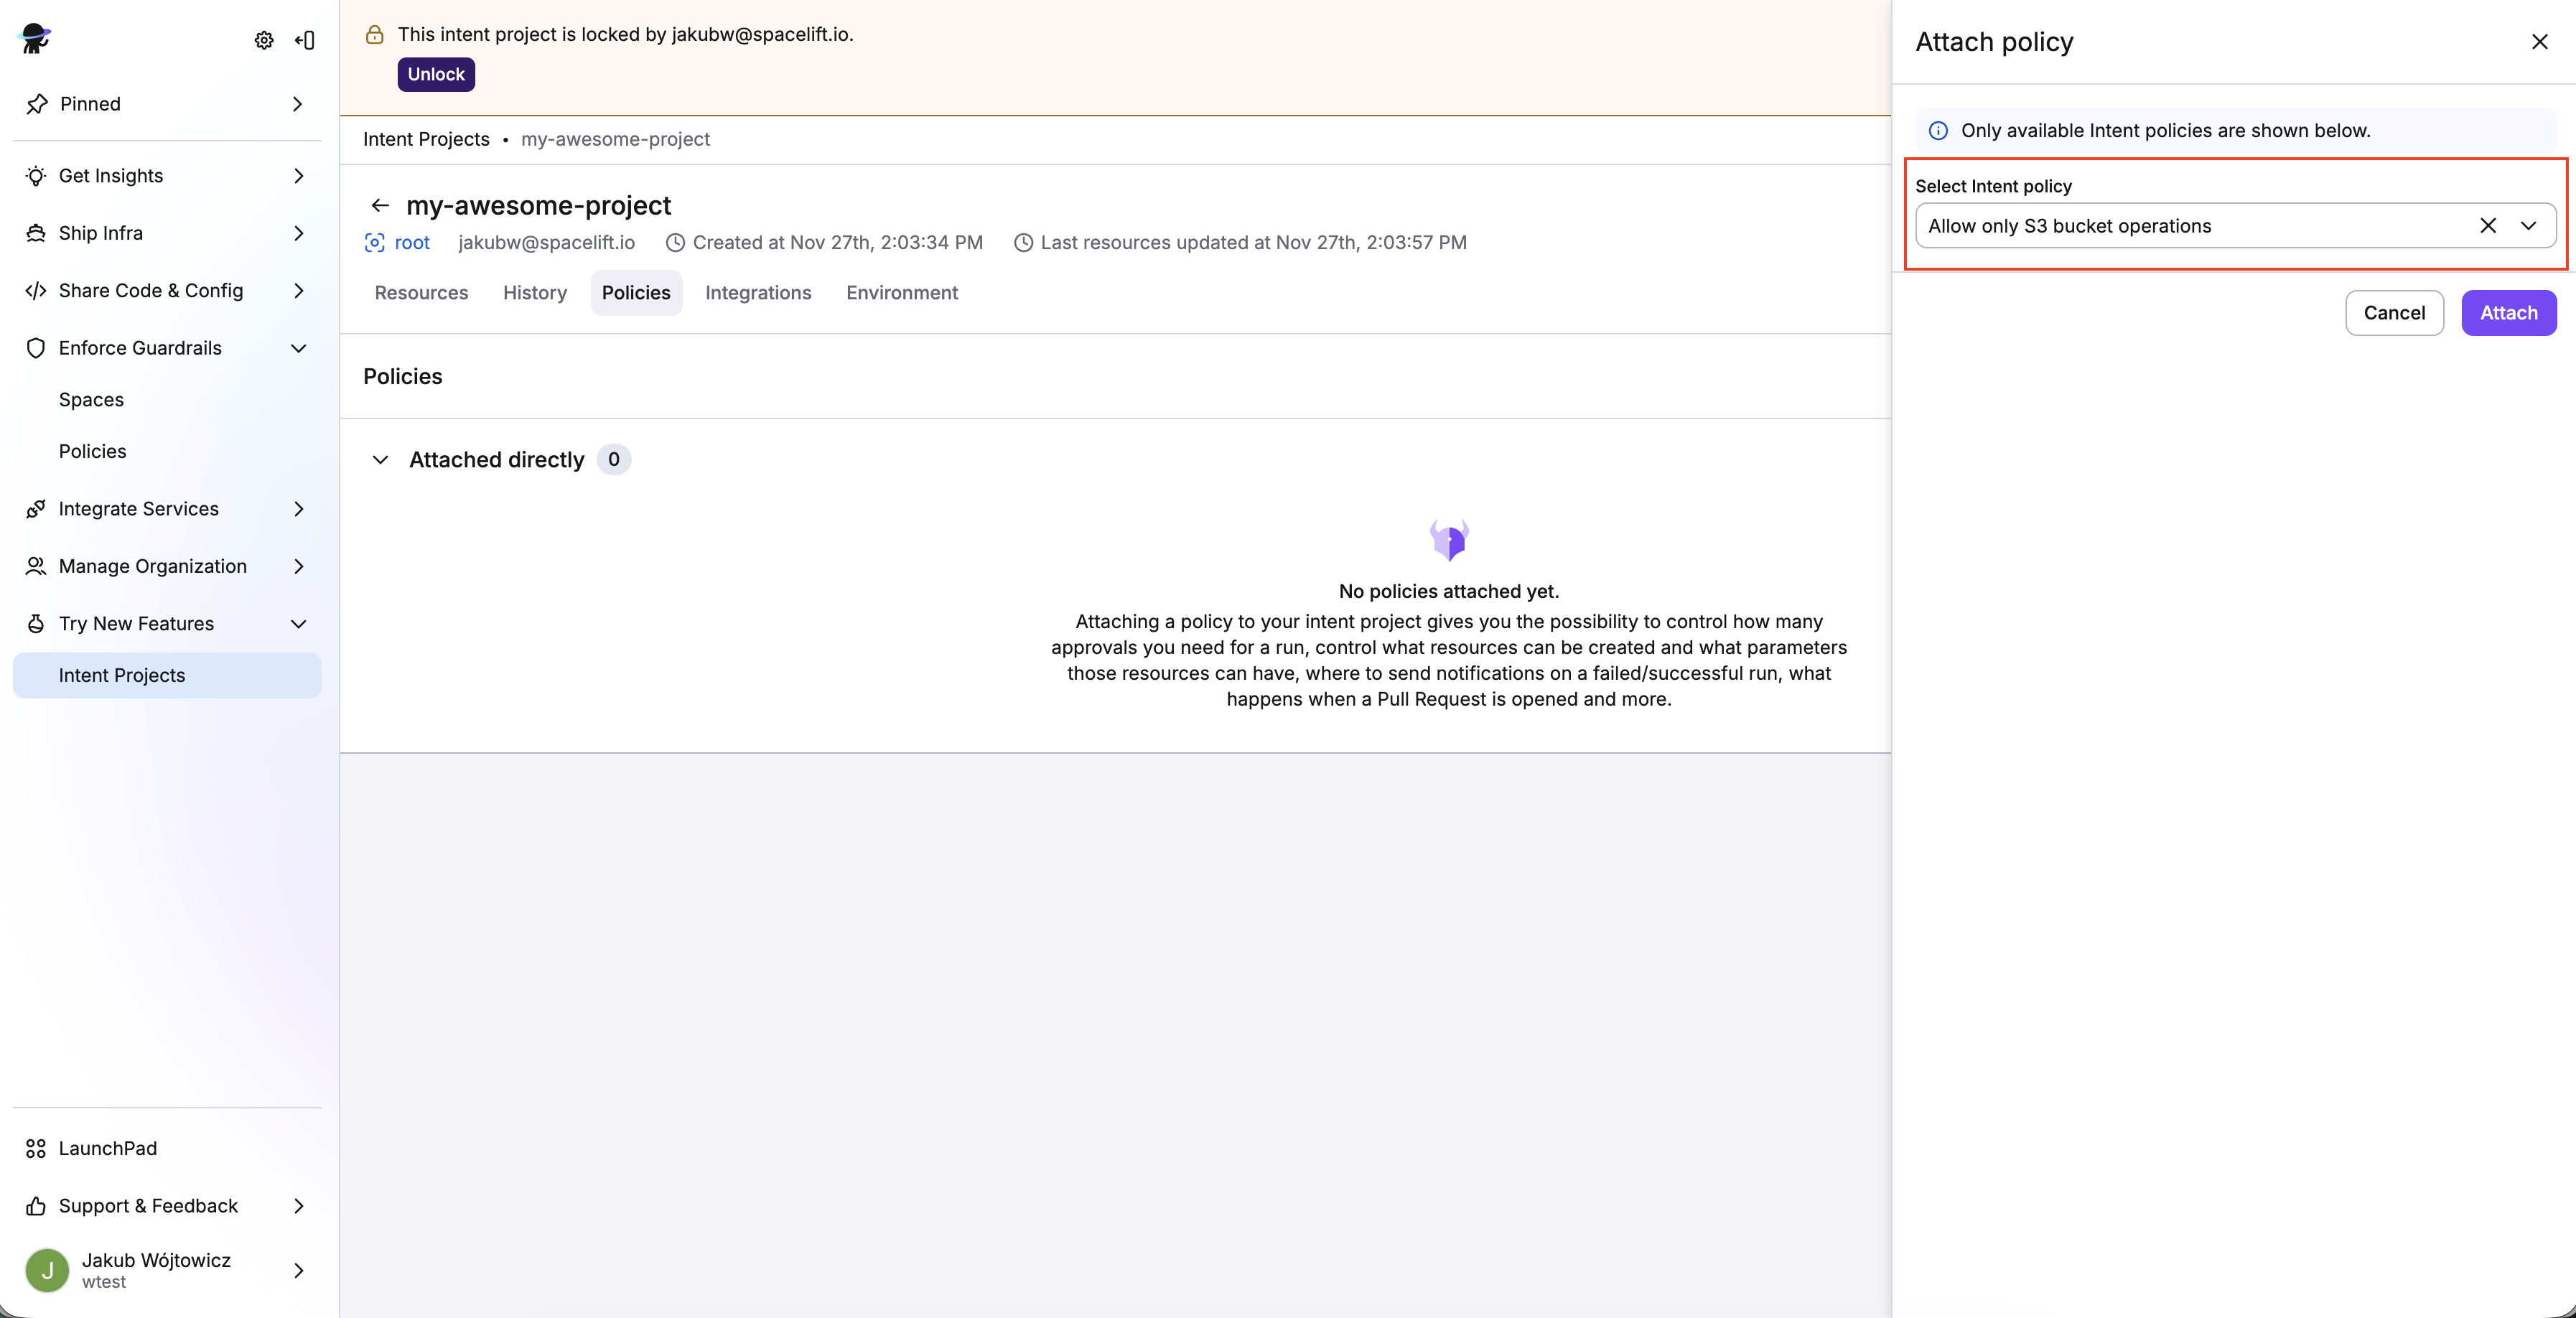
You can view attached policies in your project view on the Policies tab.
Attach an AWS integration»
Set up your AWS integration, then attach it to your Intent project.
- Click the Integrations tab in your Intent project view.
- Click Attach AWS integration.
- Select an AWS region to use.
- Enable both Read and Write permissions using the sliders, then click Attach.
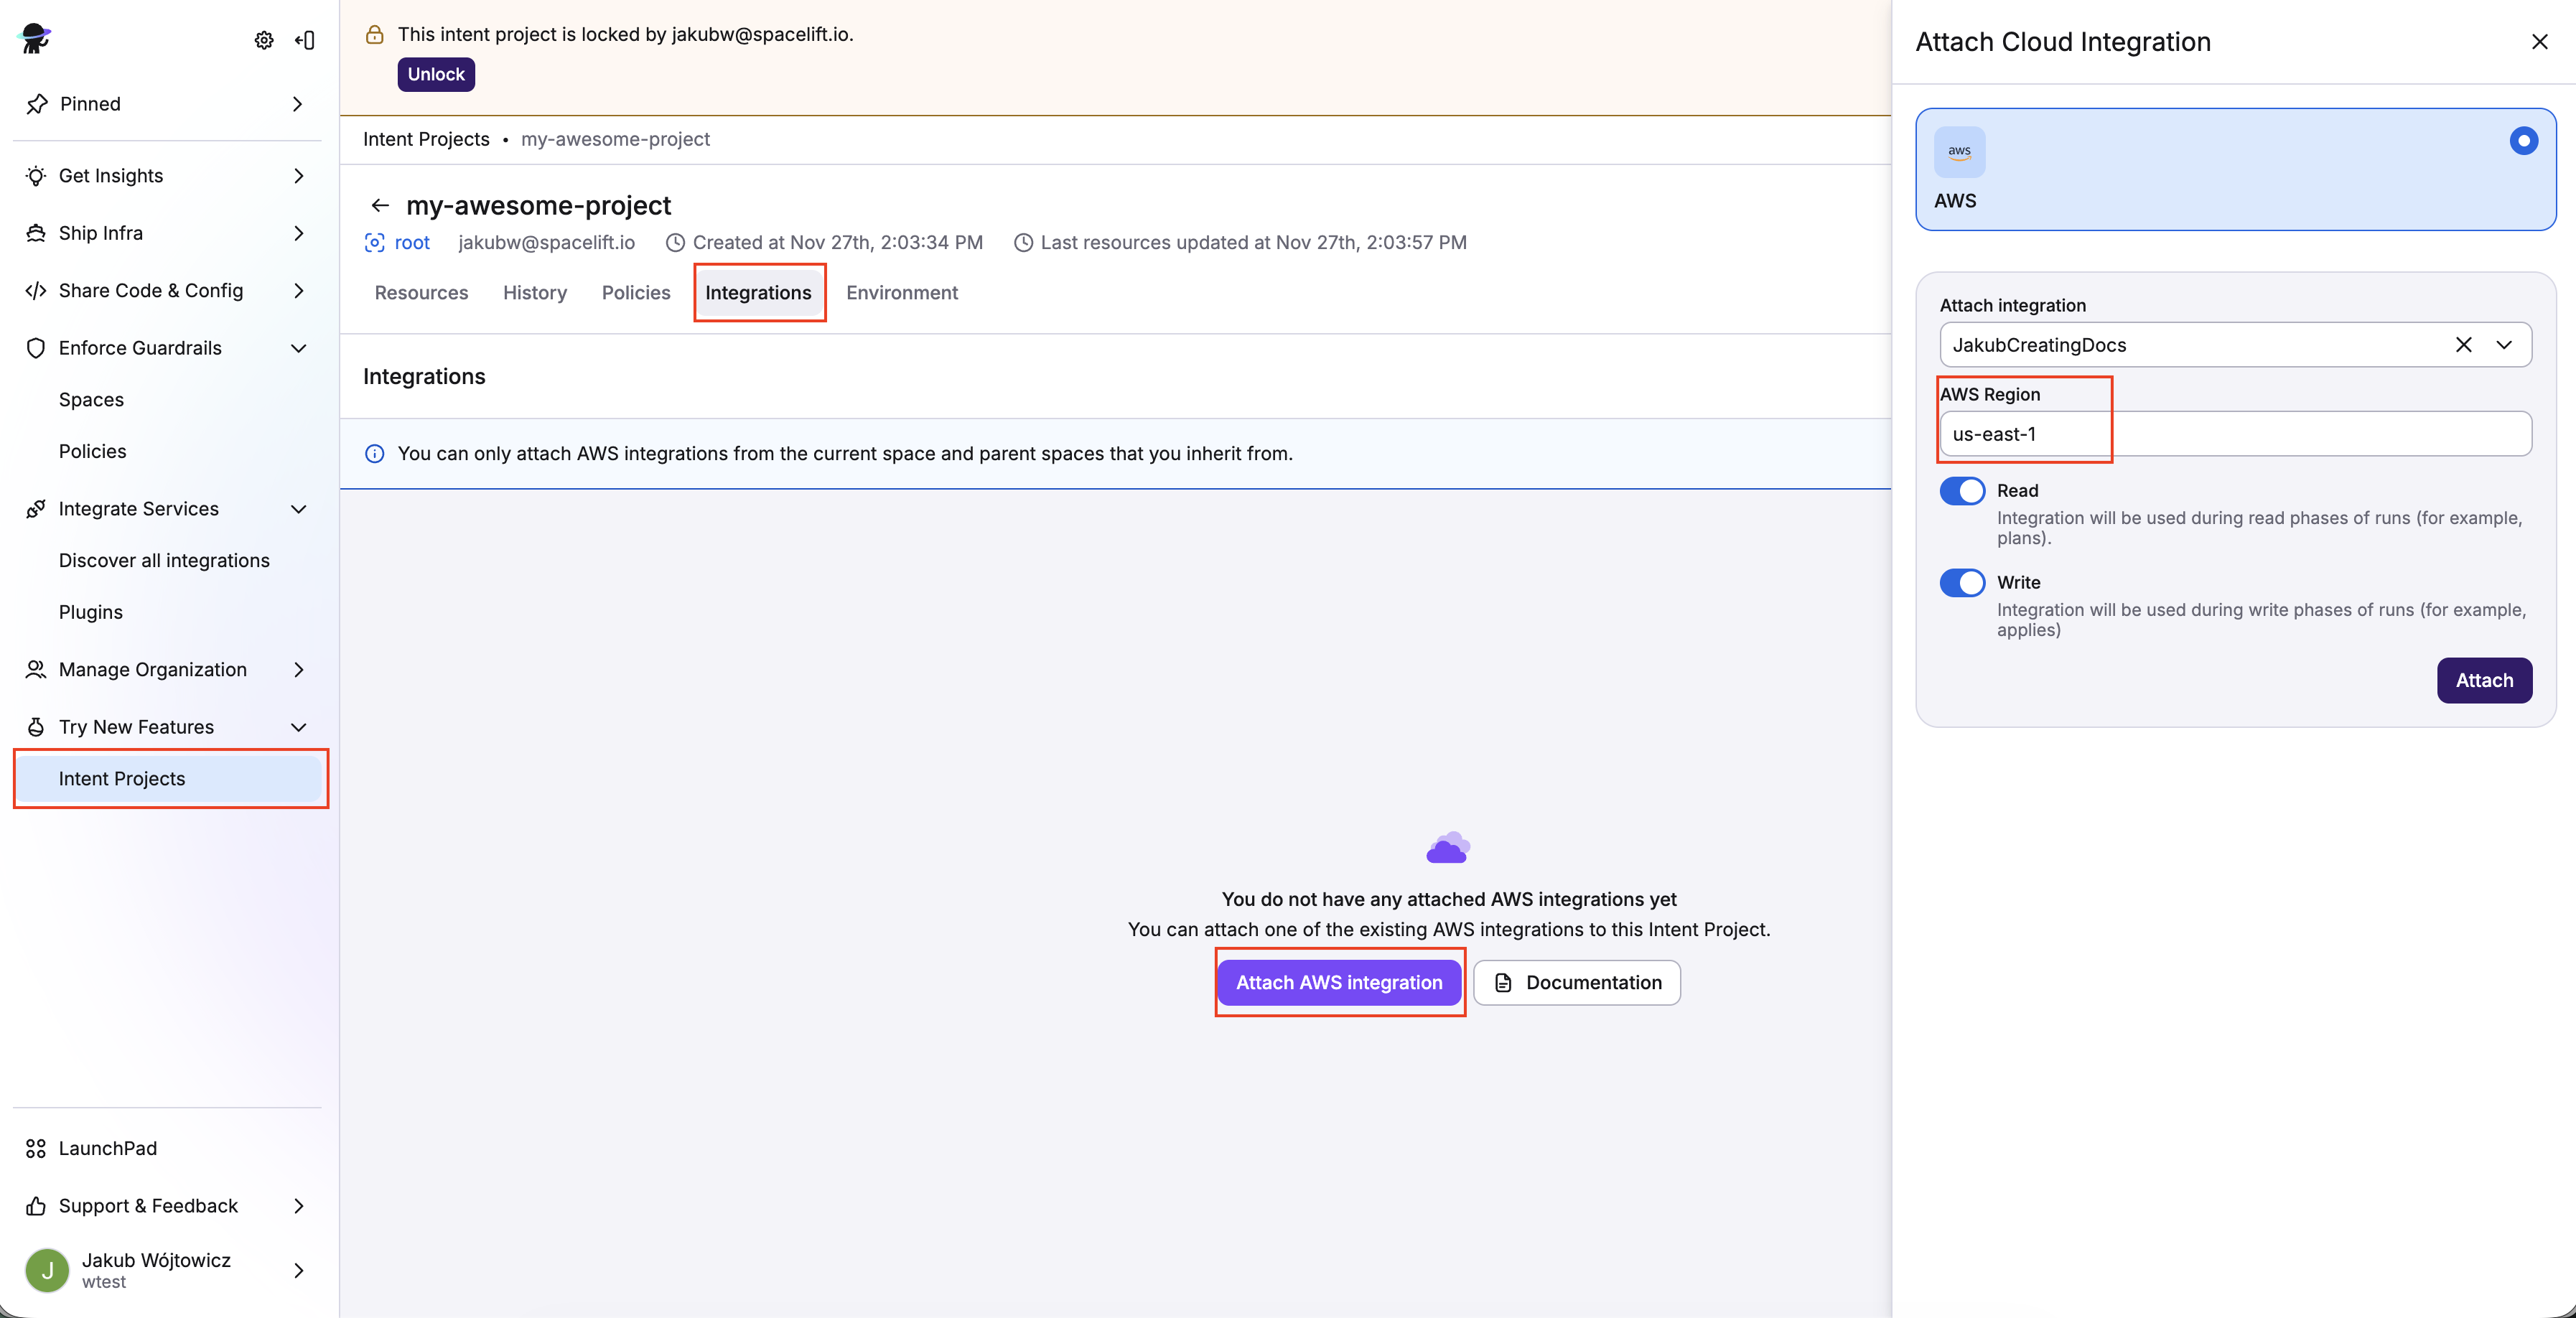
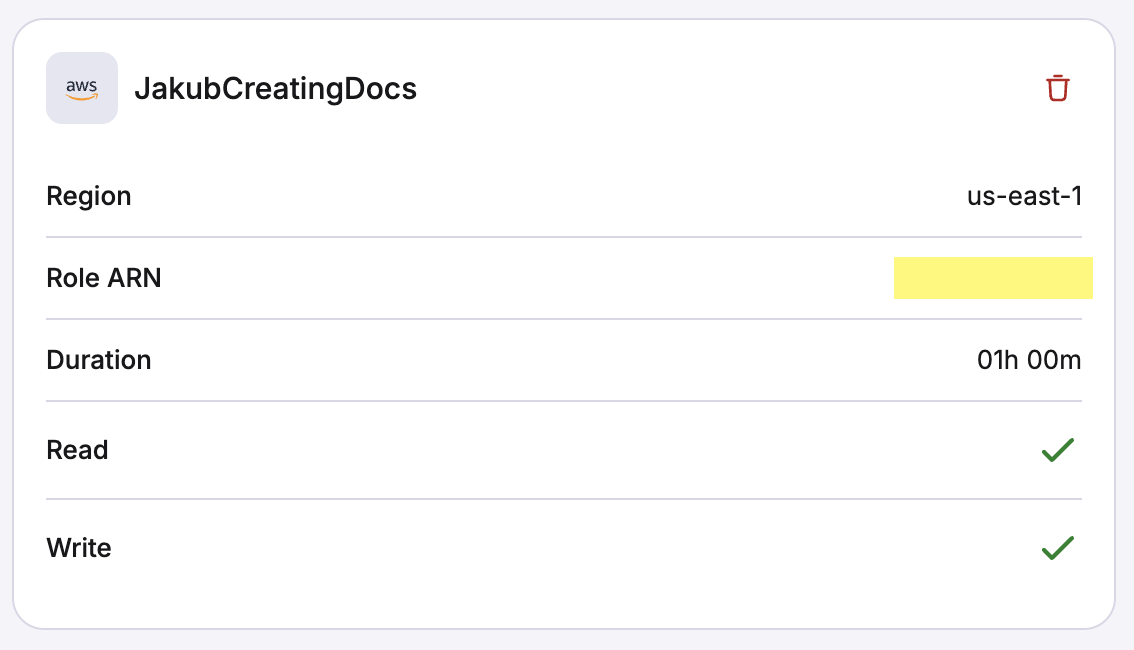
You can view the attached integration details in your project view on the Integrations tab.
Tip
To use Azure or GCP instead of AWS, see Setting up Azure and GCP credentials.
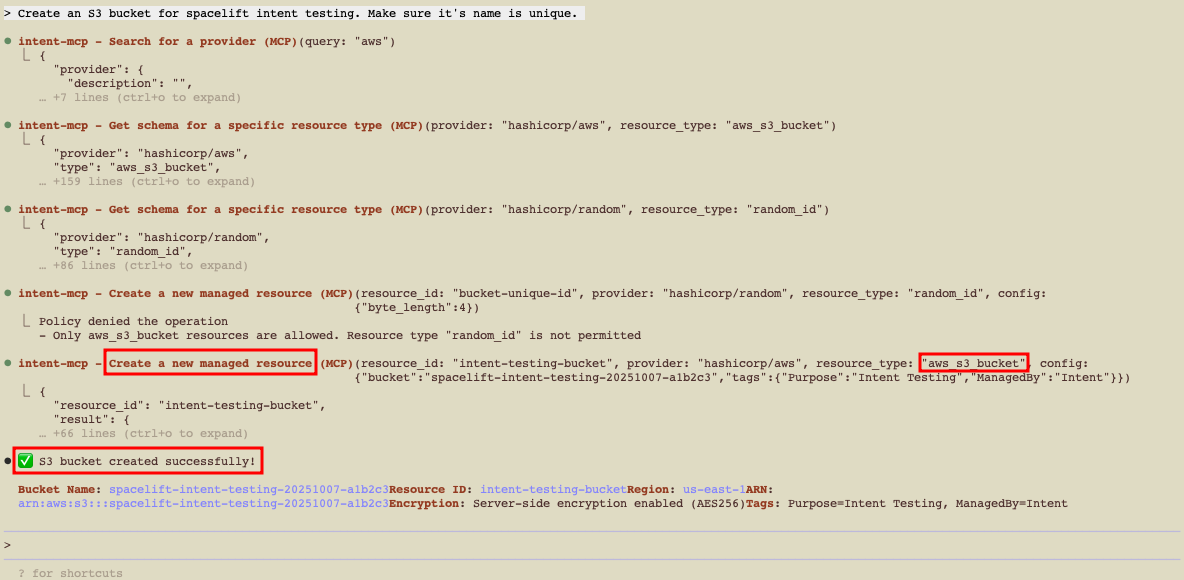
Provision AWS resources (S3, EC2)»
With the policy above:
- Creating an S3 bucket should succeed.
- Creating an EC2 instance should fail with a policy denial.
Create an S3 bucket (via chat)»
1 | |
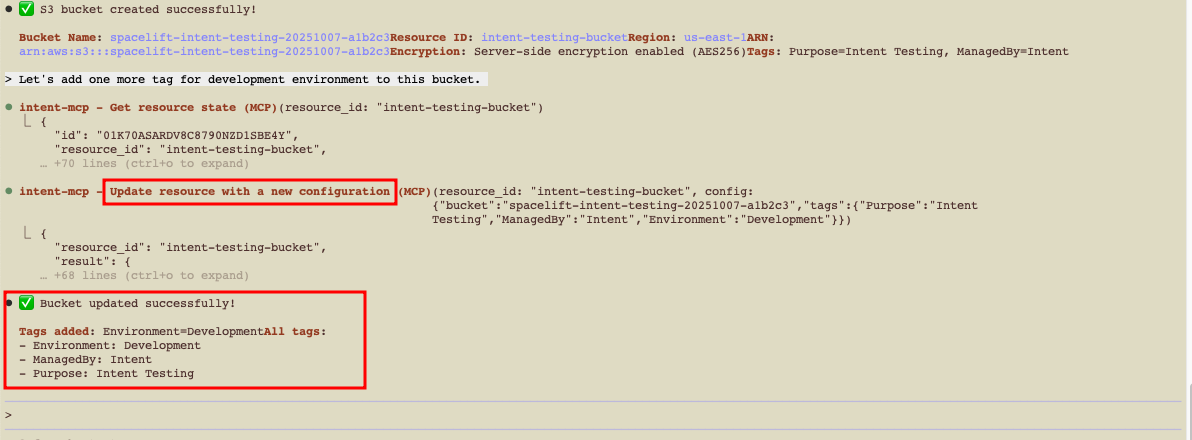
Update the S3 bucket»
You can continue the conversation to modify existing resources:
1 | |
Intent updates the resource configuration and applies the changes. You'll see the updated values in both your AWS account and the Spacelift UI. In Spacelift, the Resources tab shows the current configuration, and the History tab records the update operation.
Verify in Spacelift UI & AWS»
Confirm the resource lifecycle in both systems.
-
In the Spacelift UI, navigate to your Intent project.
-
Resources tab: Shows the S3 bucket with current configuration including the tags you just added.
-
History tab: Lists all operations (create, update) with timestamps, operation details, and who/what triggered them.

-
-
In the AWS Console, go to S3:
- Find your bucket (e.g.,
dev-attachments-123). - Verify it exists with the correct configuration.
- Check the Tags section to confirm
Environment=devandOwner=platform-teamare present.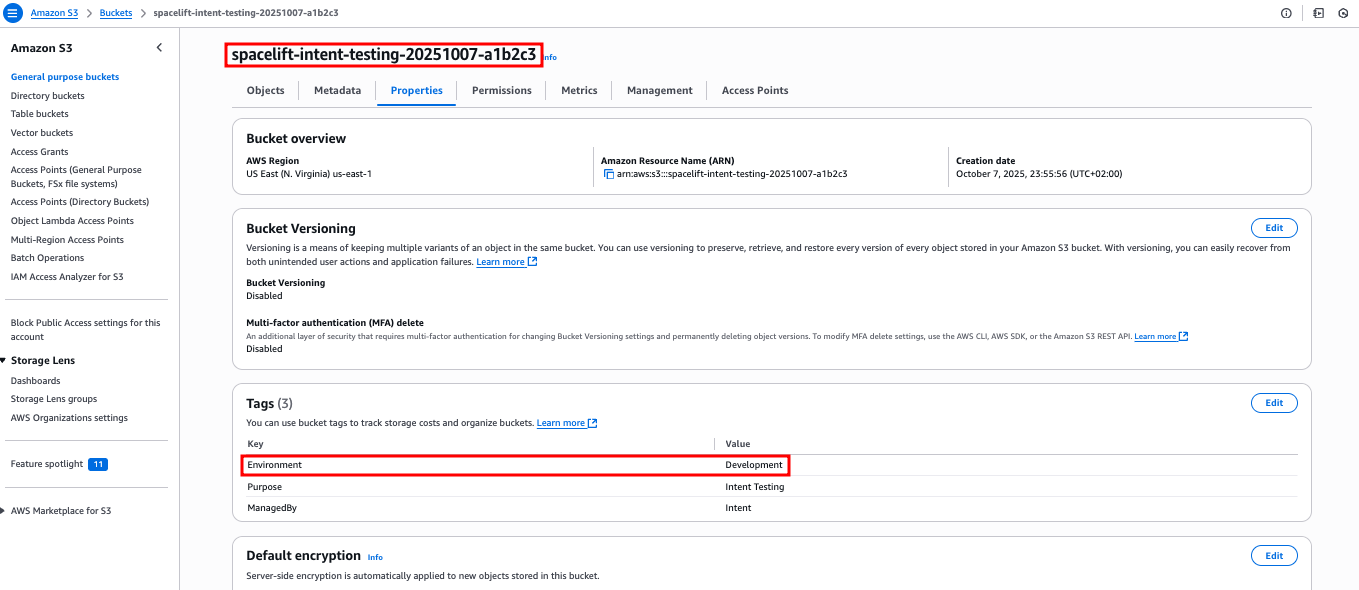
- Find your bucket (e.g.,
As we've seen, Intent creates resources directly in your cloud, while Spacelift provides access control, policy governance, state management, and full auditability.
Test policy denial»
Create an EC2 instance to see how Spacelift Intent's policy denial works.
1 | |
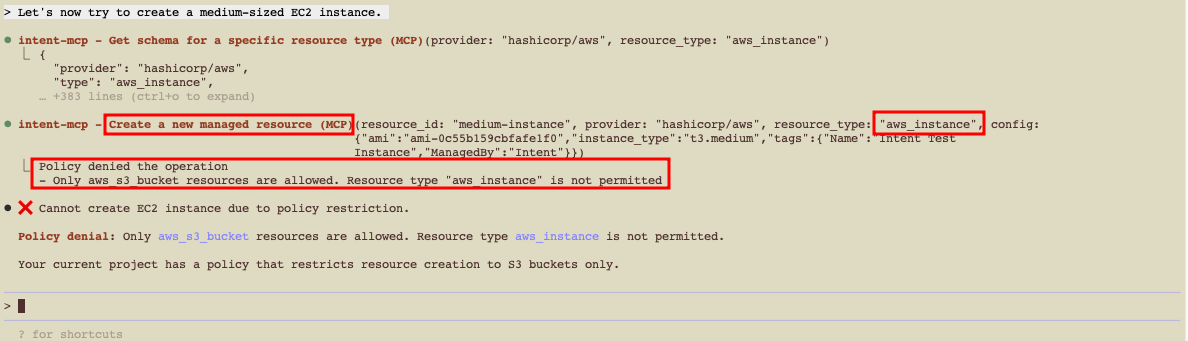
Iterate on the policy to allow additional resource types when you're ready (e.g., allow aws_instance for non-prod).
Import existing resources»
You can discover and import pre-existing resources into the Intent state, then manage them.
Example (SSM Parameters)»
1 | |
- Review the discovery result.
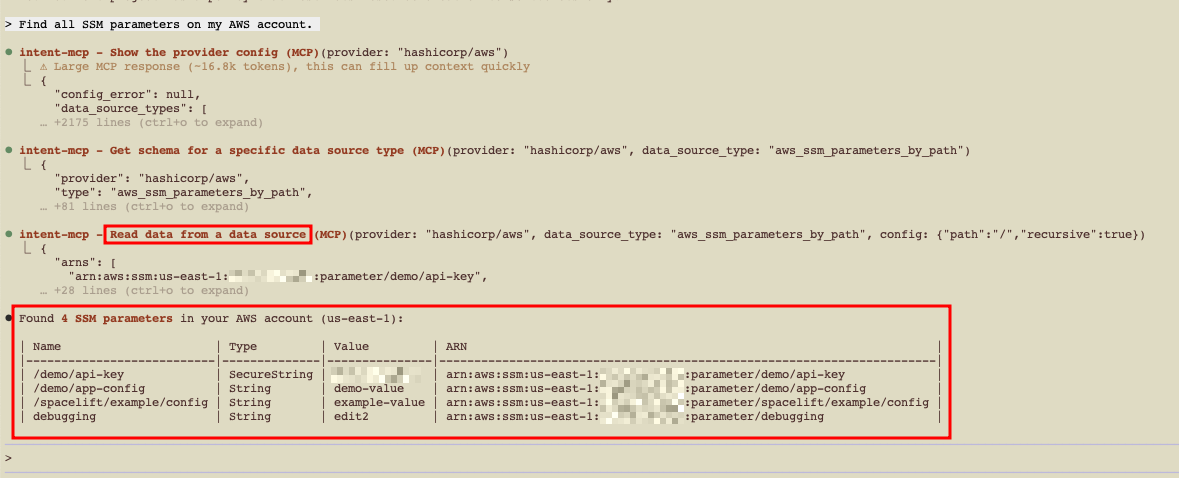
- Select items to import into Intent state.
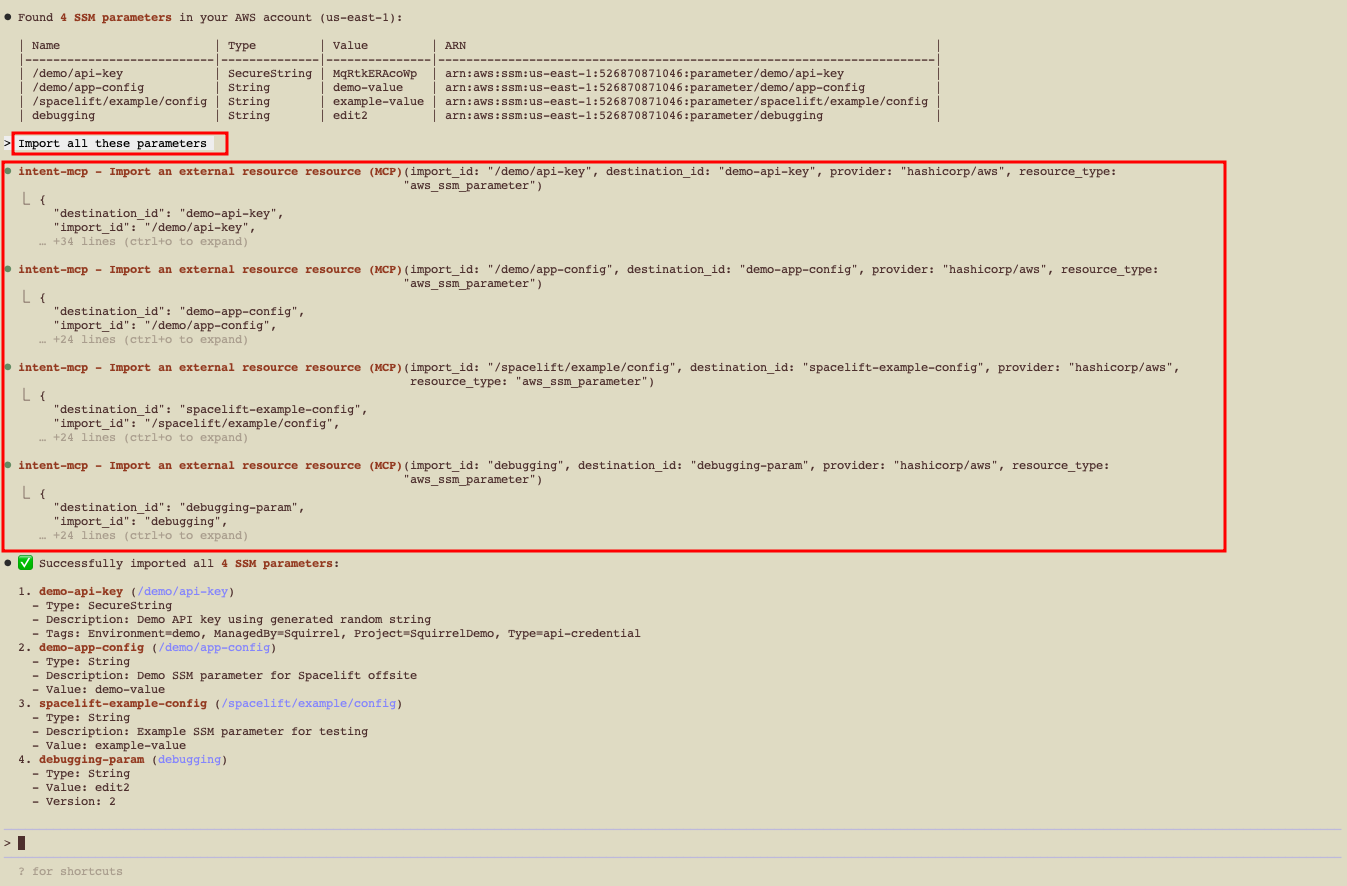
- Manage them via natural language and policy from now on.
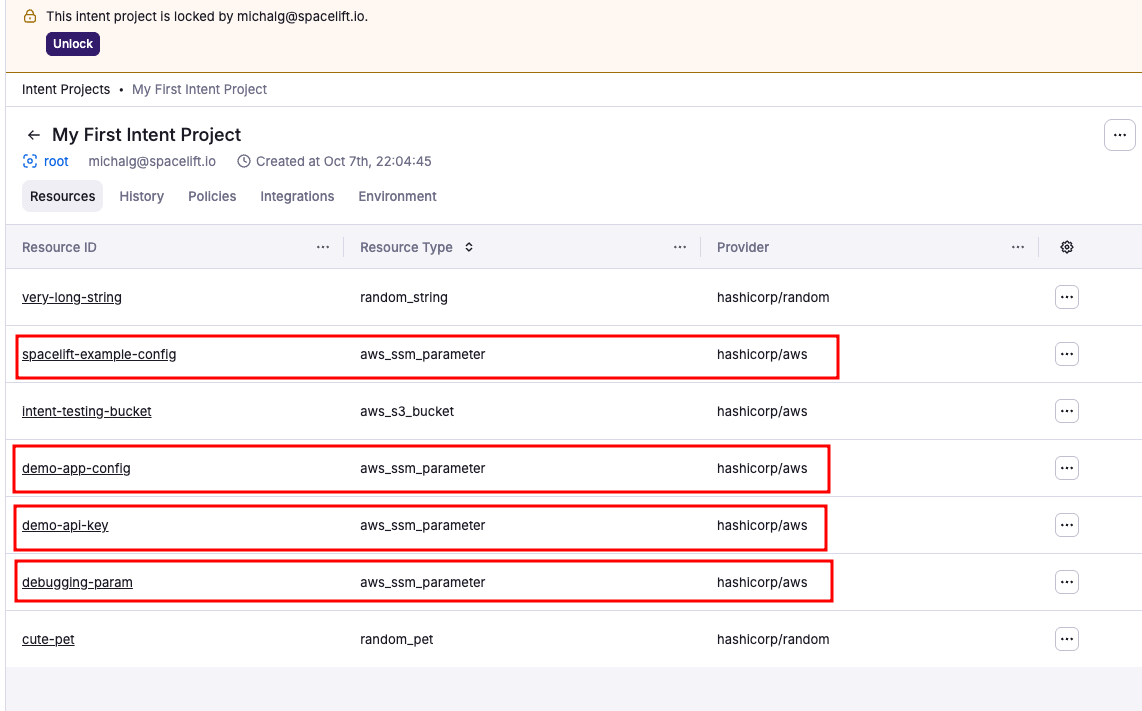
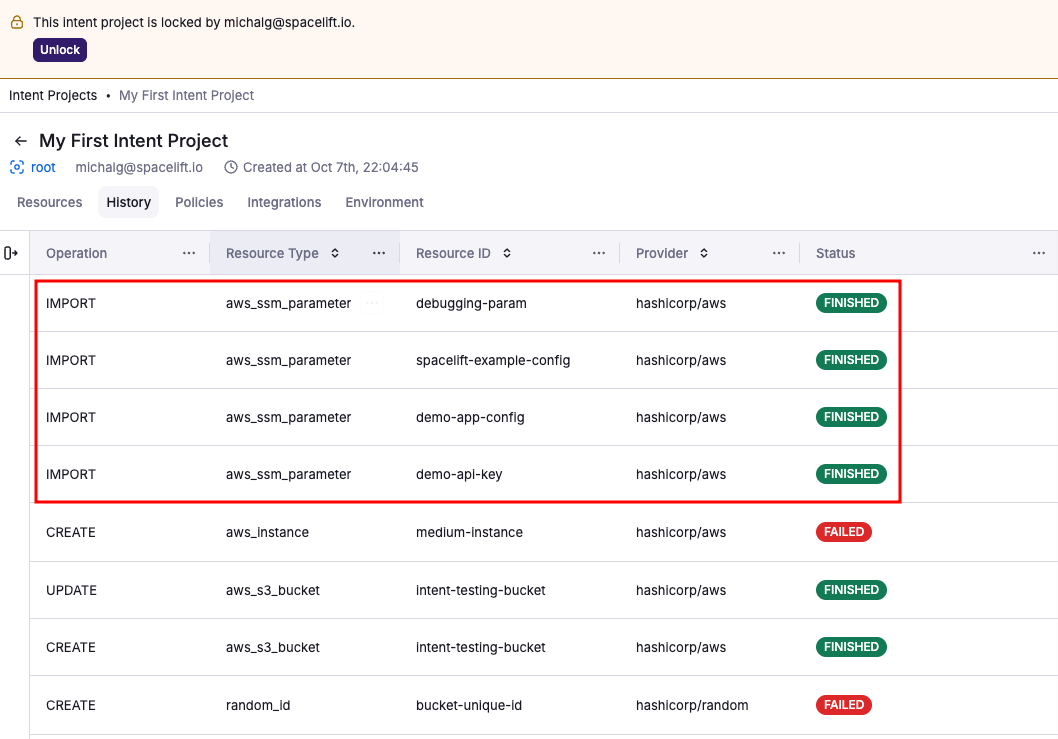
Check Spacelift UI after import»
Once resources are imported, verify them in the Spacelift UI.
- Resources tab: Shows newly imported SSM parameters alongside your existing S3 bucket.
- History tab: Records the import operation with full details of what was imported and when.
Dependencies»
Resources in a project usually relate to each other. An EC2 instance uses a security group's ID, a DNS record points at a load balancer, and so on. Intent tracks these relationships as dependencies, and the assistant records them for you as it works, so there's nothing to manage by hand. Whenever a resource's configuration uses a value that came from another resource, Intent captures a link from the resource that uses the value to the one that produced it.
Dependencies earn their keep in two places:
- Safe teardown. Intent won't delete a resource while another resource still depends on it. It asks you to remove the dependents first, so you can't pull a resource out from under something that still needs it.
- Clean export to IaC. When you graduate a project to a stack, your dependencies turn into real references in the generated Terraform code. A module output becomes something like
${module.lb.dns_name}, and a resource attribute becomes a reference to that resource, instead of a frozen literal value. The exported code stays connected, so changing one resource still flows through to the ones that use it.
You can see what a resource depends on, and what depends on it, from the project view.
Intent doesn't reorder your changes
Declaring a dependency doesn't make Intent apply your changes in a particular order. The assistant creates resources in the right order and tears them down in reverse as it works. The one rule Intent enforces directly is the teardown guard above: you can't delete a resource while something still depends on it.
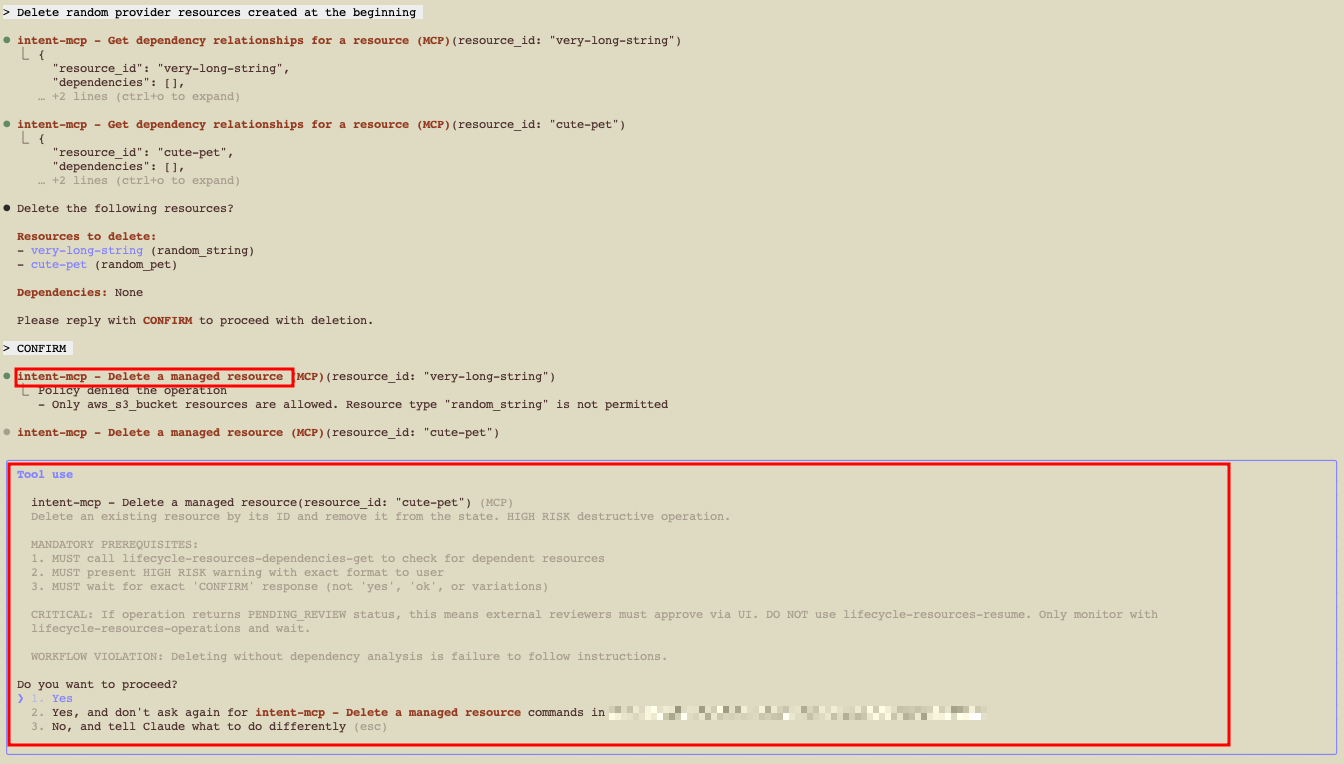
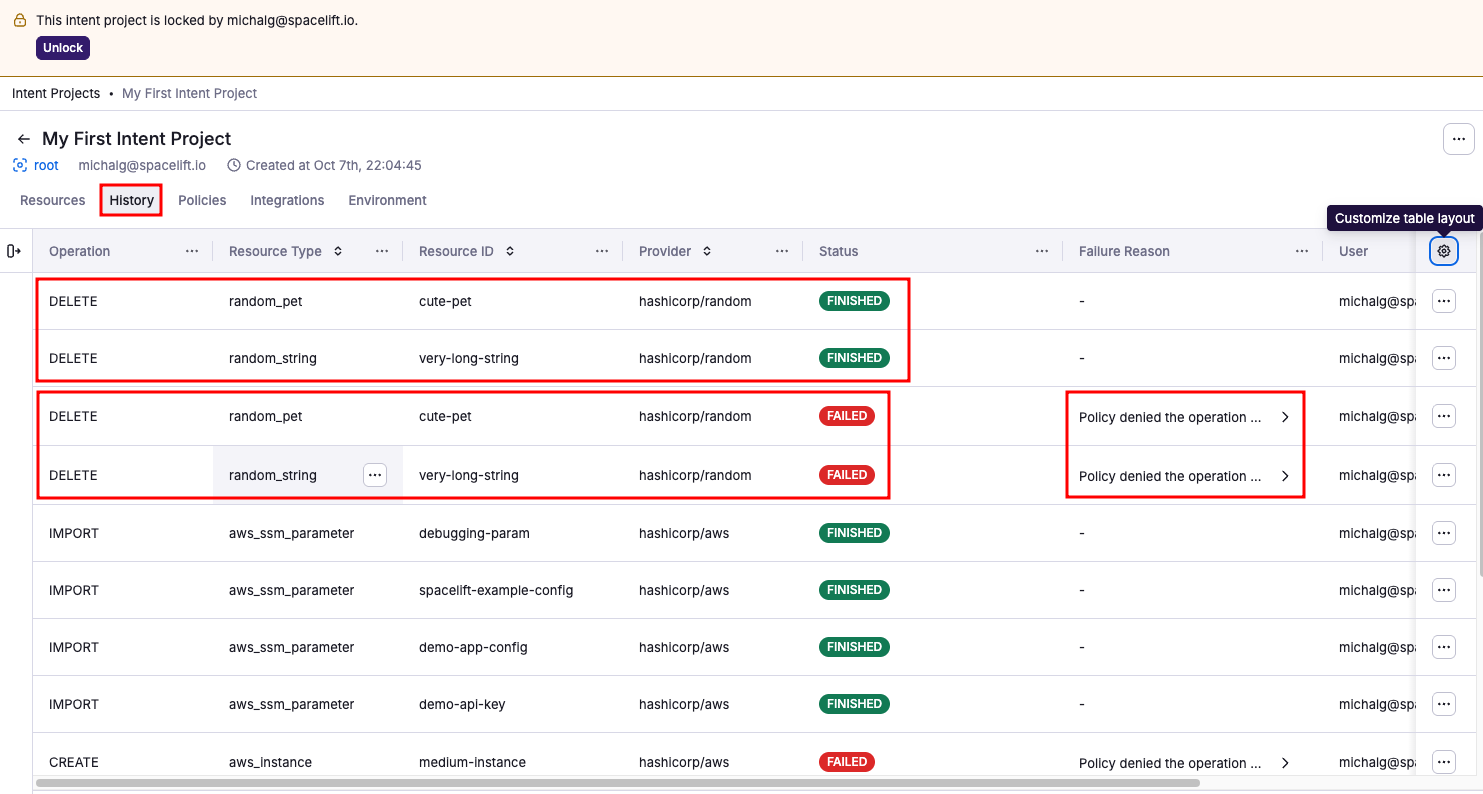
Delete resources safely»
When deleting, Intent evaluates dependencies, requests confirmation, and enforces policy.
1 | |
Typical flow:
- Intent checks for dependents and blocks the delete if any other resource still depends on this one.
- The assistant asks for explicit confirmation (by default).
- The delete proceeds, or is blocked by policy.
If policy prevents deletion, update the policy to allow the random resources. You can do this with Spacelift Intent, but review Session locks and safety first.
Updating a policy via MCP»
- Update the policy via Intent to allow
randomresources, which should enable deletion in this example.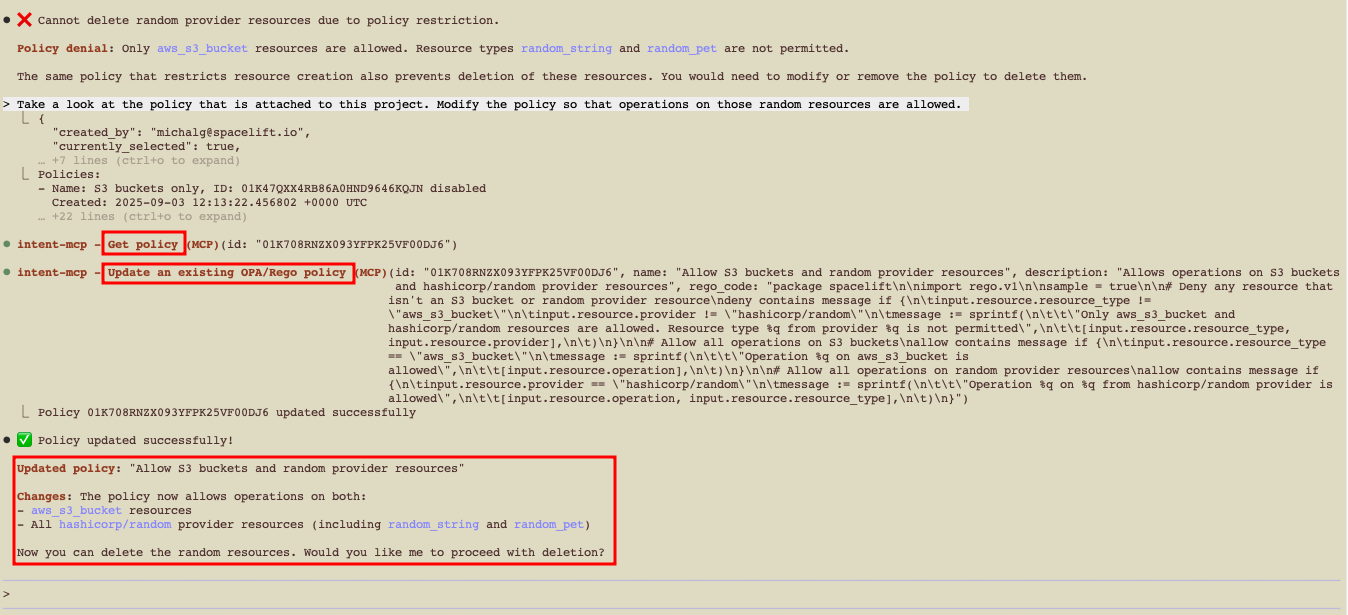
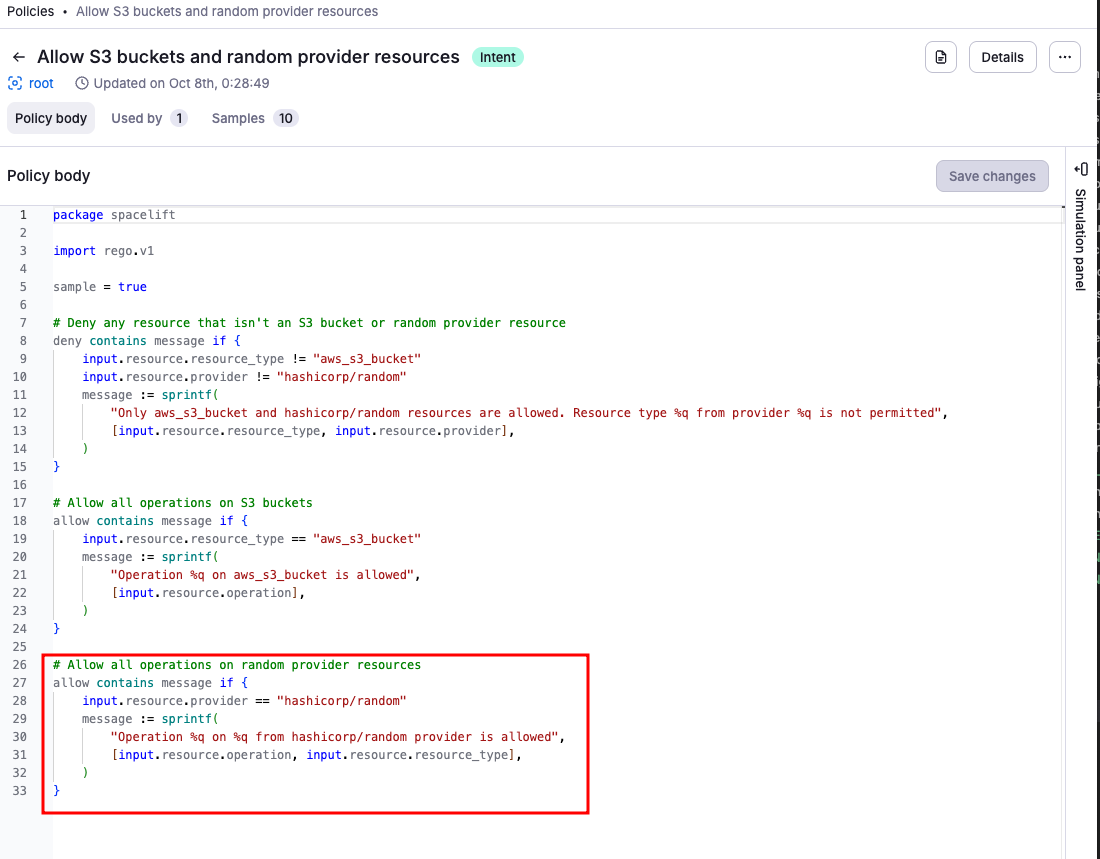
- Verify policy updates in the Spacelift UI.
- Attempt the delete prompt again and verify the updated policy works as intended.
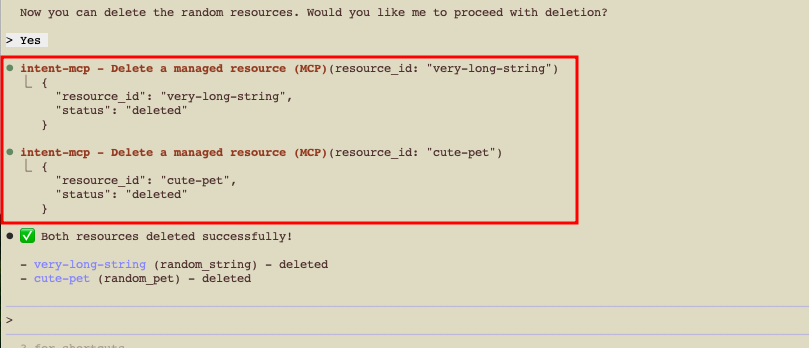
For auditability, the History tab shows attempted and successful deletions, with full receipts.
Session locks and safety»
- Project lock: Only one active session can operate on a project at a time (prevents conflicting changes). Locks auto-expire after a period of inactivity.
- OAuth scope: Sessions authorized with only
mcp:readcannot callmutateorintent, so they can inspect Spacelift and cloud resources but cannot change them. Pick the narrower scope when you want a "look-only" assistant. - Read-only projects: Projects switched to
READ_ONLY(for example via Intent to IaC state import) reject every write operation (create, update, delete, refresh, import, and resume) until they are re-enabled via theintentProjectEnablemutation or the Spacelift UI. - Client controls: You can configure your MCP client to always ask before invoking tools.