Integrate Spacelift with Google Cloud Platform»
Spacelift's GCP integration via OIDC allows Spacelift to manage your Google Cloud resources without the need for long-lived static credentials by creating a service account inside the project dedicated to your Stack.
With the service account already created, Spacelift generates temporary OAuth token for the service account as a GOOGLE_OAUTH_ACCESS_TOKEN variable in the environment of your runs and tasks. This is one of the configuration options for the Google Terraform provider, so you can define it like this:
1 | |
Many GCP resources require the project identifier too, so if you don't specify a default in your provider, you will need to pass it to each individual resource that requires it.
Set up the Google Cloud Platform integration»
To enable Spacelift runs to access GCP resources, you need to set up Spacelift as a valid identity provider for your account within GCP.
Step 1: Set Spacelift as a valid identity provider»
- Navigate to the GCP console and select the IAM & Admin service.
- Click Workload Identity Federation in the left-hand menu.
- If this is your first time creating a Workload Identity Pool, click Get Started, then Create Pool.
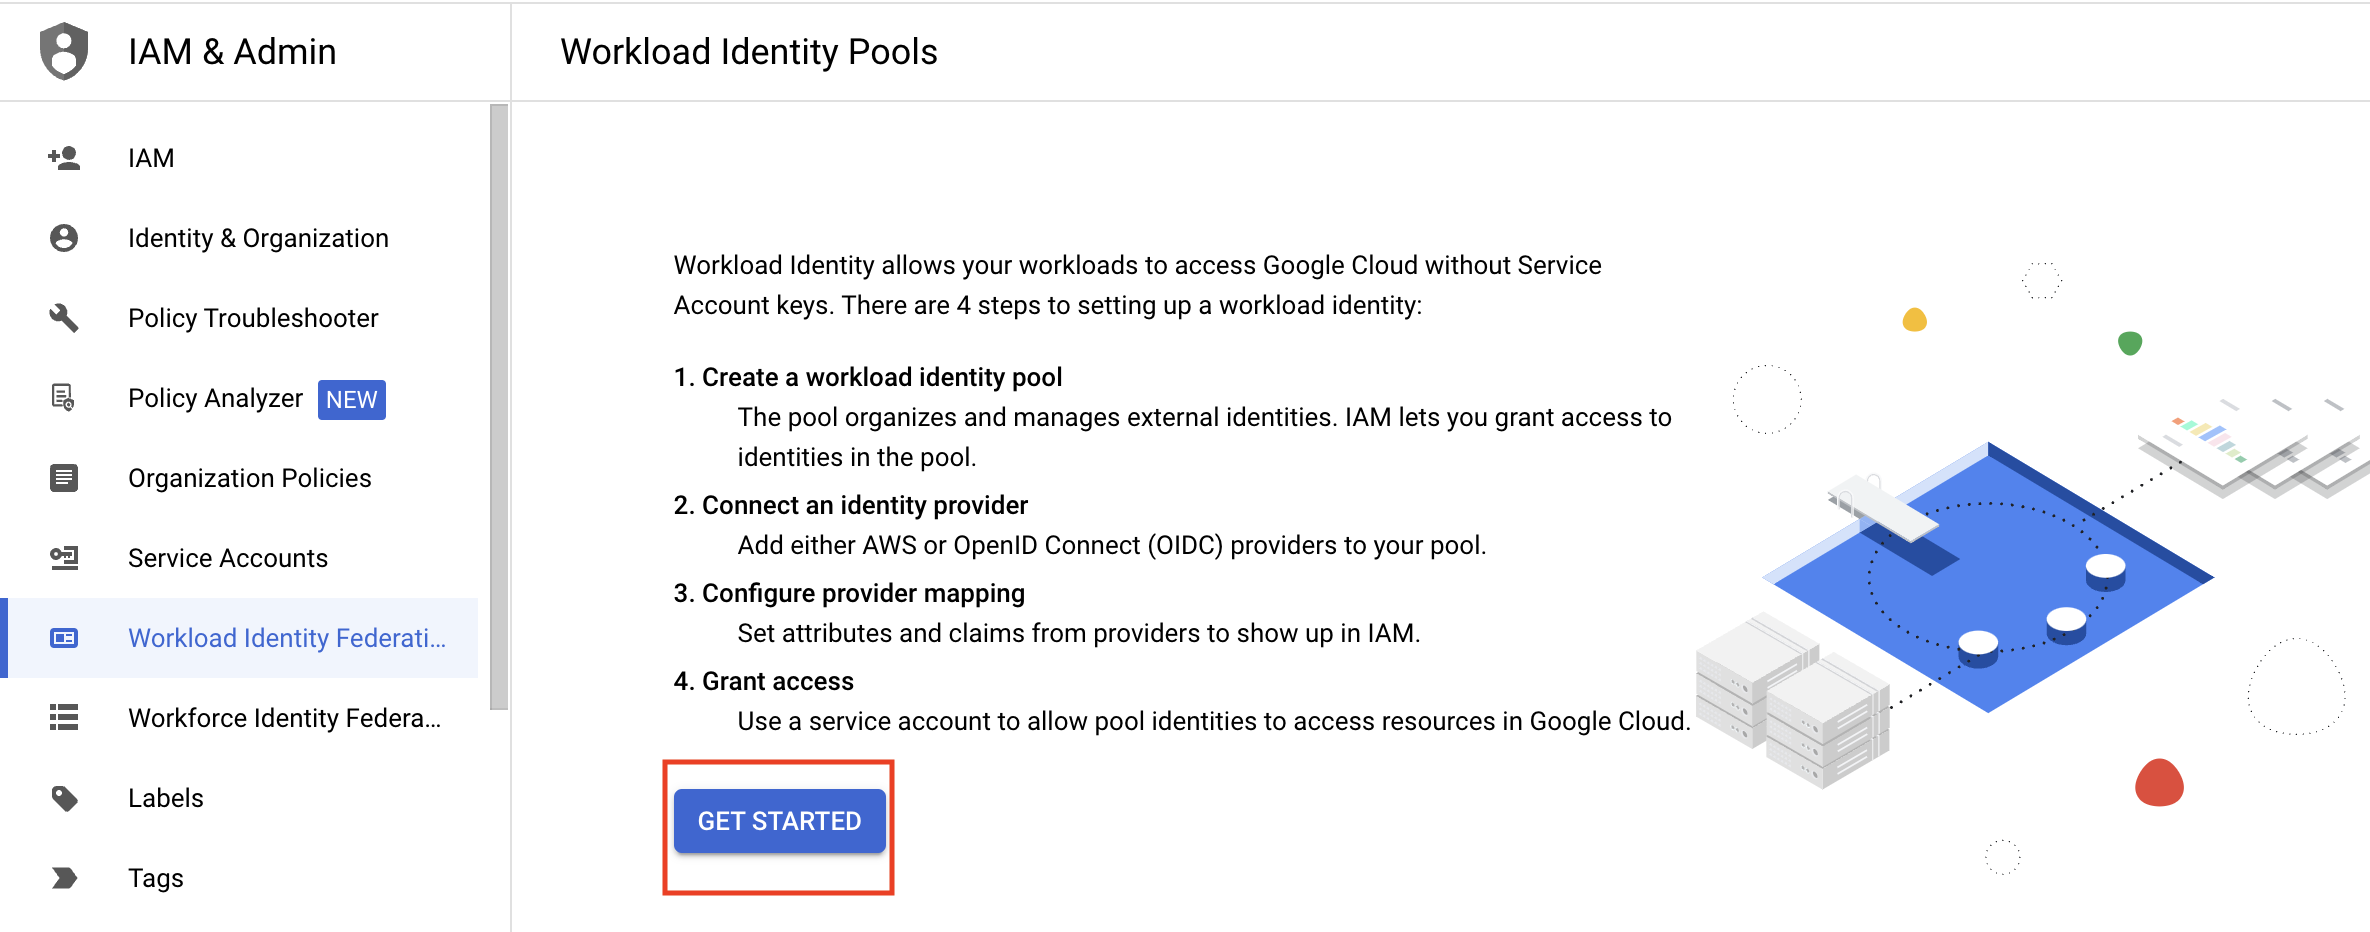
- If you have already created a Workload Identity Pool before, click Create Pool.

- If you have already created a Workload Identity Pool before, click Create Pool.
- Enter a name for your new identity pool and optionally set a description.
- Fill in the identity provider details:
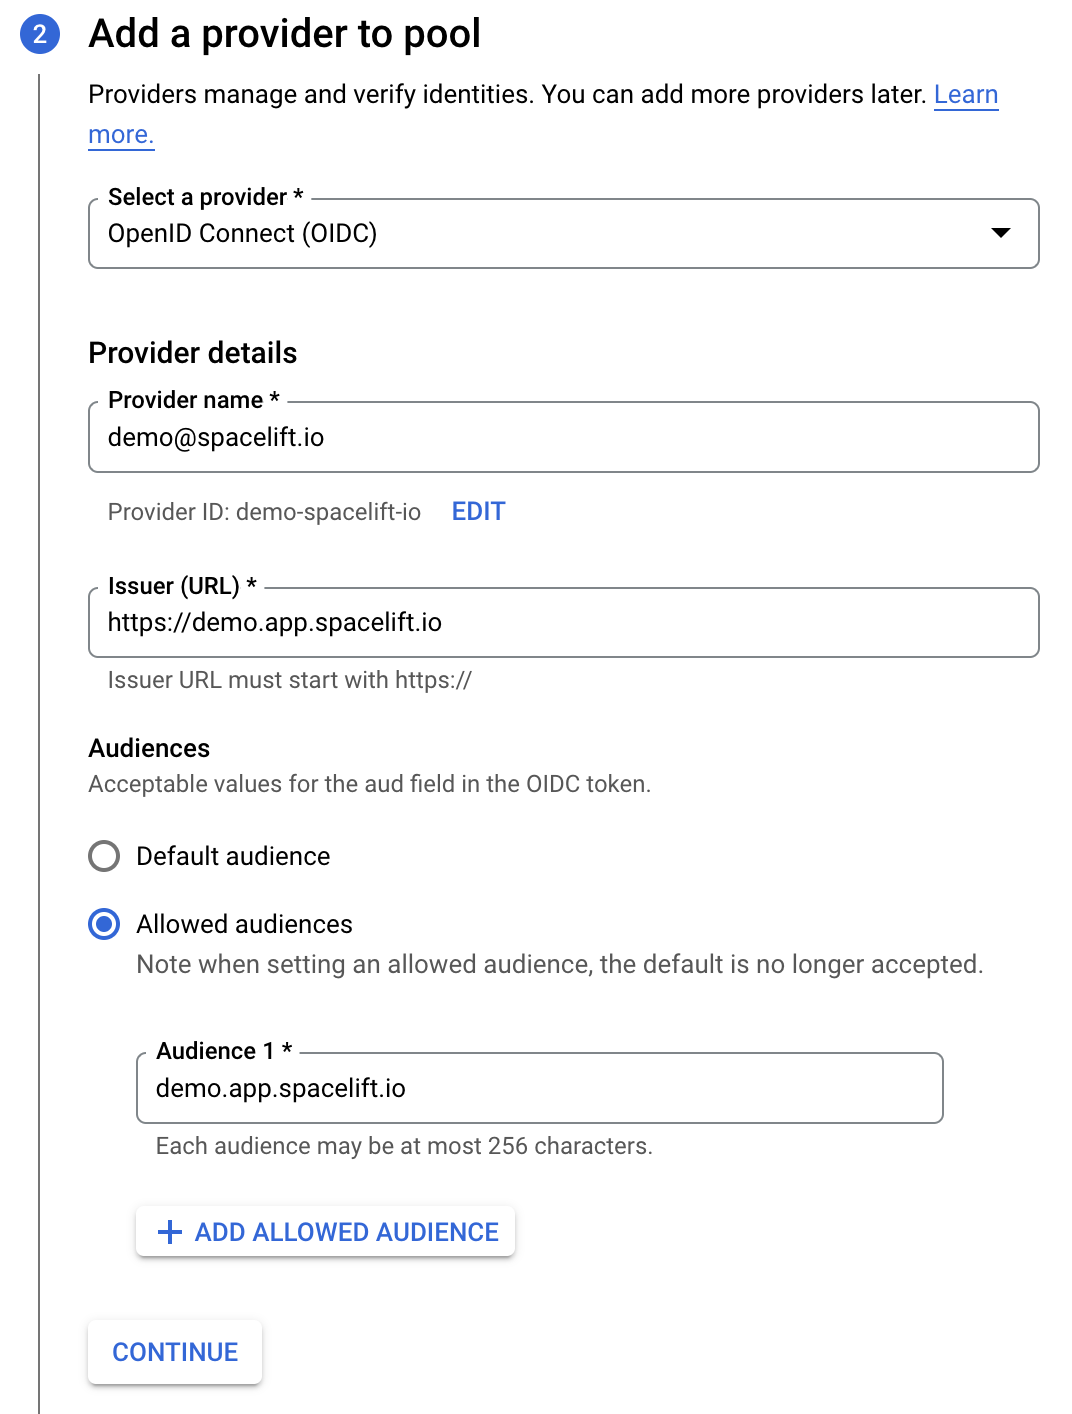
- Select a provider: Select OpenID Connect (OIDC).
- Provider name: Enter the email address linked to your Spacelift account.
- Issuer (URL): The URL of your Spacelift account, including the scheme. Ensure you add
issto the URL. - Audiences: Select Allowed audiences, then enter the hostname of your Spacelift account (e.g.
demo.app.spacelift.io). Ensure you addaudto the hostname.
- Fill in the provider attributes to configure mappings between Spacelift token claims (assertions) and Google attributes:
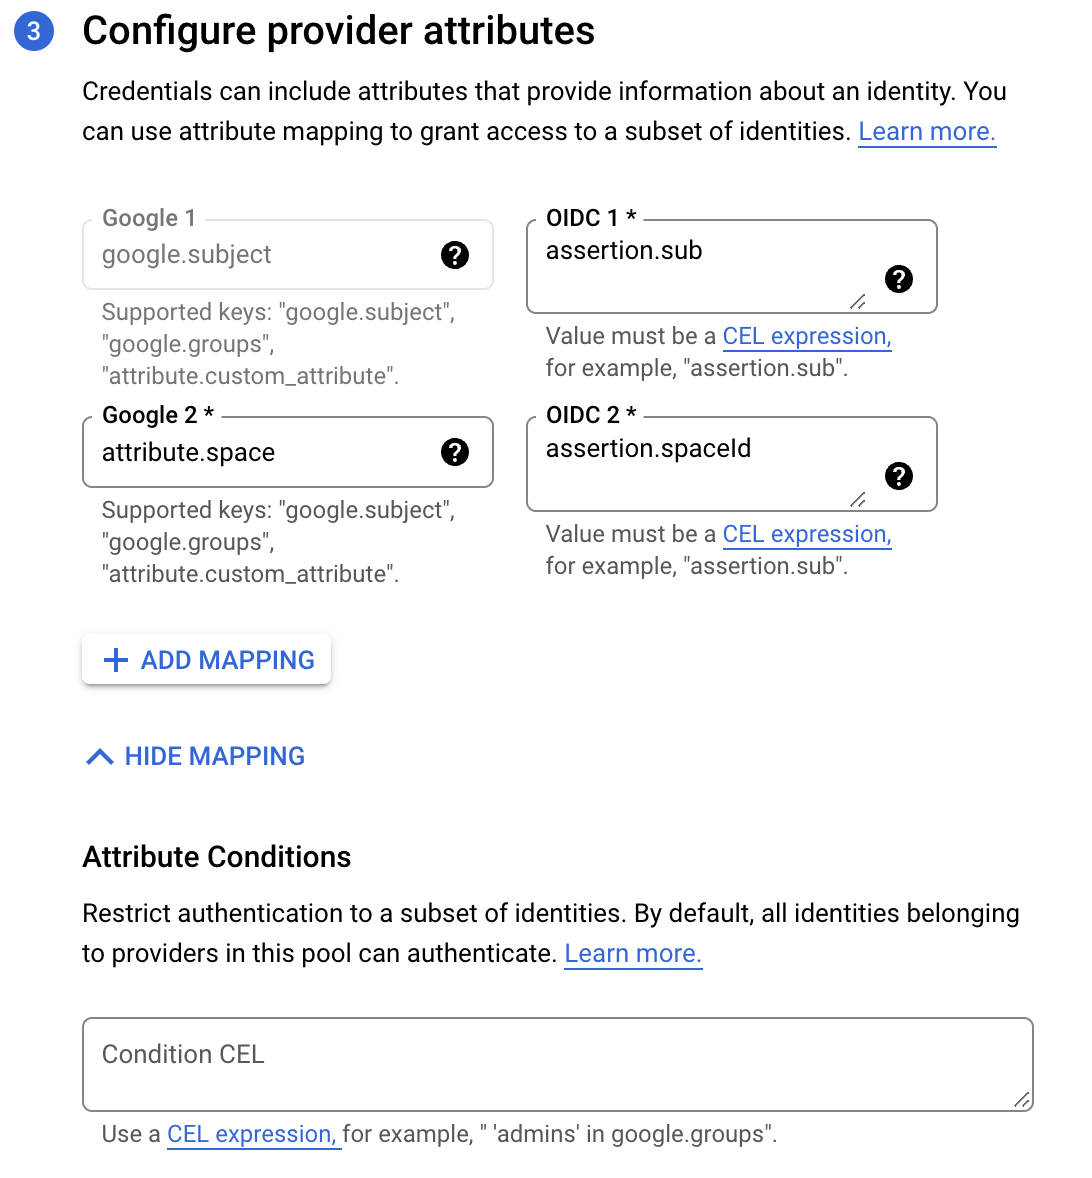
- Google 1: This is filled in automatically with
google.subject. - OIDC 1: Enter
assertion.sub. - Google 2: Enter
attribute.space. - OIDC 2: Enter
assertion.spaceId. Custom claims like this can be mapped to custom attributes, which need to start with theattribute.prefix.
- Google 1: This is filled in automatically with
- Attribute conditions: Specify extra conditions using Google's Common Expression Language to restrict which identities can authenticate using your workload identity pool.
- Finish creating the workload identity pool.
Warning
If your Stack ID is too long, it may exceed the threshold set by Google for the google.subject mapping. In that case, you can use a different custom claim to create the mapping.
Step 2: Grant access to service account»
Once the workload identity pool has been created, you need to grant it access impersonate the service account we will be using.
- Ensure you have a Spacelift service account ready to use.
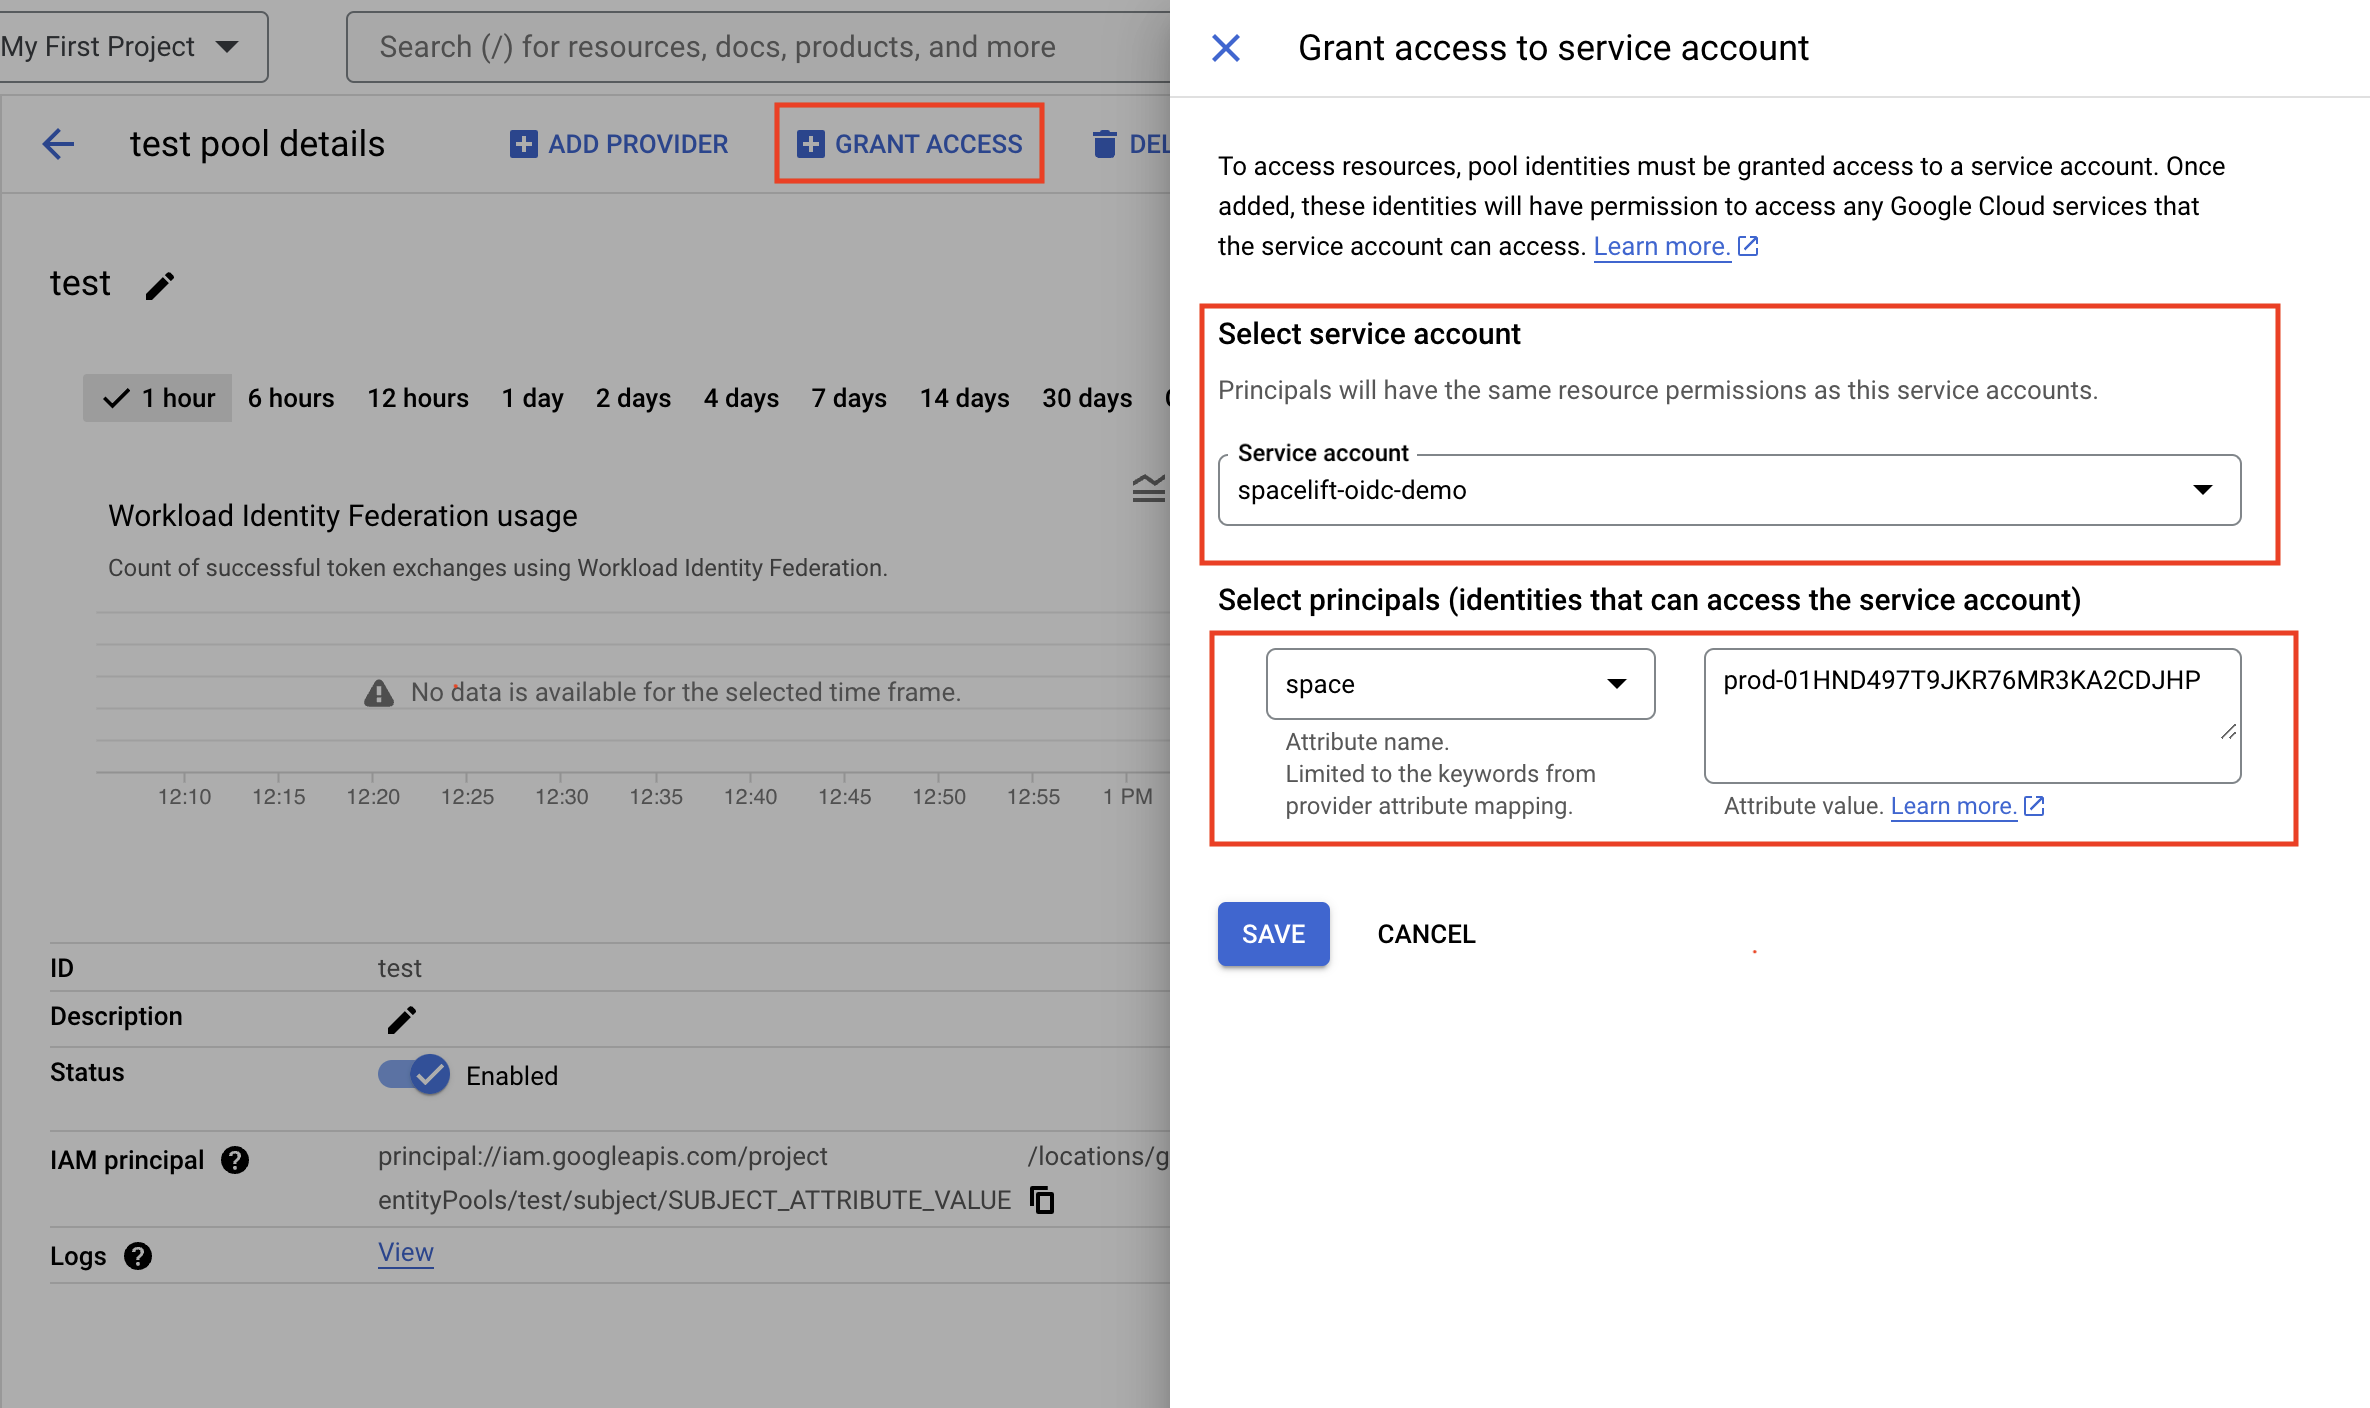
- In the workload identity pool details, click Grant access.
- Service account: Select the Spacelift service account from the list.
- Select principals: Select space in the attribute name dropdown, then enter the full SpaceId (from Spacelift) in the text box.
- Click Save.
In this example, any token claiming to originate from our Spacelift account's prod space can impersonate the service account:
Step 3: Download the configuration file»
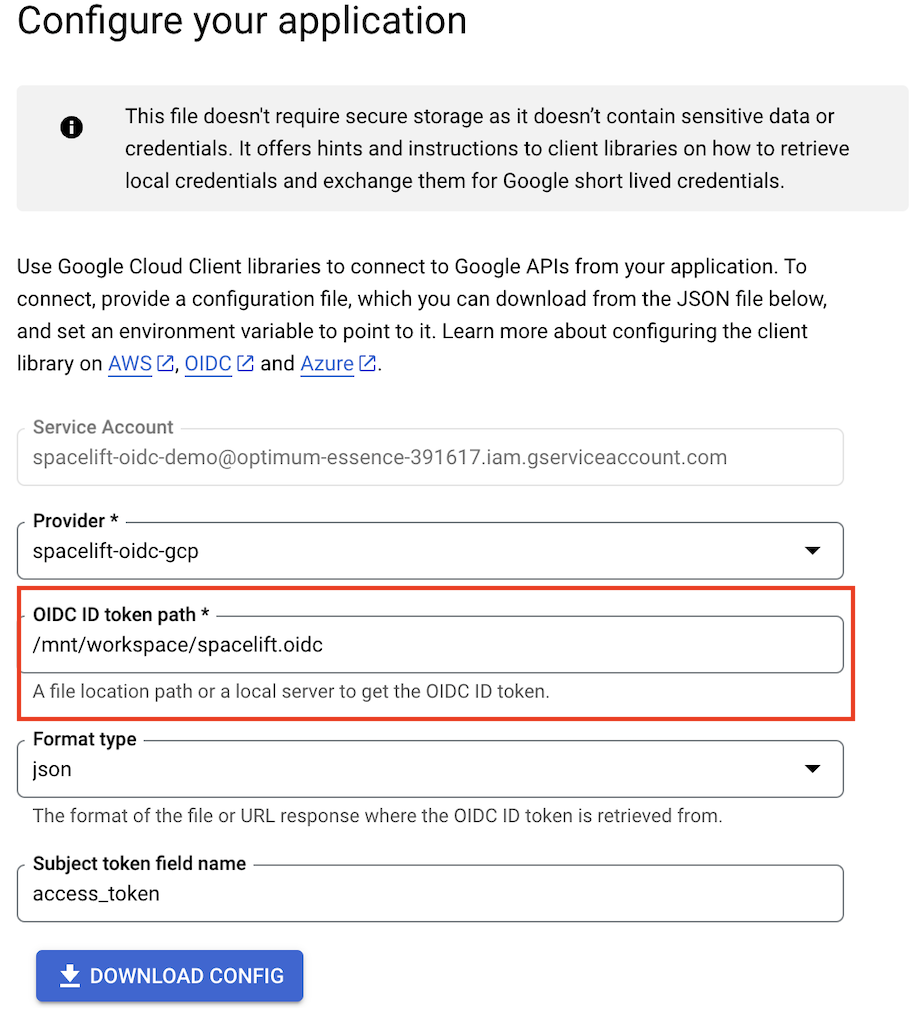
After you give the workload identity pool access to impersonate the service account, you will be able to Configure your application.
- Provider: Select your Spacelift service account name in the dropdown.
- OIDC ID token path: Enter
/mnt/workspace/spacelift.oidc. - Format type: Select json.
- Subject token field name: Leave as
access_token. - Click Download config.
The downloaded file will include the format type in credential_source. You can remove this so your credential_source section only contains:
1 2 3 | |
Step 4: Connect with specific IaC providers»
OpenTofu, Terraform, and Pulumi»
Once the Spacelift-GCP OIDC integration is set up, the Google Cloud Terraform provider and Pulumi GCP provider can be configured without the need for any static credentials.
You will need to provide a configuration file telling the provider how to authenticate. The configuration file can be created manually or generated by the gcloud utility and looks like this:
1 2 3 4 5 6 7 8 9 10 11 12 13 | |
Your Spacelift run needs to have access to this file, so check it in, then mount it on a stack directly or in a context that is attached to the stack.
You will also need to tell the provider how to find this configuration file. Create a GOOGLE_APPLICATION_CREDENTIALS environment variable, and set its value as the path to your credentials file.
Here is an example of using a Spacelift context to mount the file and configure the provider to be attached to an arbitrary number of stacks:
For more information about configuring the OpenTofu/Terraform provider, please see the Google Cloud Terraform provider docs. The Pulumi configuration follows the same steps as OpenTofu/Terraform.
✅ Step 2 of the Quick Start is complete! Now you can create your first stack.
Alternative setup: direct resource access»
If you need to avoid using service accounts in GCP, Spacelift supports direct resource access mode in GCP. Since Spacelift only produces the OIDC token and configuration is handled on the GCP portal, you can use OIDC without service account impersonation.
Step 1: Set Spacelift as a valid identity provider»
- Navigate to the GCP console and select the IAM & Admin service.
- Click Workload Identity Federation in the left-hand menu.
- If this is your first time creating a Workload Identity Pool, click Get Started, then Create Pool.
- If you have already created a Workload Identity Pool before, click Create Pool.
- If you have already created a Workload Identity Pool before, click Create Pool.
- Enter a name for your new identity pool and optionally set a description.
- Fill in the identity provider details:
- Select a provider: Select OpenID Connect (OIDC).
- Provider name: Enter the email address linked to your Spacelift account.
- Issuer (URL): The URL of your Spacelift account, including the scheme.
- Audiences: Select Allowed audiences, then enter the hostname of your Spacelift account (e.g.
demo.app.spacelift.io).
- Fill in the provider attributes to configure mappings between Spacelift token claims (assertions) and Google attributes:
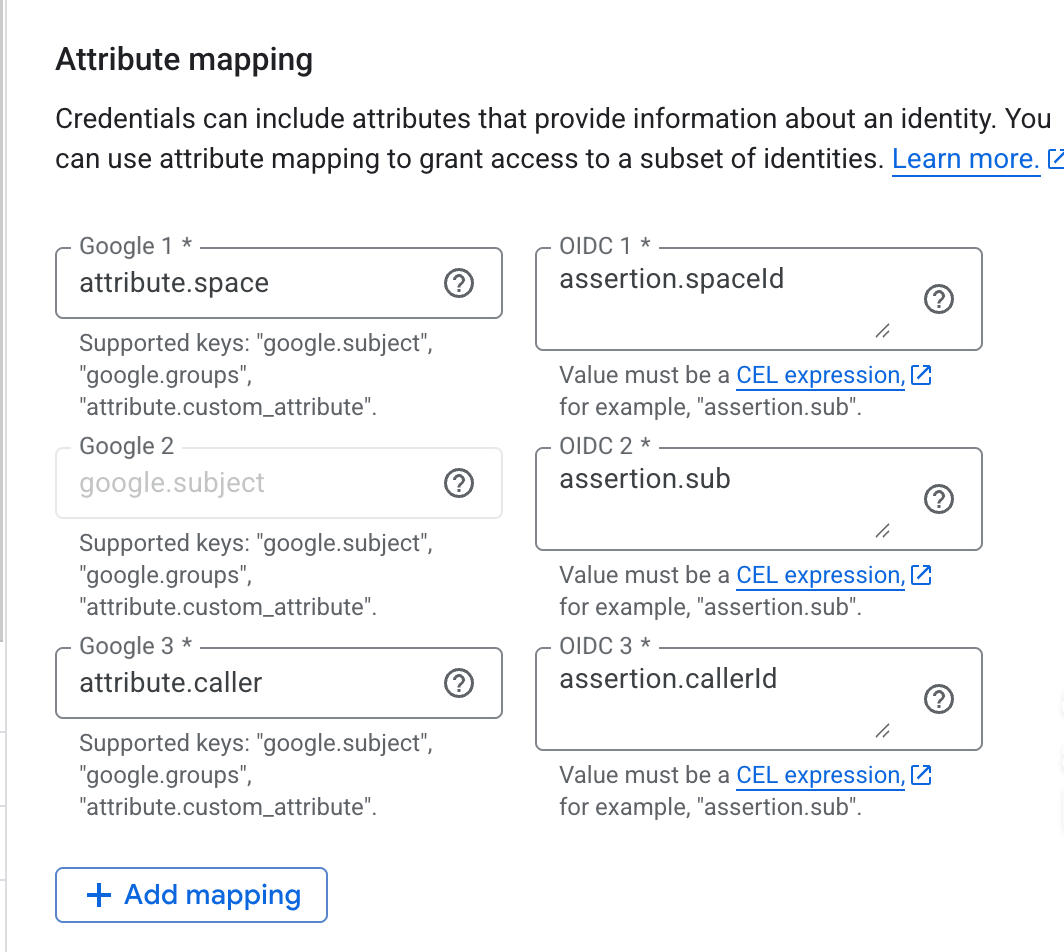
- Google 1: Enter
attribute.space. - OIDC 1: Enter
assertion.spaceId. Custom claims like this can be mapped to custom attributes, which need to start with theattribute.prefix. - Google 2: Enter
google.subject. - OIDC 2: Enter
assertion.sub. - Google 3: Enter
attribute.caller. - OIDC 3: Enter
assertion.callerId.
- Google 1: Enter
- Attribute conditions: Specify extra conditions using Google's Common Expression Language to restrict which identities can authenticate using your workload identity pool.
- Finish creating the workload identity pool.
Warning
If your Stack ID is too long, it may exceed the threshold set by Google for the google.subject mapping. In that case, you can use a different custom claim to create the mapping.
Step 2: Set up direct resource access»
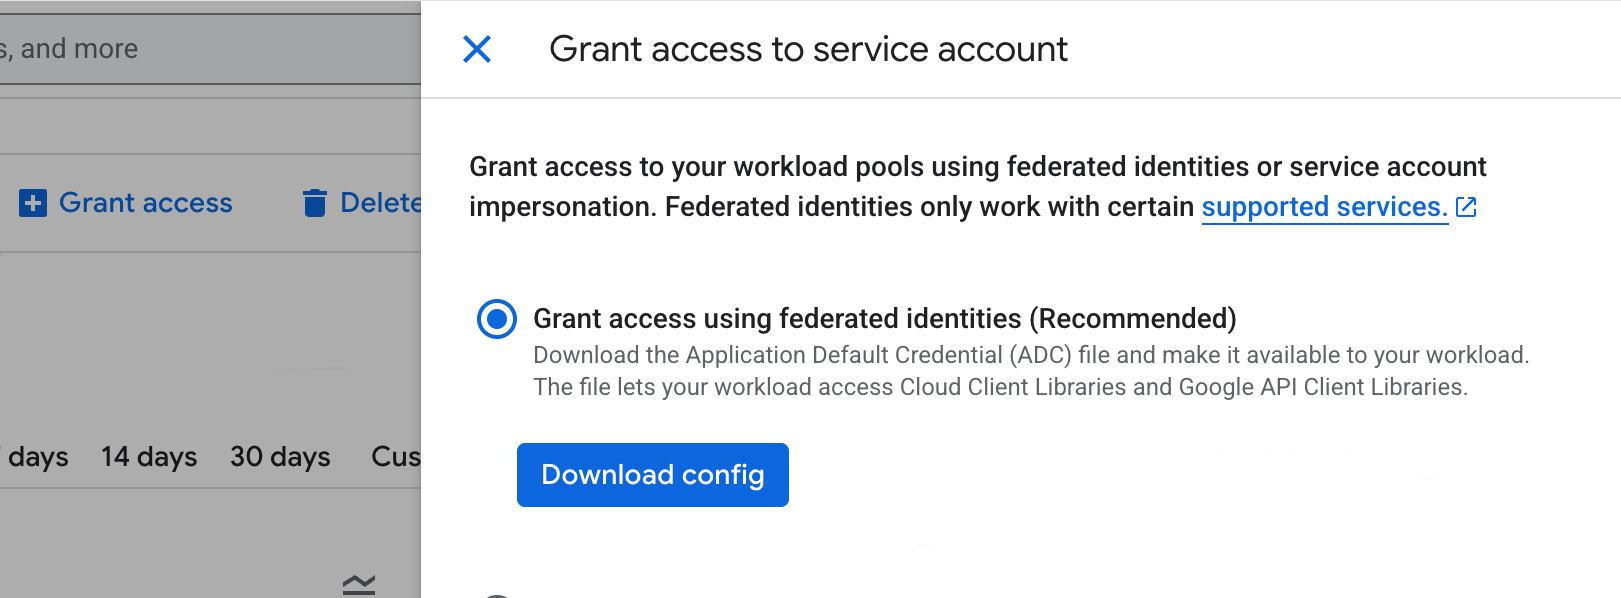
- In the Workload Identity Pool details, click Grant access.
- With Grant access using federated identites selected, click Download config.
- In GCP's Cloud Storage section, navigate to Buckets, select the bucket you would like Spacelift to access, then click Permissions.
- Set up permissions for the bucket (
Storage Legacy Bucket OwnerandStorage Legacy Object Owner) based on your Spacelift stack ID (attribute.calleras you configured in the Workload Identity Pool).- Your Principal should look something like:
principalSet://iam.googleapis.com/projects/<project ID numbers>/locations/global/workloadIdentityPools/<identity pool name>/attribute.caller/gcp-bucket.
- Your Principal should look something like:
The downloaded file will include the format type in credential_source. Remove it so your credential_source section only contains:
1 2 3 | |
Step 3: Configure access in Spacelift»
- In Spacelift, navigate to Ship Infra > Stacks, then click the name of the stack you would like to connect to GCP.
- Navigate to the Environment tab.
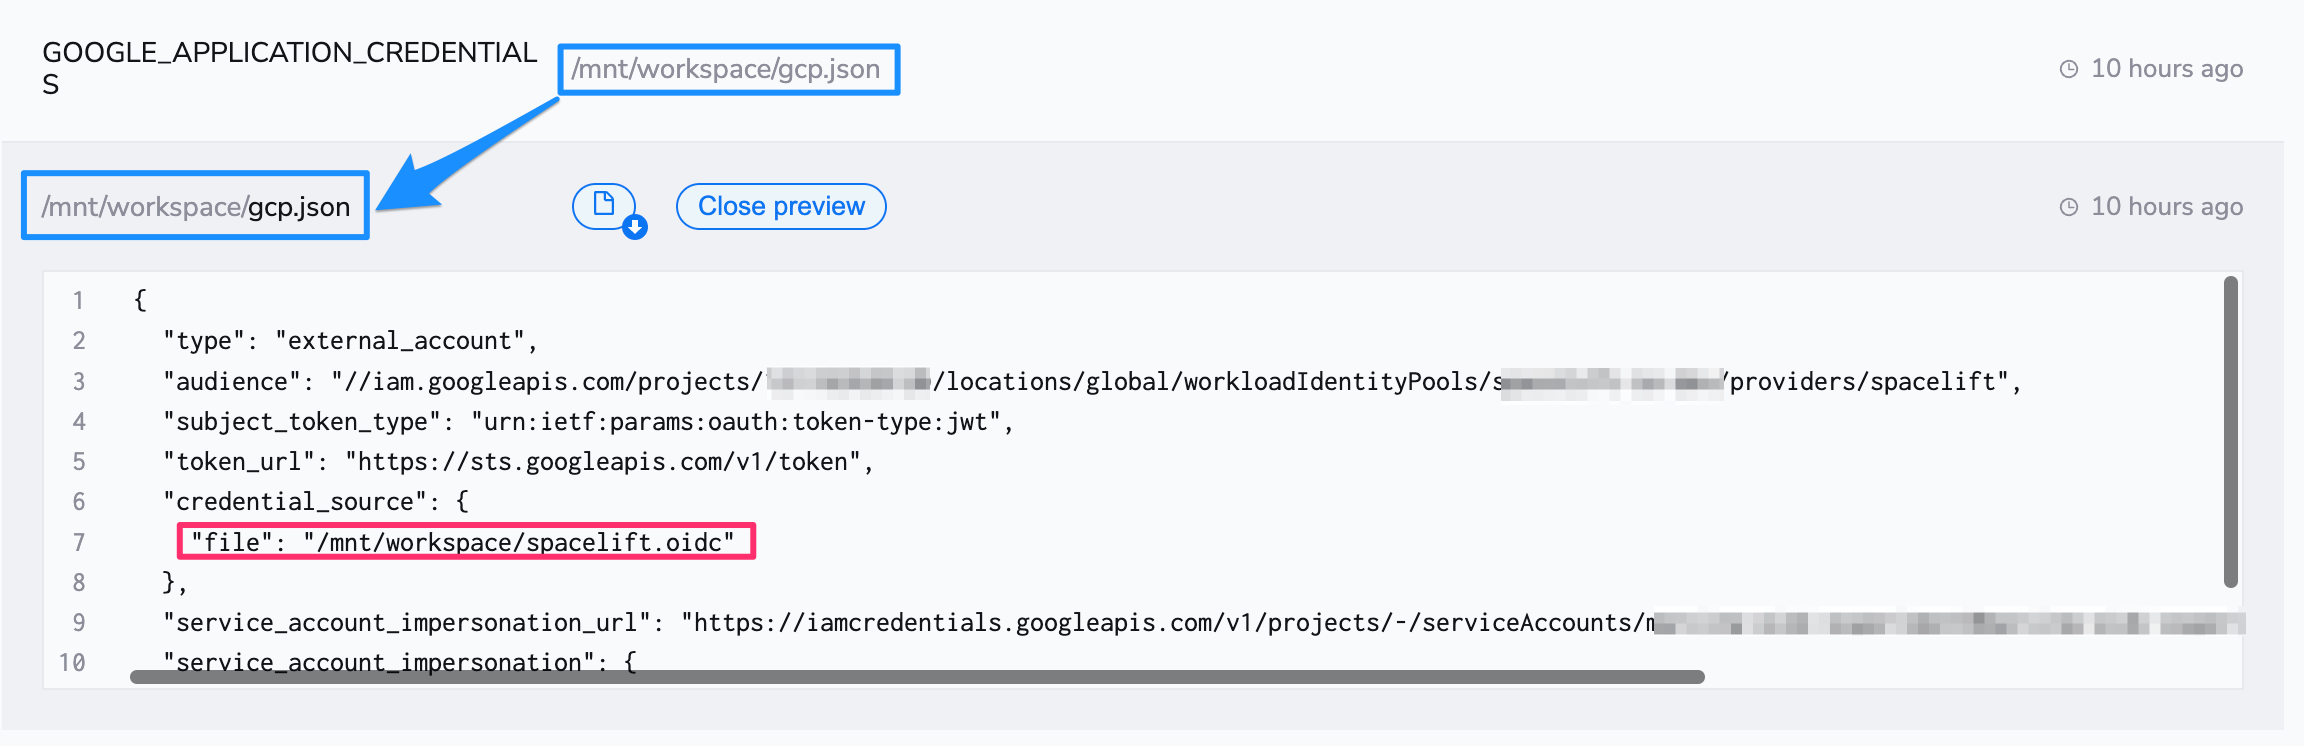
- Under Mounted files, click Add file and mount the
gcp.jsonconfig file downloaded from GCP. - Under Environment variables, click Add variable.
- Name: Enter a name for the variable, such as
GOOGLE_APPLICATION_CREDENTIALS. - Value: Enter the path to the mounted file (
/mnt/workspace/gcp.json). - Mark as secret: Enable to mark the value as a secret, which will hide it in the Spacelift UI and via API.
- Description (optional): Enter a short (markdown-supported) description of the variable.
- Name: Enter a name for the variable, such as
- Your Spacelift stack should now be able to access GCP via OIDC without a service account.