Plugins»
Plugins extend the functionality of Spacelift, allowing you to integrate with third-party services, automate tasks, and enhance your workflows.
Spacelift supports a variety of plugins, which can be used to perform actions such as sending notifications, managing resources, or integrating with external systems. You can also develop your own custom plugins using our plugin SDK spaceforge.
Available plugins»
Navigate to Integrate Services > Plugins in the Spacelift UI, then click Templates to browse and install available plugins. You can also click Create template to create custom plugins.
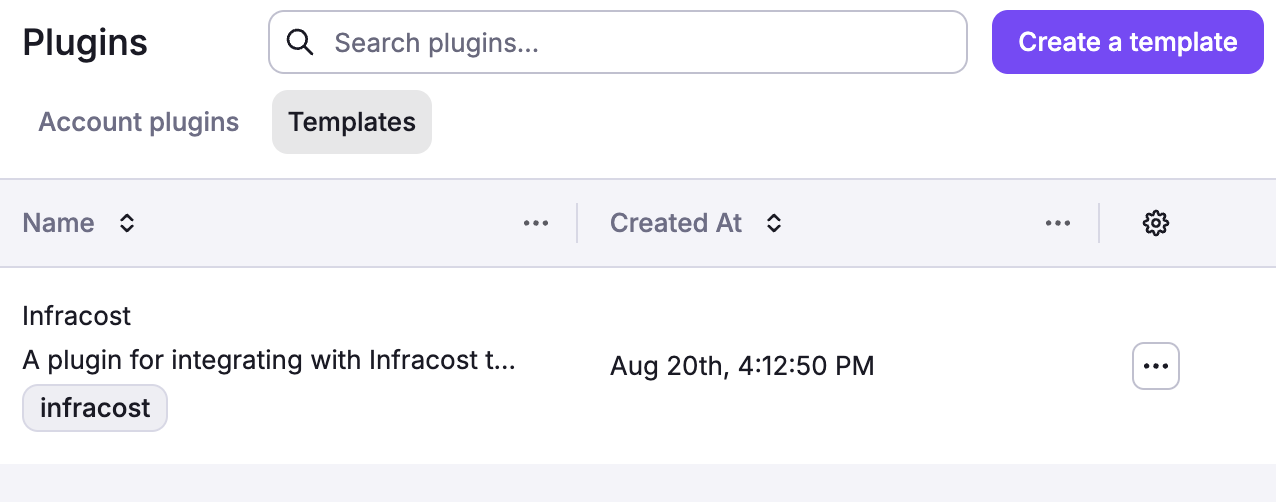
The following plugins are available in the Spacelift plugin repository:
- Infracost: Estimate infrastructure costs before deployment.
- SOPS: Decrypt secrets using cloud KMS services (AWS KMS, Azure Key Vault, GCP KMS).
- Wiz: Cloud security scanning and compliance reporting.
- Checkov: Static security analysis for IaC files.
- Terrascan: Detect compliance and security violations.
- Trivy: Comprehensive vulnerability and misconfiguration scanner.
- TruffleHog: Secret and credential detection (800+ types).
- Environment Manager: Centralized environment variable management across stacks via YAML.
- Envsubst: Environment variable substitution for Kubernetes manifests.
- OpenTofu Tracing: OpenTelemetry tracing for OpenTofu operations.
For detailed plugin documentation, configuration examples, and source code, visit the plugin repository. If you've built a plugin that could benefit the community, consider submitting it to the repository.
Changing the plugin template»
When a template is installed, the resulting policies, webhooks, contexts, etc. are locked in the UI and cannot be changed. However, some plugin templates contain default values you might want to change.
- Navigate to Integrate Services > Plugins in the Spacelift UI.
- Click Templates.
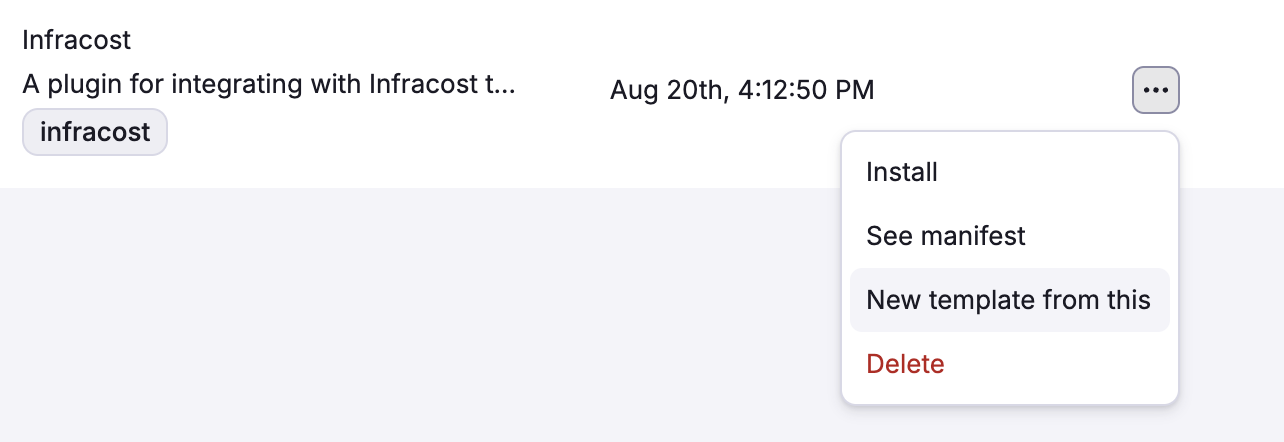
- Click the three dots beside the plugin template you want to change, then click New template from this.
- Make your desired changes and click Create.
Warning
Creating a new template from an existing one does not update any current plugin installations. Stacks using the original plugin will continue using the original configuration. To apply the new template, you must uninstall the existing plugin and then reinstall it using the new template.
Installing plugins»
- Navigate to Integrate Services > Plugins in the Spacelift UI.
- Click Templates.
- Click the three dots beside the plugin template you want to use, then click Install.
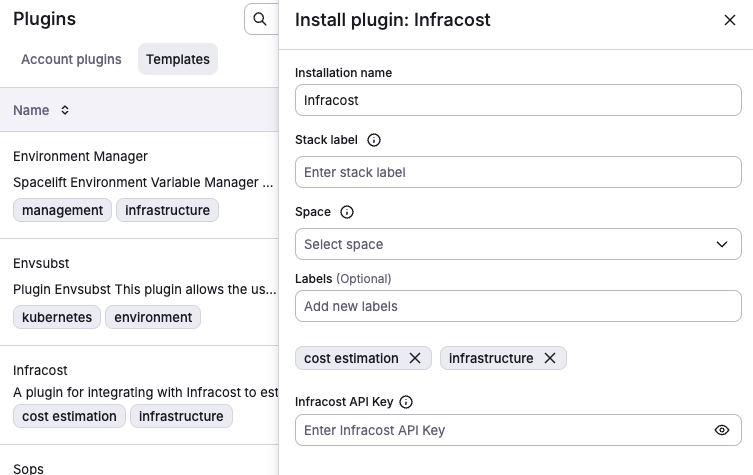
- Edit the plugin details:
- Installation name: Use the template name or enter a short, descriptive name for the plugin. This will identify the plugin in the Spacelift UI.
- Stack label: The
autoattachlabel that will be used to automatically attach the plugin to stacks. You can also use the*wildcard to attach the plugin to all stacks in a space. - Space: Select the space(s) where the plugin will be installed.
- Labels (optional): Organize plugins by assigning labels to them.
- Depending on the plugin template, fill out additional configuration options as needed.
- For example, the Infracost plugin template requires the
Infracost API Keydetails.
- For example, the Infracost plugin template requires the
- Click Install.
After a plugin is installed, you can view its details on the Account plugins tab.
Using a plugin»
Plugins can only attach via the autoattach label, which is the value provided in the Stack label field.
- Navigate to Ship Infra > Stacks.
- Beside the stack you want to attach a plugin to, click the three dots, then click Settings.
- Under Labels, enter the label you provided in the plugin's Stack label field.
- Click Save.
For example, if you installed Infracost with the infracost stack label, you can attach it to a stack by adding the infracost label to the stack.
Managing plugins with OpenTofu»
You can manage plugins programmatically using the Spacelift OpenTofu provider. The provider offers two plugin-related resources:
spacelift_plugin: Creates a plugin instance from a template.spacelift_plugin_template: Creates a custom plugin template from a manifest.
Example: installing a plugin with OpenTofu»
1 2 3 4 5 6 7 8 9 10 11 12 | |
Updating a plugin»
Plugin installations are immutable. Once installed, the configuration and associated resources (policies, webhooks, contexts) cannot be edited. To update a plugin to a new template version or change its configuration, you must uninstall the current installation and reinstall it.
- Uninstall the plugin you want to update.
- If you need a modified template, create a new template from the existing one with your desired changes.
- Reinstall the plugin using the updated template.
Uninstalling a plugin removes all associated resources (contexts, policies, webhooks) that were created during installation. Make note of any custom configuration before uninstalling so you can reapply it during reinstallation.
Info
After reinstalling, verify that the correct autoattach label is still applied to your stacks. If you changed the stack label during reinstallation, you will need to update the labels on your stacks accordingly.
Uninstalling a plugin»
To remove a plugin installation from your account:
- Navigate to Integrate Services > Plugins in the Spacelift UI.
- Click the Account plugins tab.
- Click the three dots beside the plugin installation you want to remove, then click Delete.
- Confirm the deletion when prompted.
Warning
Uninstalling a plugin permanently deletes all resources that were created as part of the installation, including contexts, policies, and webhooks. This action cannot be undone. Stacks that had the plugin attached via the autoattach label will no longer have those resources applied on subsequent runs.
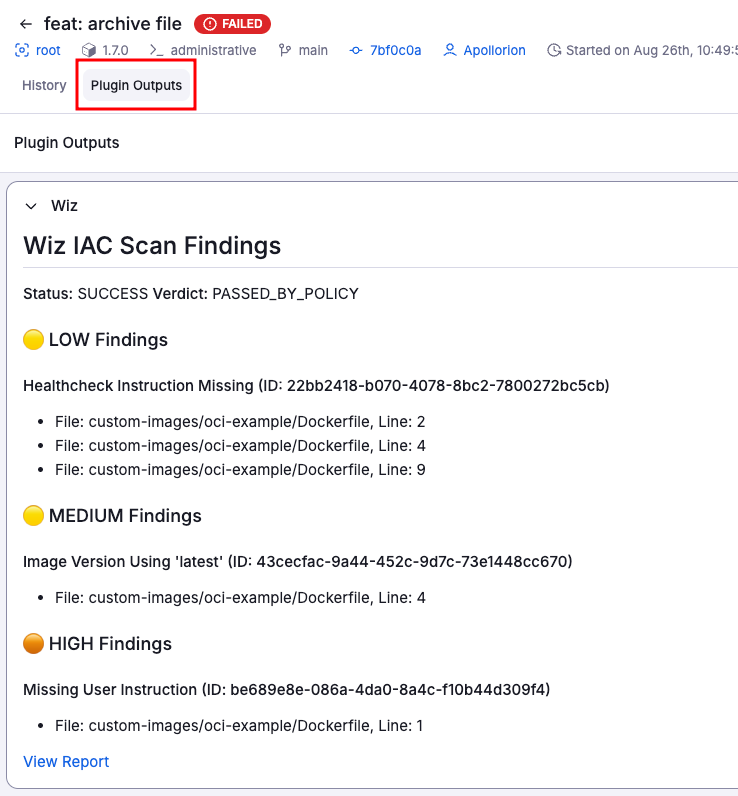
Plugin outputs»
Plugins may output useful information. If a plugin produces outputs, you can see them in the Plugin Outputs tab of the run details page.
Here's an example of the Wiz plugin output:
Plugin development»
Getting started with custom plugins»
Custom plugins allow you to extend Spacelift's functionality to meet your specific needs. The spaceforge SDK provides templates and tools for creating, testing, and publishing plugins.
Plugin architecture»
Spacelift plugins are packaged as .yaml files. Each plugin defines:
- Execution phases: When the plugin runs (e.g., before_init, after_plan, after_apply).
- Input parameters: Configuration options exposed during installation. At least one input parameter is required.
- Output artifacts: Files, logs, or data produced by the plugin.
- Dependencies: Required tools, libraries, or external services.
Plugin lifecycle»
Plugins have two lifecycle aspects: the management lifecycle and the execution lifecycle.
Management lifecycle»
The management lifecycle covers how a plugin installation is created, maintained, and removed:
- Installation: A plugin template is installed into your account via the Spacelift UI or OpenTofu/Terraform provider with specific configuration, creating the associated resources (contexts, policies, webhooks).
- Attachment: The plugin automatically attaches to stacks via
autoattachlabels. - Update: To change a plugin's configuration or template version, the existing installation must be deleted and reinstalled. See Updating a plugin.
- Removal: The plugin installation can be deleted, which permanently removes all associated resources. See Uninstalling a plugin.
Execution lifecycle»
The execution lifecycle covers what happens each time a plugin runs as part of a stack run:
- Execution: Plugin runs during appropriate run phases based on its configuration (e.g.,
before_init,after_plan,after_apply). - Output: Plugin generates logs, artifacts, or external integrations.
- Cleanup: Temporary resources are cleaned up after execution.
Contributing to the plugin ecosystem»
The Spacelift plugin ecosystem thrives on community contributions. Here's how you can get involved:
Plugin templates»
- Contribute new plugin templates to the spaceforge repository.
- Improve existing plugin documentation and examples.
- Submit bug fixes and feature enhancements.
Contribution process»
- Fork the repository: Create your own fork of the spaceforge repo.
- Create feature branch:
git checkout -b feature/my-awesome-plugin. - Develop and test: Follow the development guidelines and test thoroughly.
- Submit pull request: Include clear description and test results.
- Review process: Core maintainers will review and provide feedback.
Plugin submission guidelines»
Quality standards»
- Documentation: Comprehensive README with setup instructions.
- Security: Follow security best practices, no hardcoded secrets.
- Compatibility: Test with supported Spacelift features and IaC tool versions.
Plugin categories»
Popular plugin categories include:
| Category | Examples |
|---|---|
| Security & Compliance | Vulnerability scanning, policy enforcement, compliance reporting. |
| Cost Management | Cost estimation, budget alerts, resource optimization. |
| Notifications | Slack, Discord, email, webhooks for run status updates. |
| Monitoring & Observability | Metrics collection, log aggregation, alerting. |
| CI/CD Integration | GitHub Actions, GitLab CI, Jenkins pipeline triggers. |
| Cloud Services | Provider-specific integrations and automation. |
| Testing | Infrastructure testing, compliance validation, performance testing. |