GitLab»
Spacelift supports GitLab as the code source for your stacks and modules.
You can set up multiple Space-level and one default GitLab integration per account.
Using multiple GitLab accounts
If you want to use multiple GitLab accounts, teams, or groups, or connect Spacelift to your GitLab Enterprise instance, you will need to set up separate GitLab integrations (with different access tokens) for each different team or group in GitLab.
Create the GitLab integration»
Initial setup»
- On the Integrate Services > Discover all integrations screen, click View on the GitLab card, then Set up GitLab.
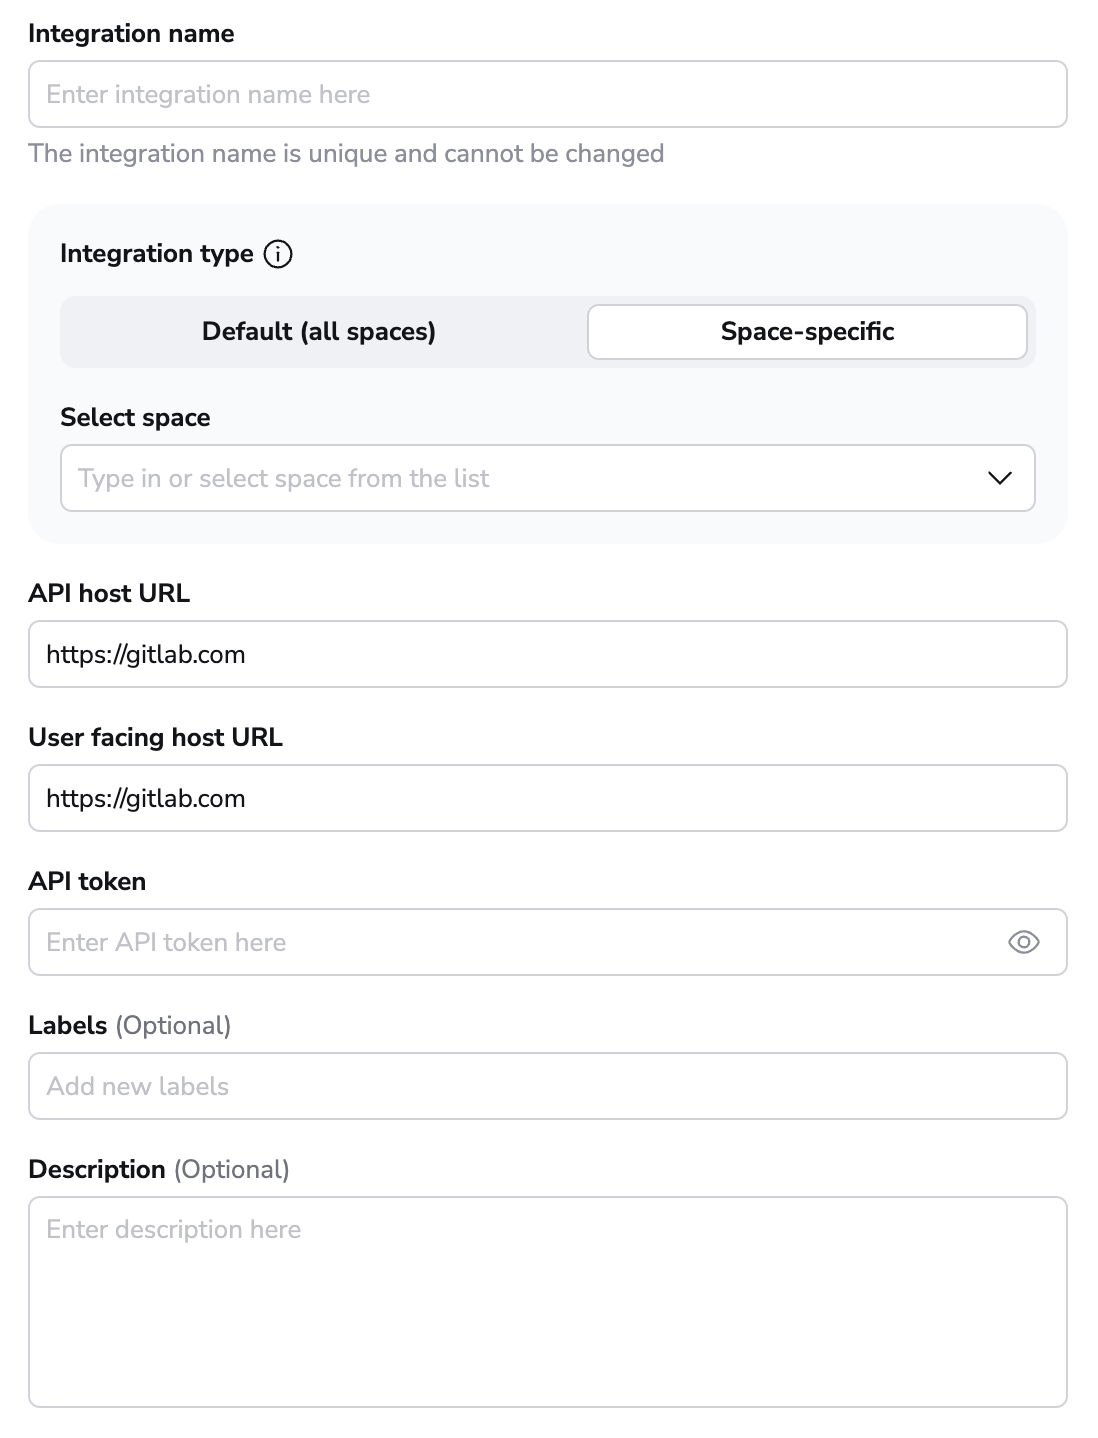
- Integration name: Enter a name for your integration. It cannot be changed later because the Spacelift webhook endpoint is generated based on this name.
- Integration type: Default (all spaces) or Space-specific. Each Spacelift account can only support one default integration per VCS provider, which is available to all stacks and modules in the same Space as the integration.
Create an access token»
Assuming you don't already have an access token at the ready, navigate to your GitLab server (we'll just use gitlab.com) to create one from the Access Tokens section of your User Settings page:
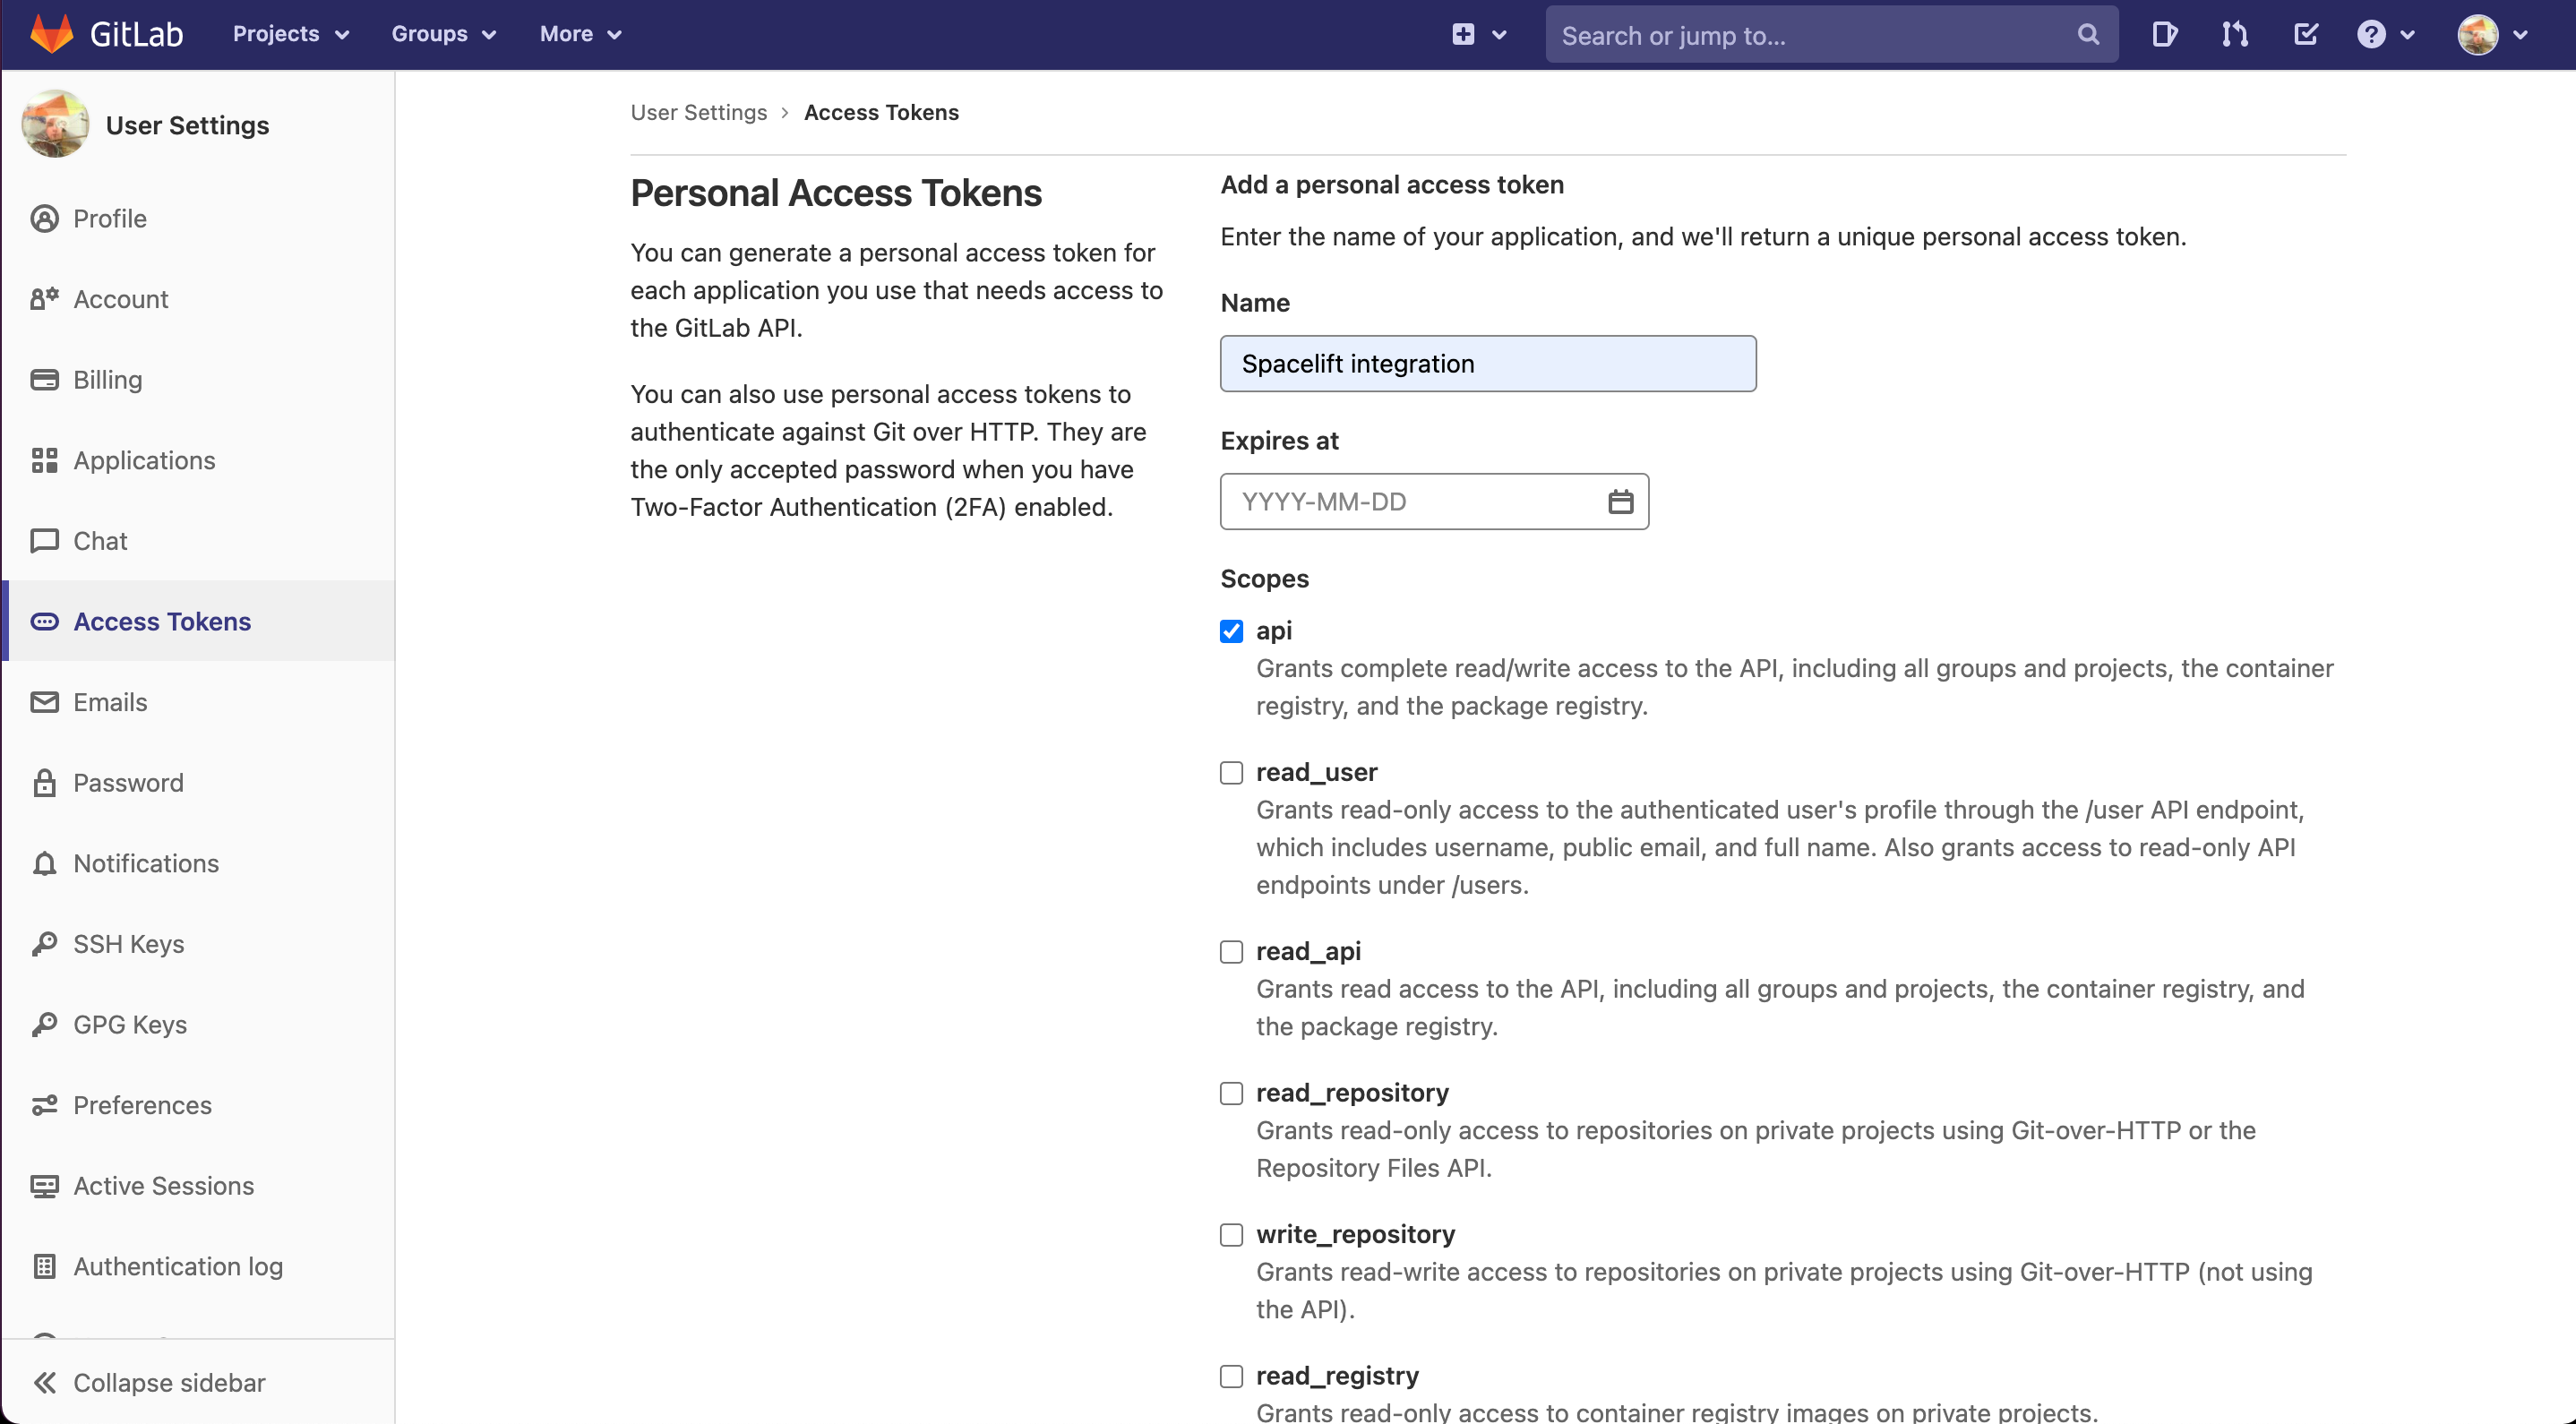
- Name: Enter a descriptive name for the token.
- Expires at: Set a date for the access token to expire, at which point it will need to be refreshed. If the token expires before being replaced, Spacelift won't be able to access your GitLab environment.
- Scopes: Check the
apibox. While Spacelift will only write commit statuses, merge request comments, and environment deployments, GitLab's permissions require us to take write access on everything. - Create the token and copy its details to finish the integration in Spacelift.
Required user access level
When creating tokens bound to a GitLab user, the user is required to have "Maintainer" level access to any projects you require Spacelift to access.
Copy details into Spacelift»
Now that your GitLab access token has been created, return to the integration configuration screen in Spacelift.
- API host URL: Enter the URL of your GitLab server. For SaaS GitLab, this is
https://gitlab.com. - User facing host URL: Enter the URL that will be shown to the user and displayed in the Spacelift UI. This will be the same as the API host URL unless you are using VCS Agents, in which case it should be
private://<vcs-agent-pool-name>. - API token: Enter the access token that Spacelift will use to access your GitLab.
- Labels: Organize integrations by assigning labels to them.
- Description: A markdown-formatted free-form text field to describe the integration.
- Use Git checkout: Toggle that defines if integration should use git checkout to download source code, otherwise source code will be downloaded as archive through API. This is required for sparse checkout to work.
- Click Set up to save your integration settings.
Warning
Unlike GitHub credentials (which are organization-specific), the GitLab integration uses personal credentials, which makes it more fragile in situations where an individual leaves the organization and deletes the access token. This is a general concern across your environment, not one specific to Spacelift.
We recommend you create "virtual" (machine) users in GitLab as a source of more stable credentials.
Set up webhooks»
For every GitLab project being used in Spacelift stacks or modules, you will need to set up a webhook to notify Spacelift about the project changes.
Note
Default integrations are visible to all users of the account, but only root Space admins can see their details.
Space-level integrations will be listed to users with read access to the integration Space. Integration details, however, contain sensitive information (such as the webhook secret) and are only visible to those with admin access.
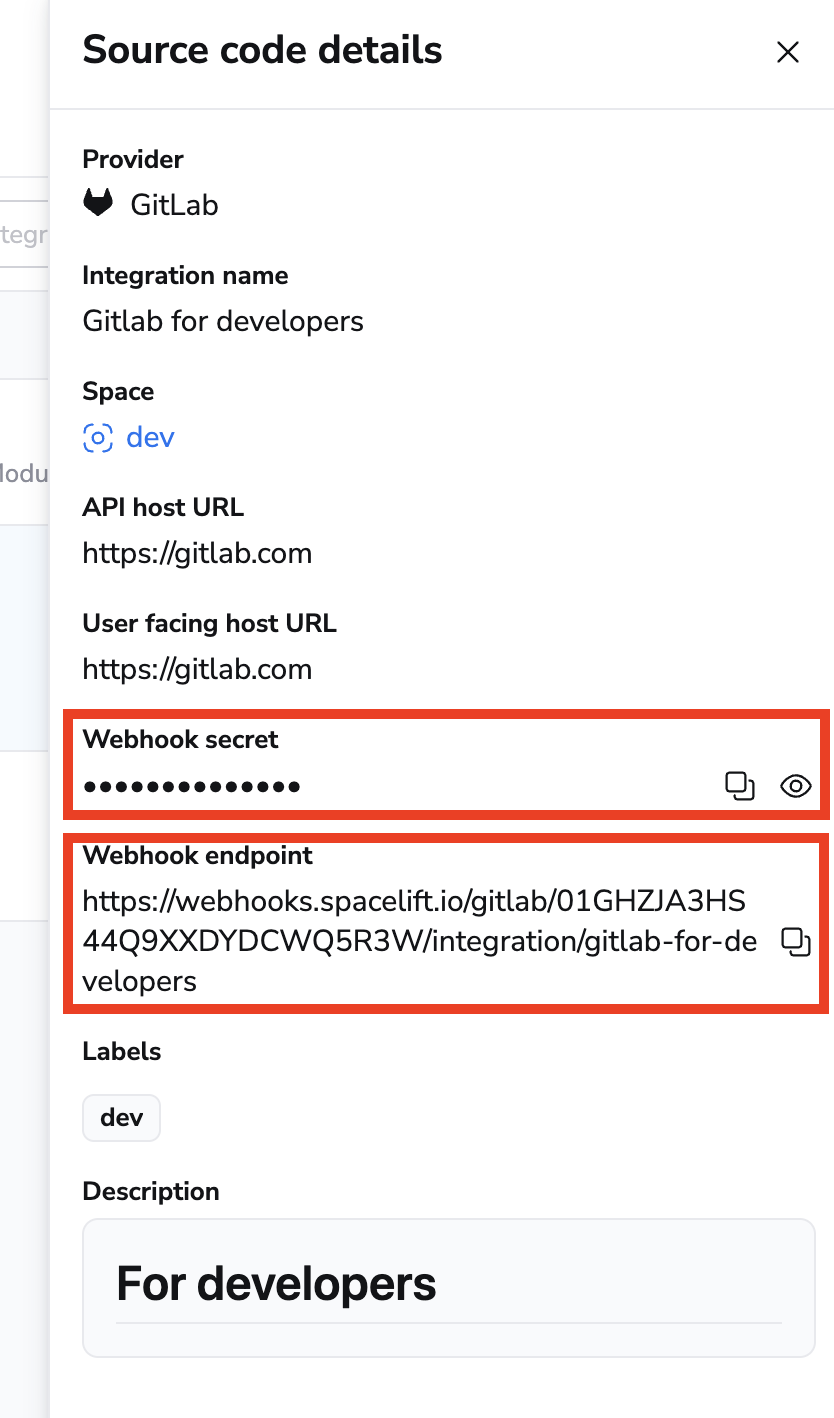
- On the Integrate Services > Discover all integrations page, click View on the GitLab card, then click the three dots next to the integration name.
- Click See details to find the webhook endpoint and webhook secret.
- In GitLab, navigate to Settings > Webhooks to create a new webhook.
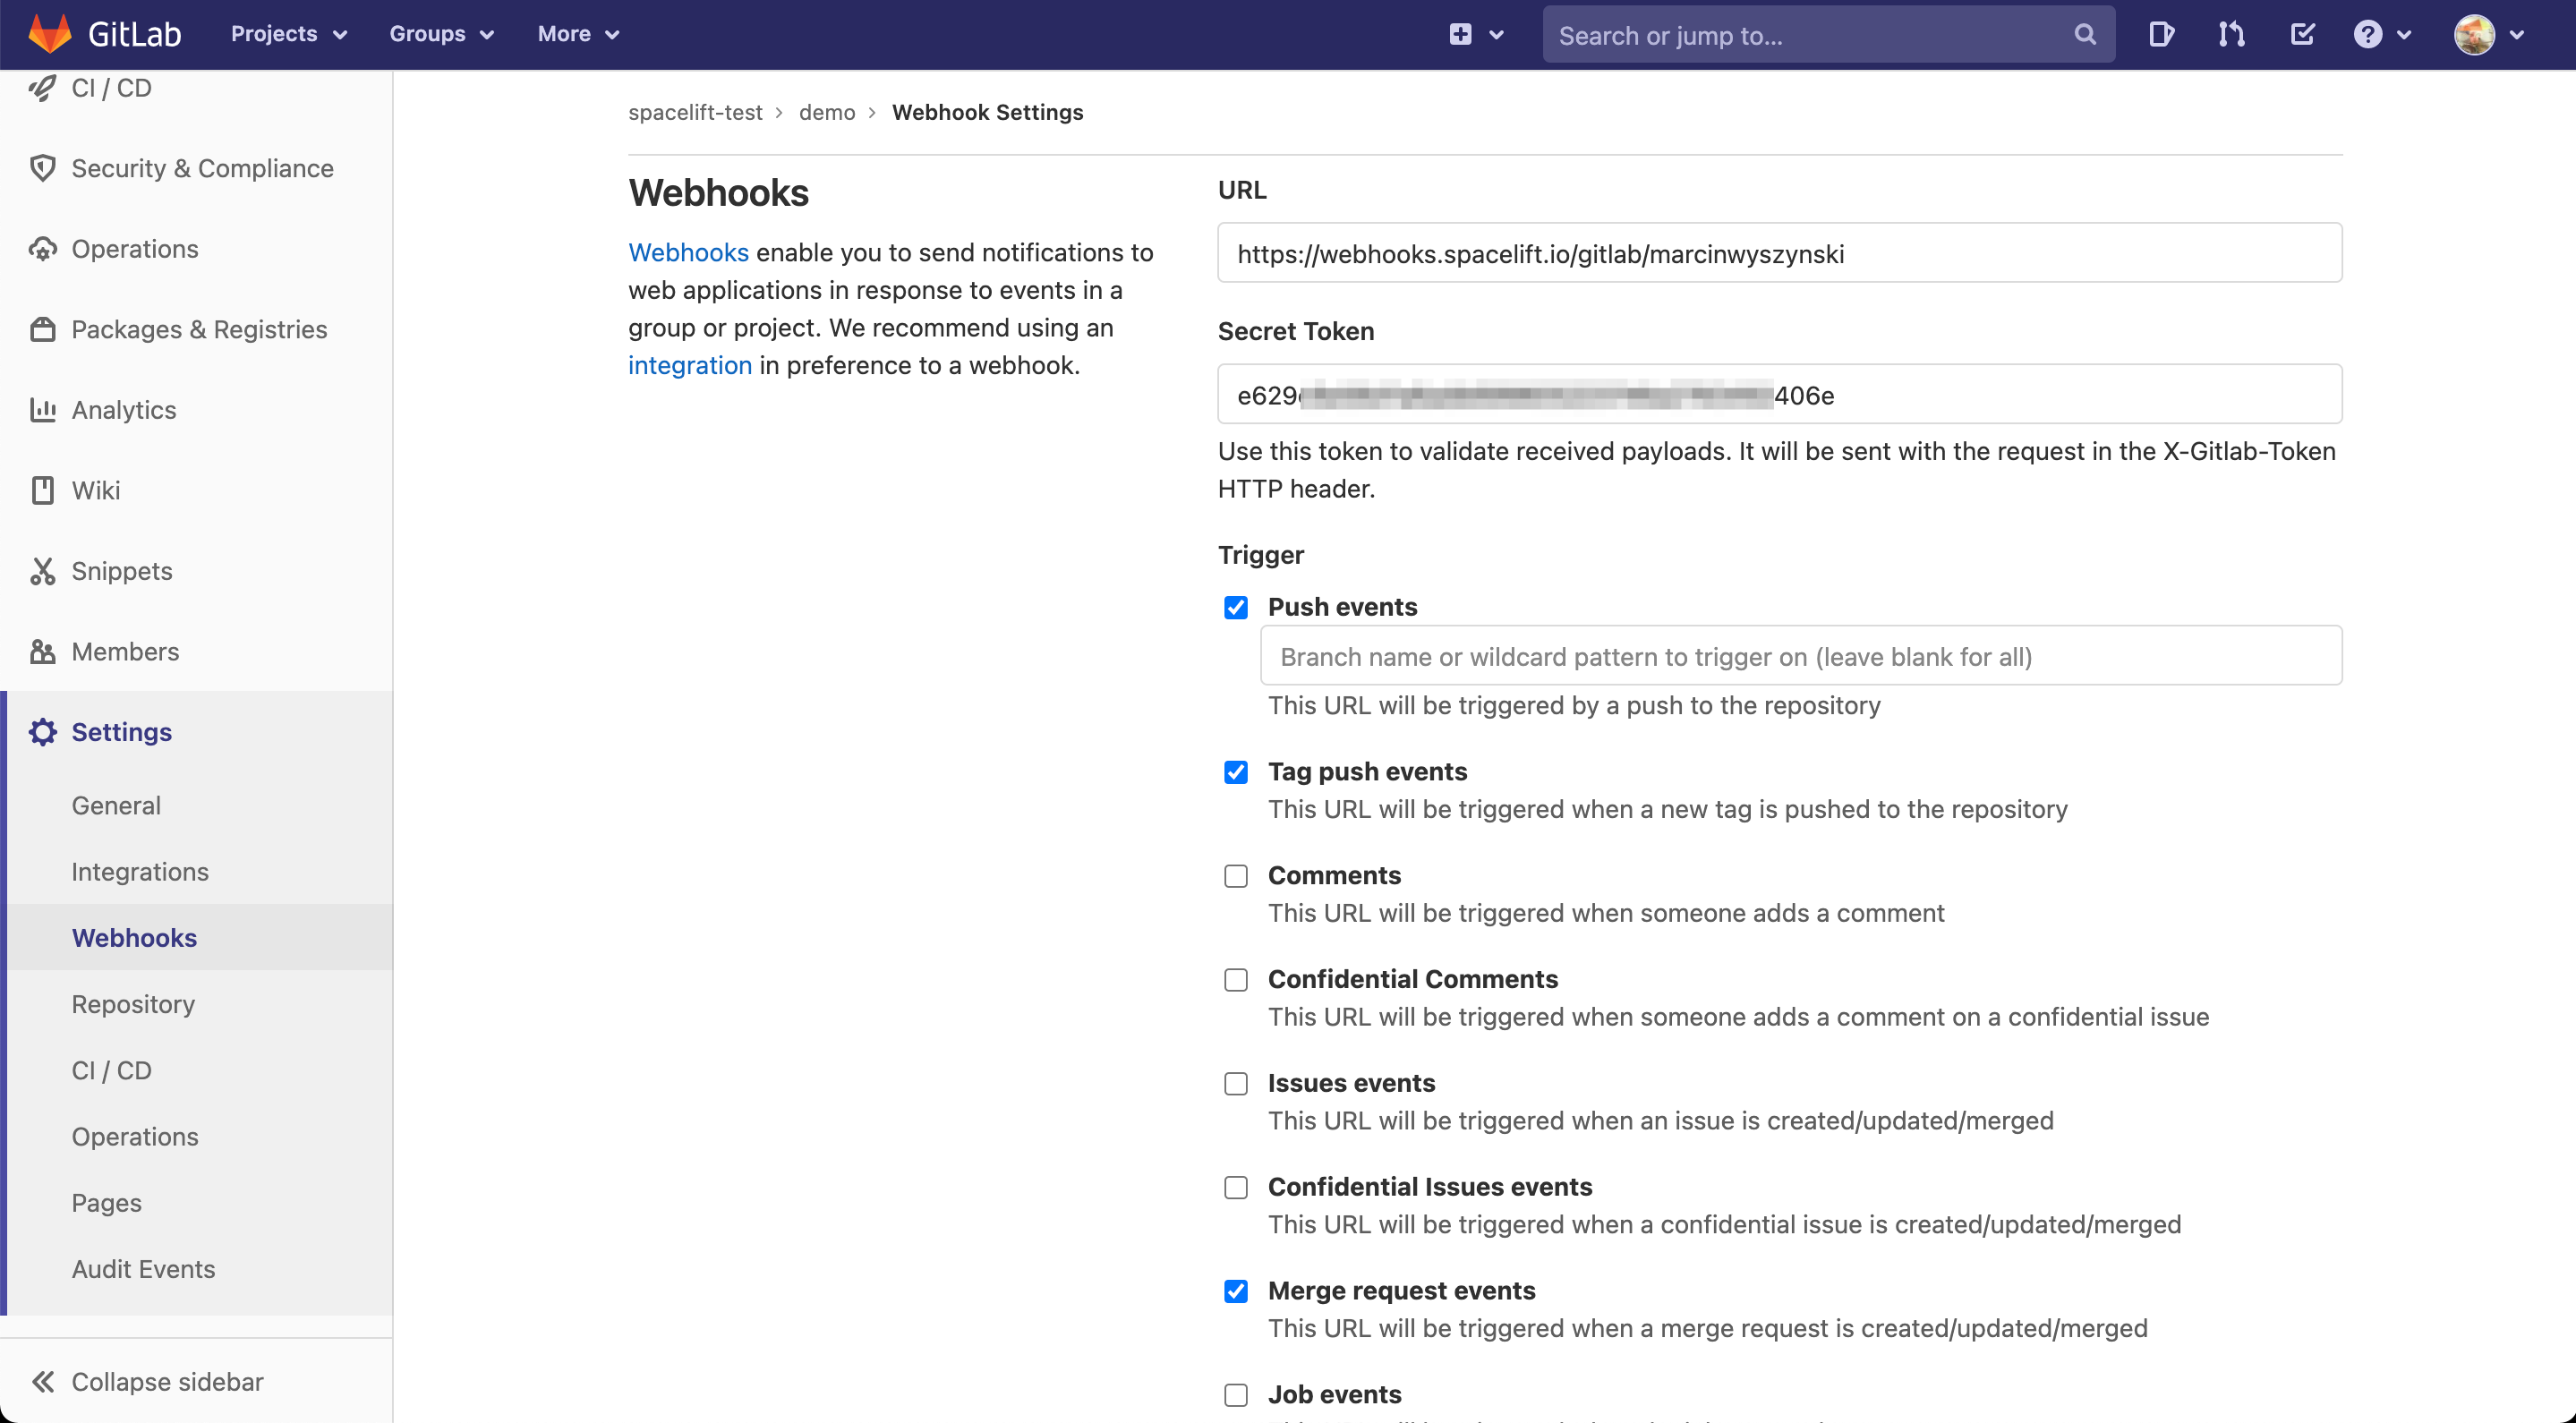
- URL: Enter the webhook endpoint from Spacelift.
- Secret Token: Enter the webhook secret from Spacelift.
- Trigger: Check the Push events, Tag push events, and Merge request events boxes.
- Complete the webhook setup in GitLab.
Warning
You only need to set up one hook for each repository used by Spacelift, regardless of how many stacks use it. Setting up multiple hooks for a single repo may lead to unintended behavior.
You can also set up GitLab webhooks automatically using GitLab's Terraform provider.
Regardless of whether you've created it manually or programmatically, once your project webhook is set up, your GitLab-powered stack or module is ready to use.
Use GitLab with stacks and modules»
If your Spacelift account is integrated with GitLab, the creation and editing forms for stacks and modules will display GitLab as a source code option:
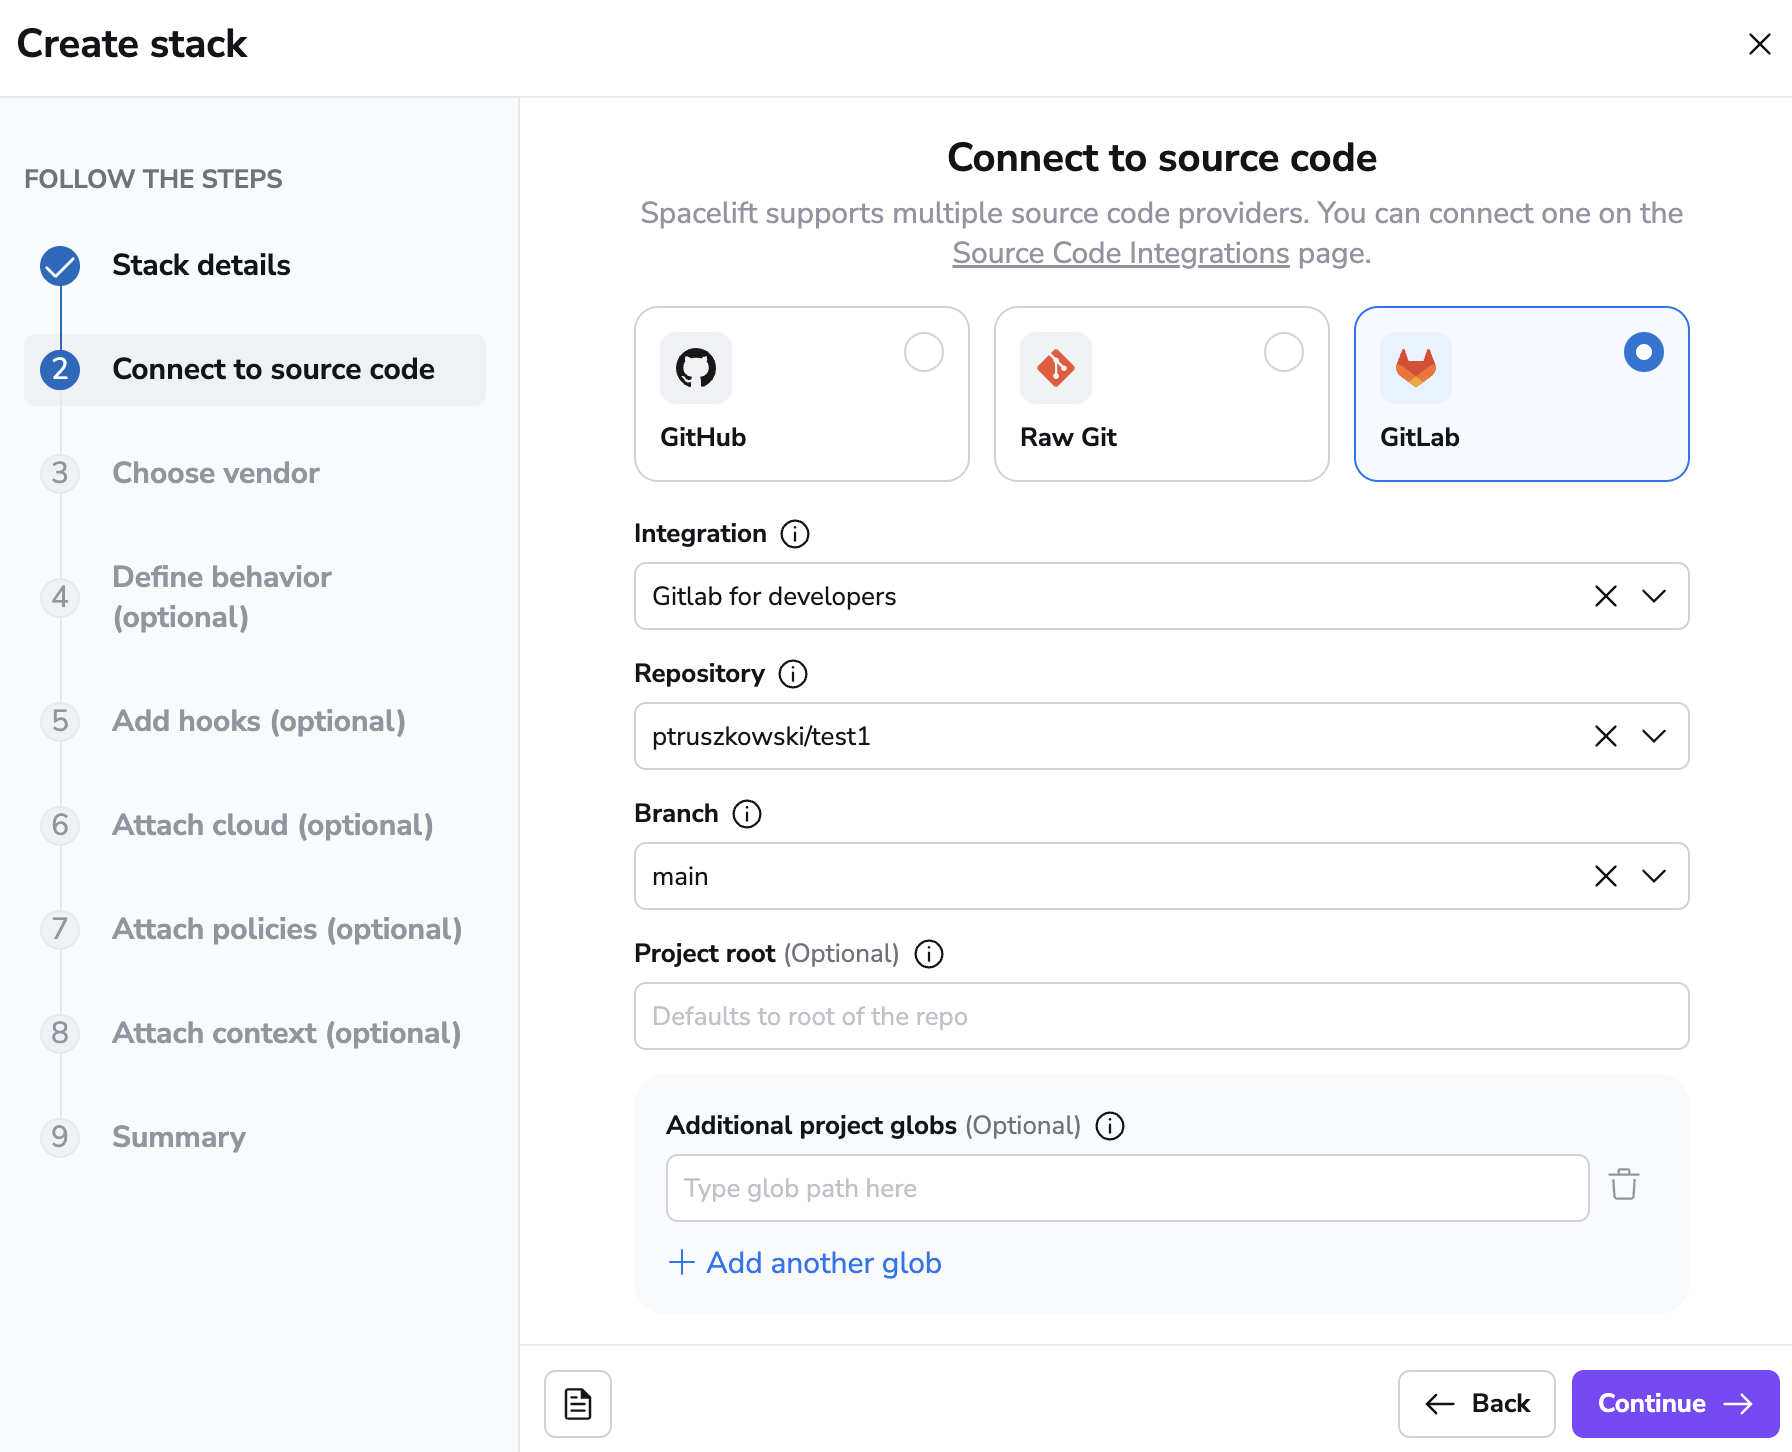
The rest of the process is exactly the same as with creating a GitHub-backed stack or module, so we won't be going into further details.
Namespaces»
When using the Terraform provider to provision Spacelift stacks for GitLab, you are required to specify a namespace.
The namespace value should be set to the group that your project (repository) is within. For example, if you are simply referencing a project (repository) within your GitLab account that is not within any group, then the namespace value should be set to your GitLab account username.
If your project lives within a group, then the namespace should be set to the project group's slug. For example, if you have project-a within group-1 the namespace would be group-1. When using subgroups, you will also need to include these within your namespace references.
GitLab provides a Namespaces API which you can use to find information about your project's namespace. Reference the full_url attribute value as this namespace for a given project.
Spacelift in GitLab»
Spacelift provides feedback to GitLab in a number of ways.
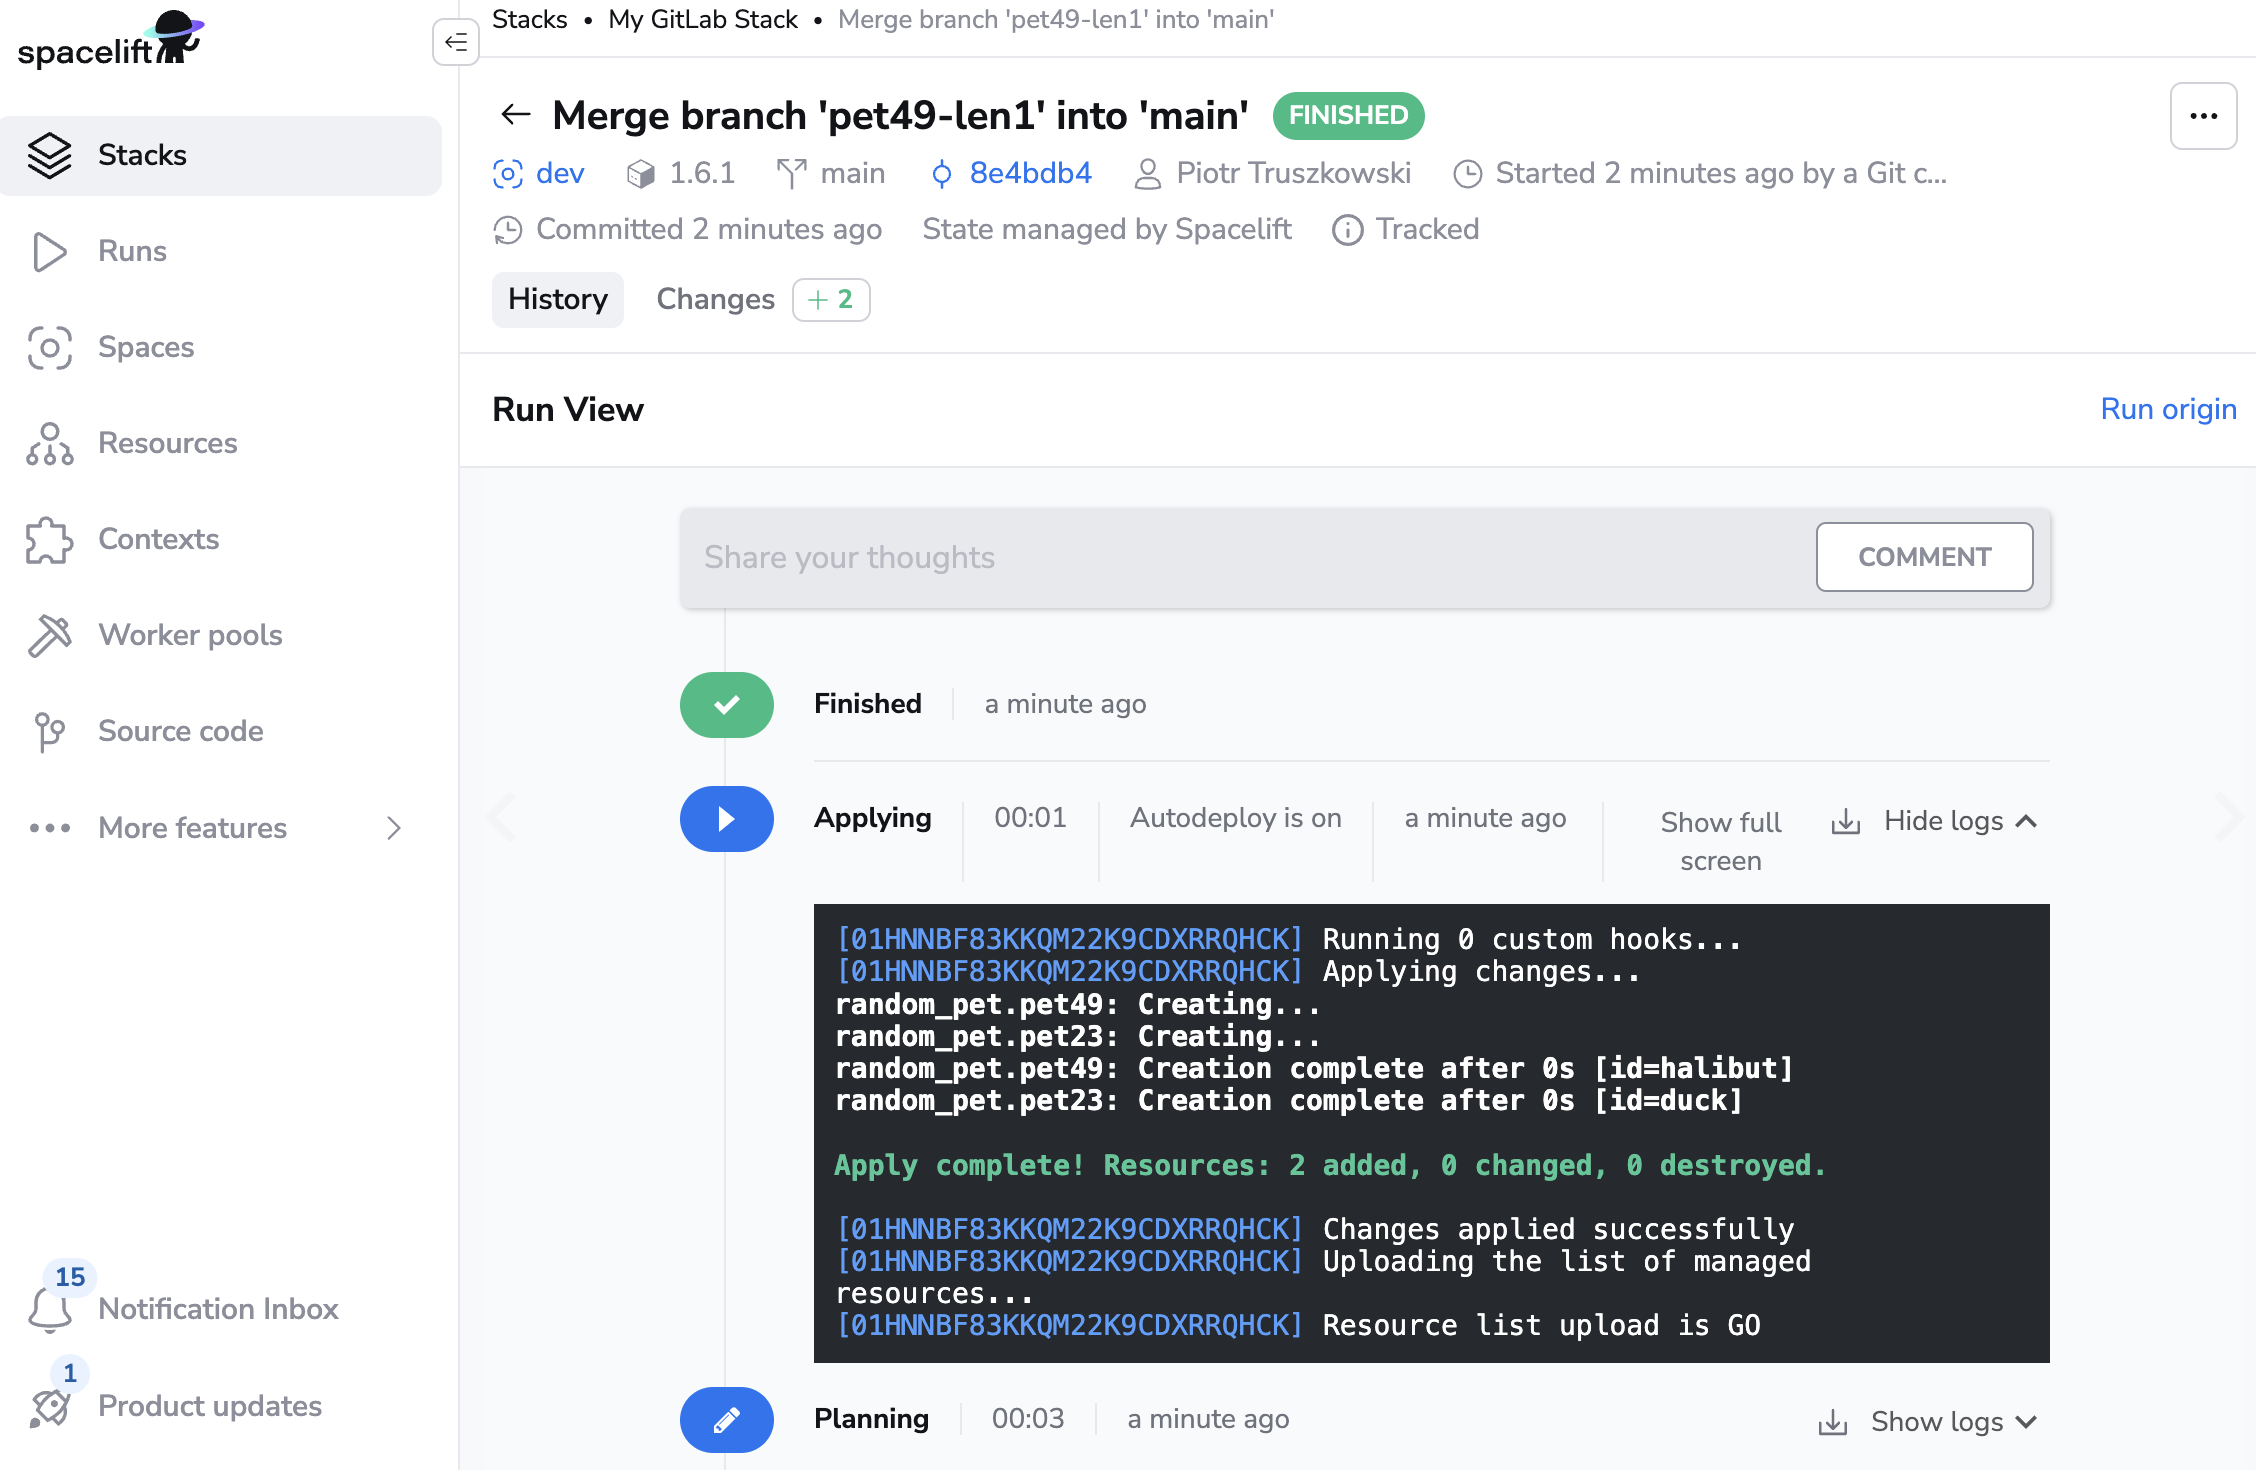
Commits and merge requests»
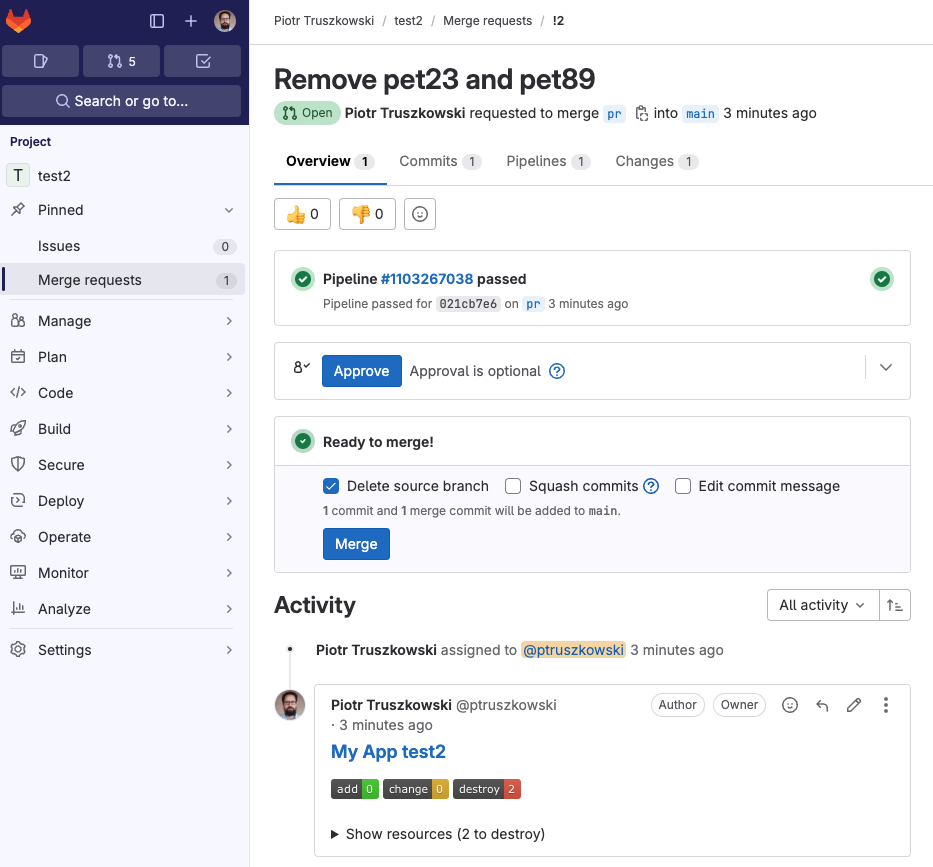
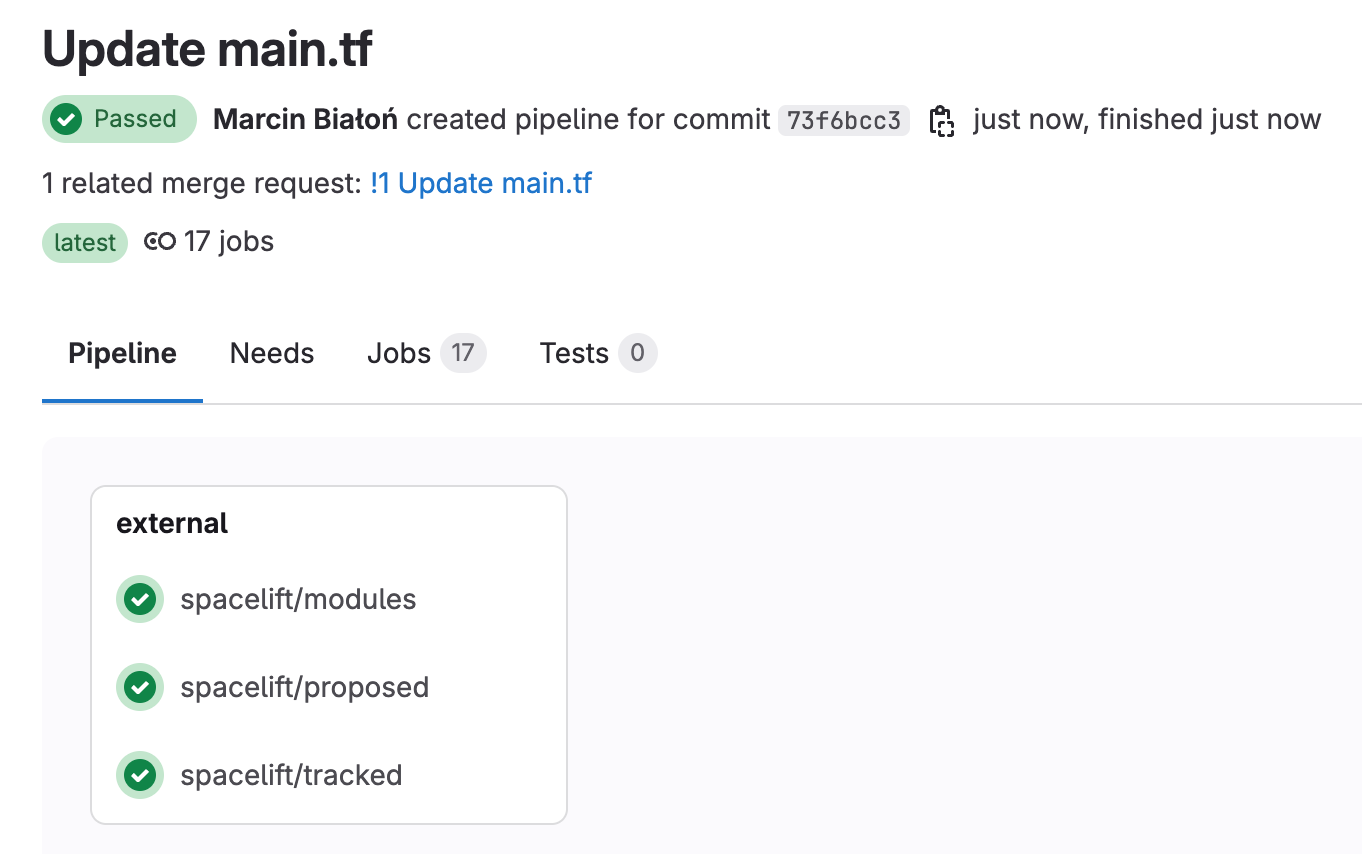
When a webhook containing a push or tag event is received by Spacelift, it may trigger a test run. Test runs provide feedback though GitLab's pipeline functionality. When viewed from a merge request, the pipeline looks like this:
Click through to a pipeline's dedicated view to see all the Spacelift jobs executed as part of it:
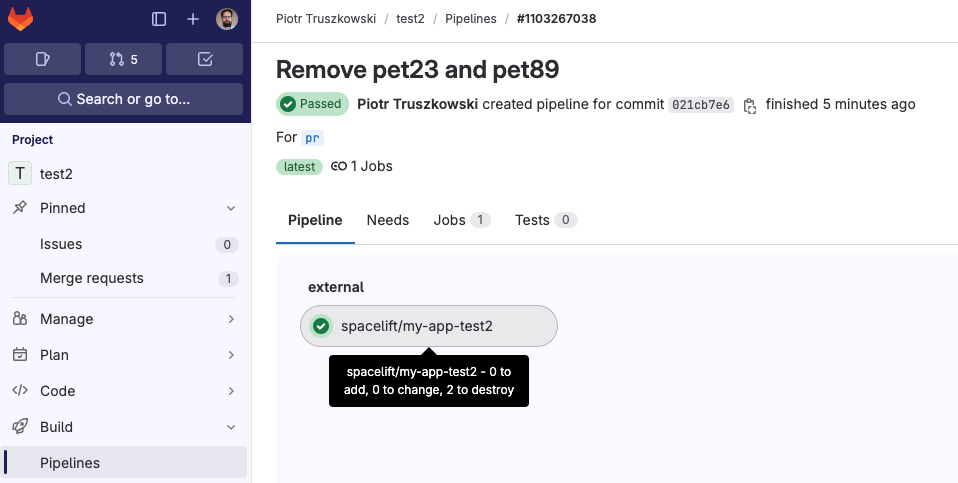
As you can see, the test job passed and gave some brief information about the proposed change that, if applied, would add a single resource.
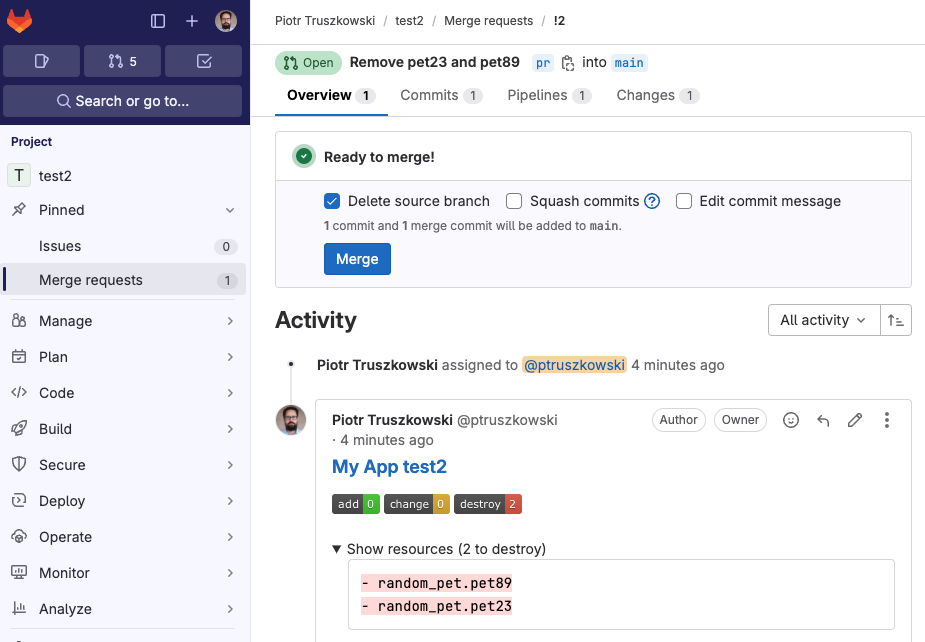
Also, for every merge request affected by the commit there will be a comment showing the exact change:
Use Spacelift checks to protect branches»
You can use commit statuses to protect your branches tracked by Spacelift stacks by ensuring that proposed runs succeed before merging their Merge Requests.
Aggregated checks»
Info
This feature is only available to Business plan and above. Please check out our pricing page for more information.
If you have multiple stacks tracking the same repository, you can enable the Aggregate VCS checks feature in the integration's settings. This will group all the checks from the same commit into a predefined set of checks, making it easier to see the overall status of the commit.
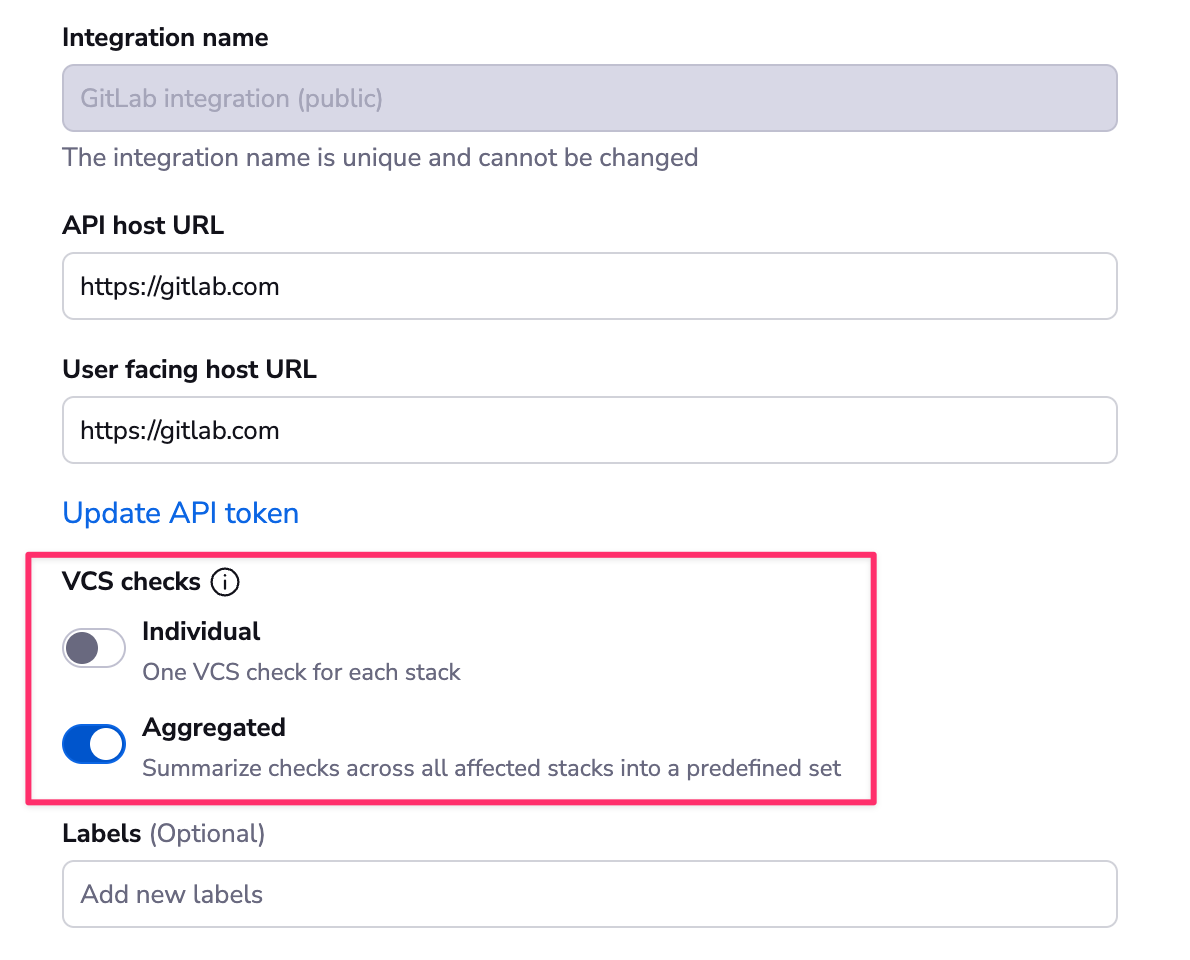
When the aggregated option is enabled, Spacelift will post the following checks:
- spacelift/tracked: Groups all checks from tracked runs
- spacelift/proposed: Groups all checks from proposed runs
- spacelift/modules: Groups all checks from module runs
The summary will look like this:
Environments»
Each Spacelift stack creates an Environment in GitLab where we report the status of each tracked run.
For example, this successful run is reflected in its respective GitLab environment:
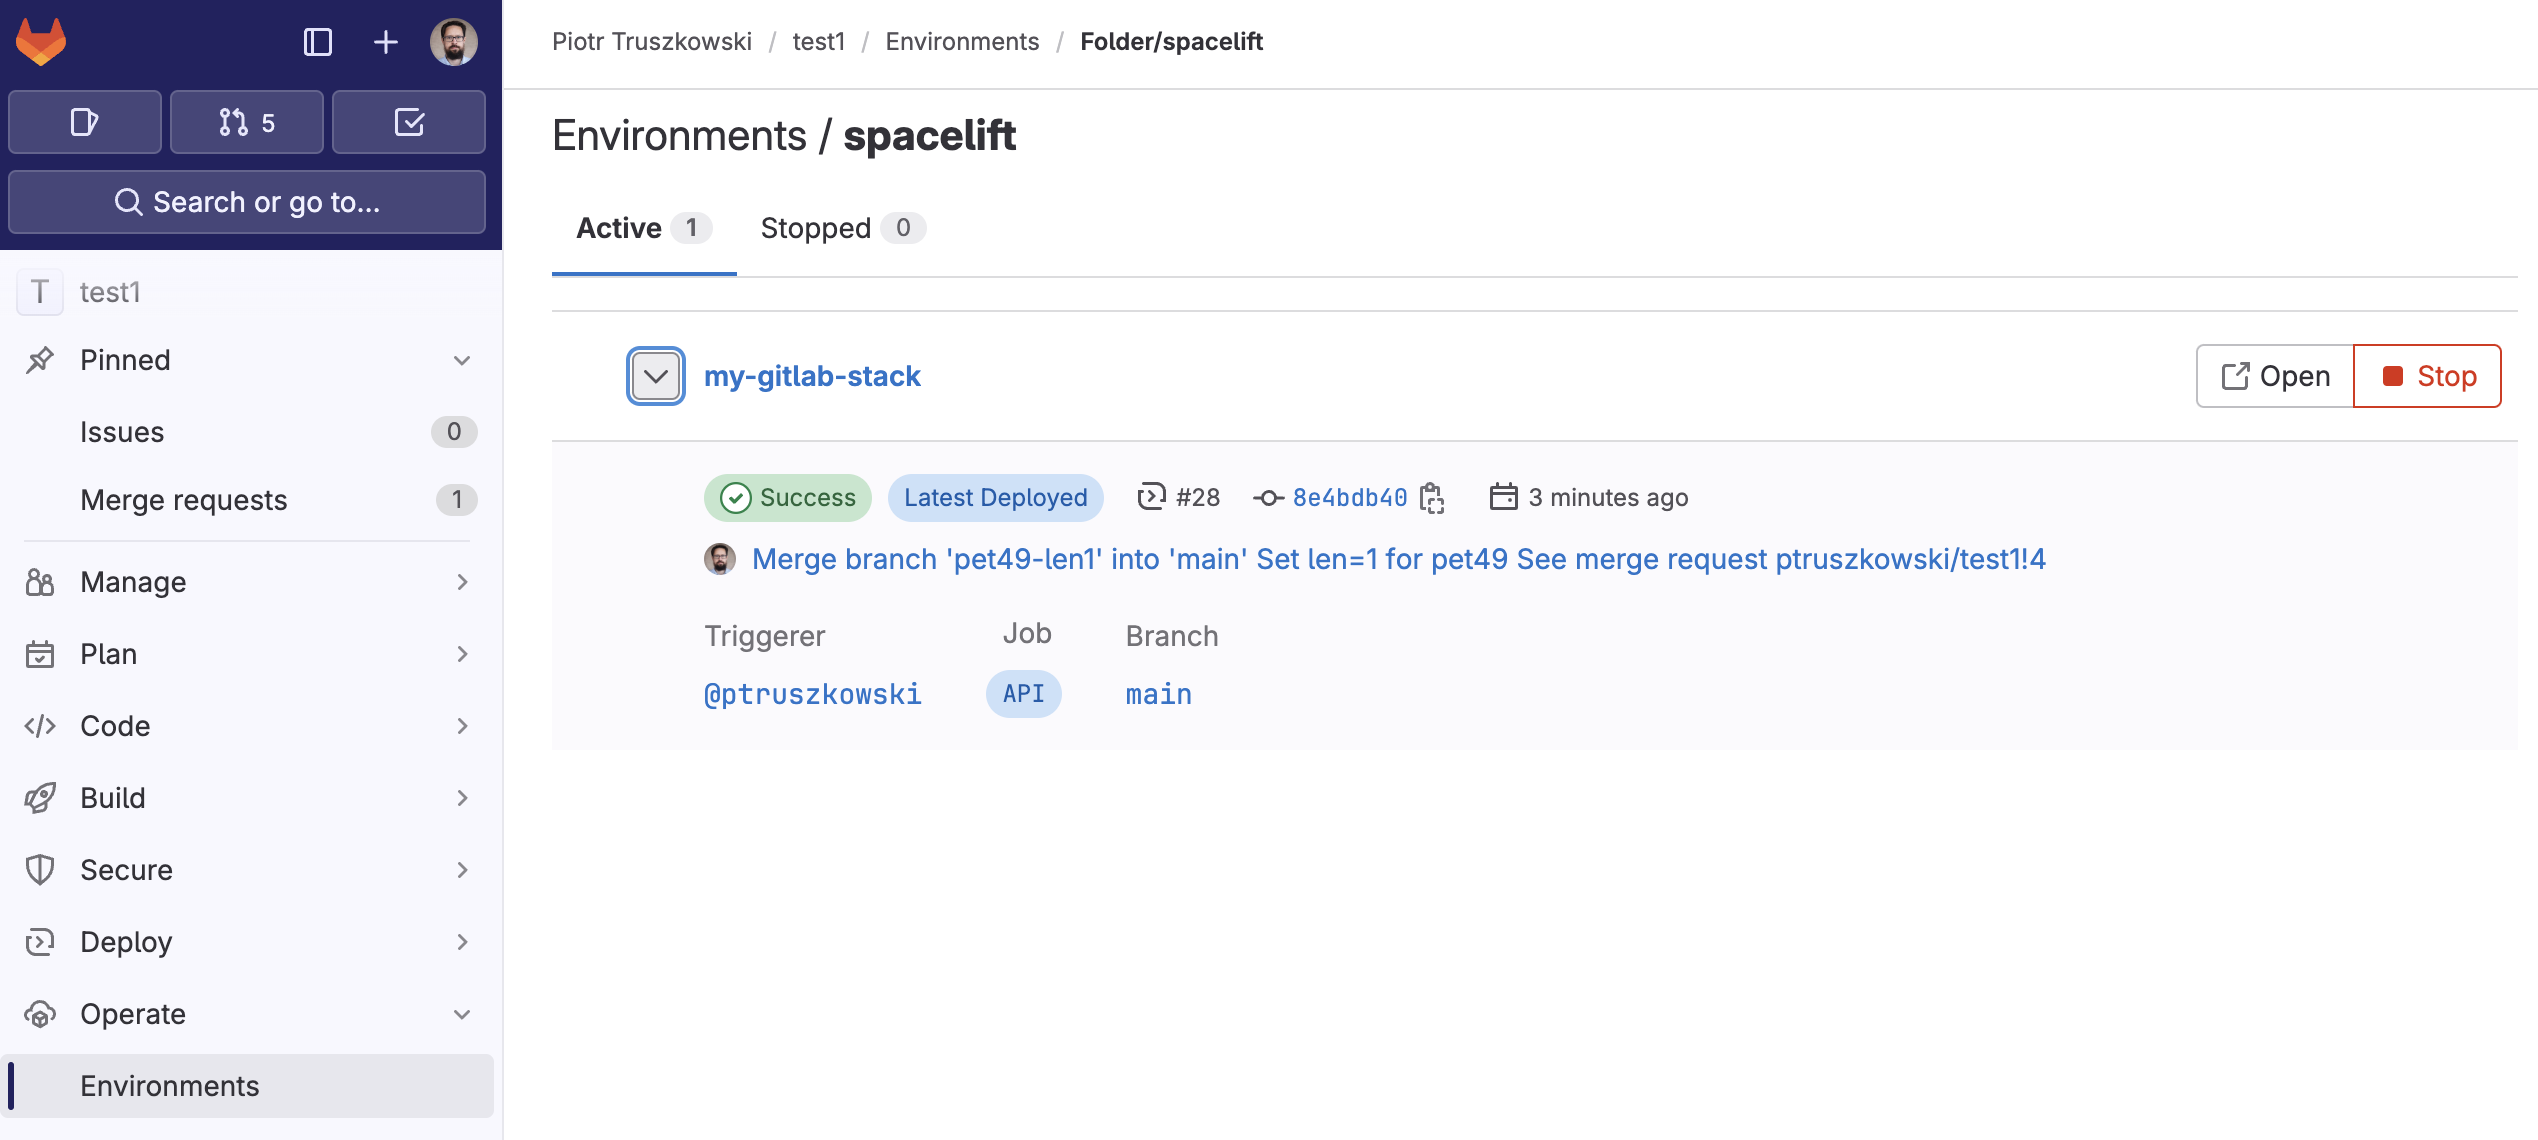
This functionality allows you to track Spacelift history directly from GitLab.
Delete the GitHub integration»
If you no longer need the integration, you can delete it by clicking the 3 dots next to the integration name on the Integrations > GitLab page, and then clicking Delete. You need admin access to the integration Space to be able to delete it.
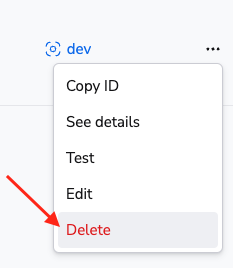
Warning
You can delete integrations while stacks are still using them, which will have consequences.
Consequences»
When a stack has a detached integration, it will no longer be able to receive webhooks from GitLab and you won't be able to trigger runs manually either.
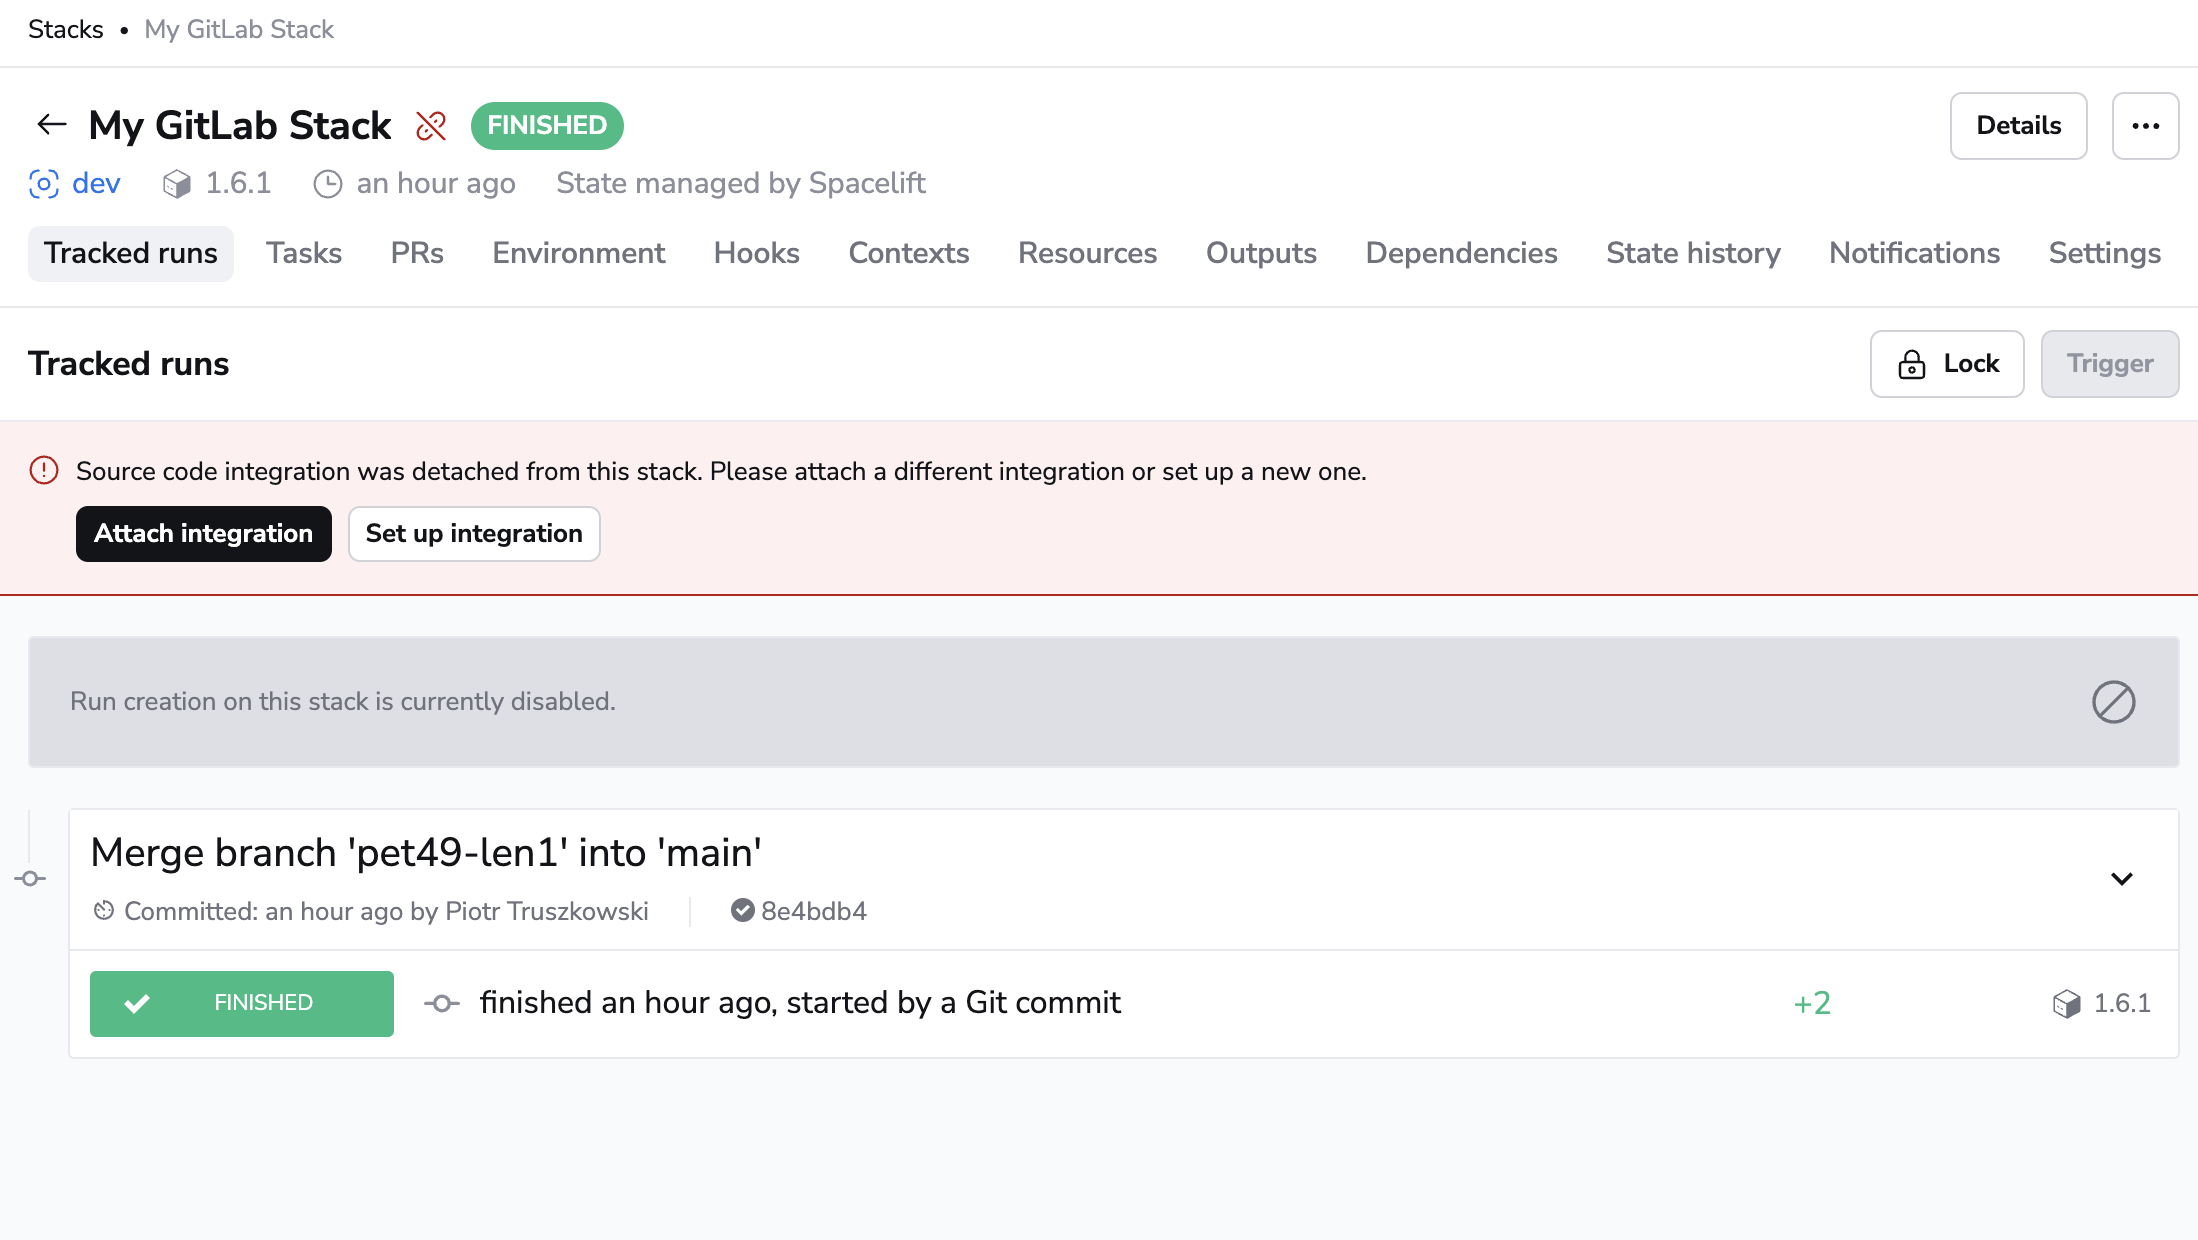
To fix the issue, click the stack name on the Stacks tab, navigate to the Settings tab, and choose a new integration.
Tip
You can save a little time if you create the new integration with the exact same name as the old one. This way, the webhook URL will remain the same and you won't have to update it in GitLab. You will still need to update the webhook secret though.