Amazon Web Services (AWS)»
The AWS integration allows Spacelift runs or tasks to automatically assume an IAM role in your AWS account, and in the process, generate a set of temporary credentials. These credentials are then exposed as computed environment variables during the run/task that takes place on the Spacelift stack where the integration is attached.
AWS_ACCESS_KEY_IDAWS_SECRET_ACCESS_KEYAWS_SECURITY_TOKENAWS_SESSION_TOKEN
These temporary credentials are enough for both the AWS Terraform provider and the Amazon S3 state backend to generate a fully authenticated AWS session without further configuration.
To use the AWS integration, you need to set it up and attach it to any stacks that need it.
Spacelift UI setup»
See Integrate Spacelift with Amazon Web Services to configure your AWS IAM role, trust policy, and the integration within Spacelift.
Programmatic setup»
You can also use the Spacelift Terraform provider in order to create an AWS Cloud integration from a stack with Space admin role attachment, including the trust relationship. Note that in order to do that, your stack will require AWS credentials itself, and ones powerful enough to be able to deal with IAM.
Here's an example of what it might look like to create an AWS cloud integration programmatically:
1 2 3 4 5 6 7 8 9 10 11 12 13 14 15 16 17 18 19 20 21 22 23 24 25 26 27 28 29 30 31 32 33 34 35 36 37 38 39 40 41 42 43 44 45 46 47 48 49 50 51 52 53 54 55 56 | |
Info
Please always refer to the provider documentation for the most up-to-date documentation.
Attach a role to multiple stacks»
The previous example explained how to use the spacelift_aws_integration_attachment_external_id data-source to generate the assume role policy for using the integration with a single stack, but what if you want to attach the integration to multiple stacks? The simplest option would be to create multiple instances of the data-source (one for each stack) but you can also use a Terraform for_each condition to reduce the amount of code required:
1 2 3 4 5 6 7 8 9 10 11 12 13 14 15 16 17 18 19 20 21 22 23 24 25 26 27 28 29 30 31 32 33 34 35 36 37 38 39 40 41 42 43 44 45 46 47 48 49 | |
This will generate a trust relationship that looks something like this:
1 2 3 4 5 6 7 8 9 10 11 12 13 14 15 16 17 18 19 20 21 | |
Info
Make sure to replace:
spacelifterwith your actual Spacelift account name.<principal>based on your environment:- for spacelift.io, use
324880187172. - for us.spacelift.io, use
577638371743.
- for spacelift.io, use
Auto-attach integrations»
AWS integrations can now be auto-attached to stacks and modules. To do so, include a label in your integration following this format autoattach:<your_label>. Then select the Enable auto-attach toggle and click Set up.
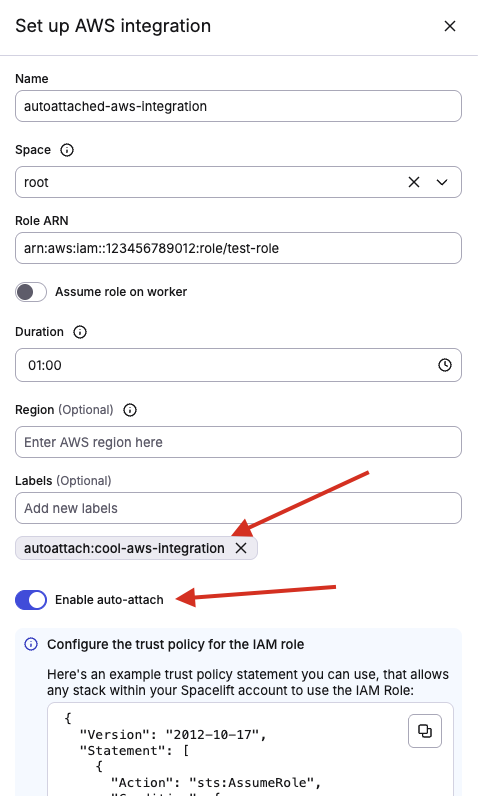
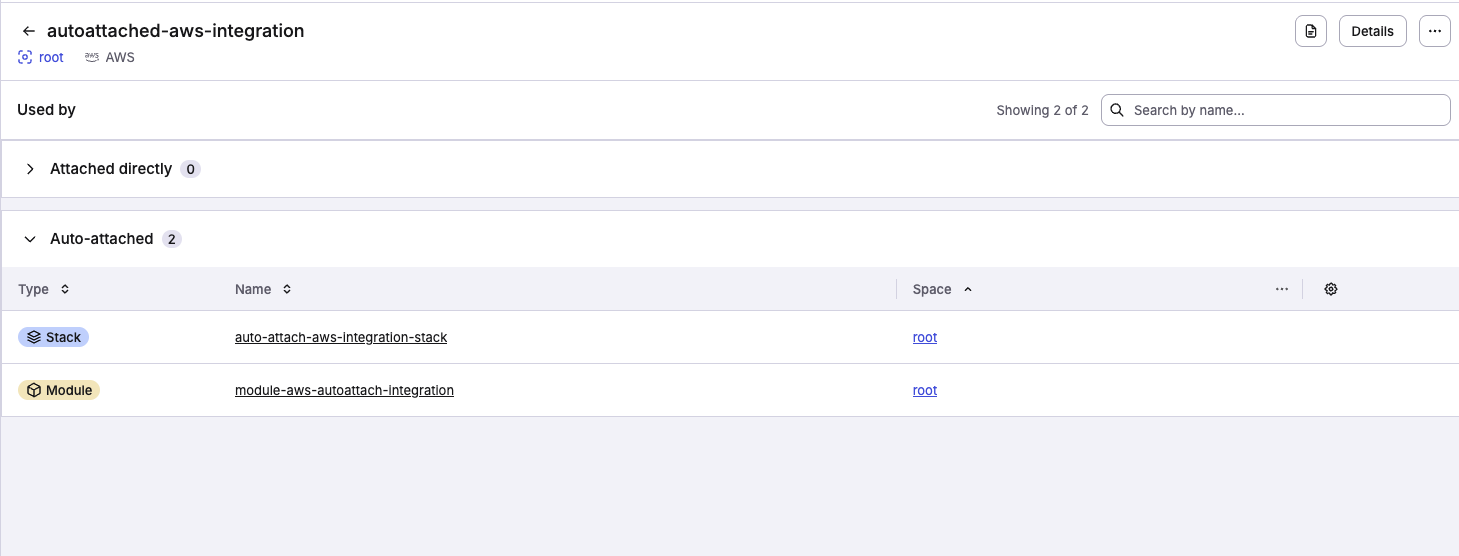
You will immediately see the stacks and modules that already have your label in the Auto-attached section. To auto-attach your new integration to another stack or module, simply add <your_label> to it and we will attach the integration for you. This follows the same behavior as other auto-attachable resources.
Info
You have to enable auto-attach on each integration individually to prevent clashes with previous labels in your account.
Session tagging»
You can enable session tagging to have Spacelift attach run and stack metadata as tags when assuming your IAM role. These tags show up in CloudTrail logs, providing additional context for auditing.
When session tagging is enabled, Spacelift sets the following tags on the assumed role session:
| Tag key | Value |
|---|---|
run |
The ULID of the run |
stack |
The slug of the stack |
space |
The slug of the space the stack belongs to |
To use session tagging, enable the Enable tag session option when creating or editing your AWS integration. Your IAM role's trust policy will need to include both sts:AssumeRole and sts:TagSession permissions as separate statements:
1 2 3 4 5 6 7 8 9 10 11 12 13 14 15 16 17 18 19 20 21 22 23 24 | |
Are my credentials safe?»
Assuming roles and generating credentials on private worker is perfectly safe. Those credentials are never leaked to us in any shape or form.
As for the trust relationship established between the Spacelift account and your AWS account for the purpose of dynamically generating short-lived credentials, this is considered much safer than storing static credentials in your stack environment. Unlike user keys that you'd normally have to use, role credentials are dynamically created and short-lived. We use the default expiration which is 1 hour, and do not store them anywhere. Leaking them accidentally through the logs is not an option either because we mask AWS credentials.
The most tangible safety feature of the AWS integration is the breadcrumb trail it leaves in CloudTrail. Every resource change can be mapped to an individual Terraform run or task whose ID automatically becomes the username as the sts:AssumeRole API call with that ID as RoleSessionName. In conjunction with AWS tools like Config, it can be a very powerful compliance tool.
Let's have a look at a CloudTrail event showing an IAM role being created by what seems to be a Spacelift run:

01DSJ63P40BAZY4VW8BXXG7M4K is a run ID we can then trace back even further.
Roles assuming other roles»
The AWS Terraform provider allows you to assume an IAM role during setup, effectively doing the same thing over again. This approach is especially useful if you want to control resources in multiple AWS accounts from a single Spacelift stack. This is totally fine; in IAM, roles can assume other roles, though you need to set up the trust relationship between the role you have Spacelift assume and the role for each provider instance to assume.
One thing you want to watch is the guaranteed ability to map the change to a particular run or task that we described in the previous section. One way of fixing this would be to use the TF_VAR_spacelift_run_id computed environment variable available to each Spacelift workflow. It's already a Terraform variable, so you can set it up like this:
1 2 3 4 5 6 7 8 9 10 11 12 13 14 15 16 | |