GraphQL API»
GraphQL»
GraphQL is a query language for APIs and a runtime for fulfilling those queries with your existing data. GraphQL:
- Provides a complete and understandable description of the data in your API.
- Gives clients the power to ask for exactly what they need and nothing more.
- Makes it easier to evolve APIs over time.
- Enables powerful developer tools.
Spacelift provides a GraphQL API for you to control your Spacelift account programmatically and/or through an API Client if you choose to do so. A smaller subset of this API is also used by the Spacelift Terraform provider, as well as the Spacelift CLI (spacectl). The API can be accessed at the /graphql endpoint of your account using POST HTTPS method.
Quick start with AI coding assistants
The fastest way to build applications against our API is using a coding assistant with our MCP server. You don't need to learn the GraphQL API because the assistant discovers it automatically. See API development with MCP for setup instructions.
Example request and response»
1 2 3 4 5 | |
The request body looks like this when formatted a bit nicer:
1 2 3 4 5 6 7 8 9 | |
And the response looks like this:
1 2 3 4 5 6 7 8 9 10 11 12 13 14 15 16 17 18 | |
What tool should I use?»
Our recommendation is to use our Bruno collection, which covers the whole API with ready-to-send requests, and to authenticate with a Spacelift API key. You do not need to write any GraphQL or handle tokens yourself.
If you would rather build your own request library, any GraphQL client will do, such as Insomnia, Postman or GraphiQL. In that case you will need to write each query yourself and handle token refresh.
Bruno collection»
The fastest way to work with the Spacelift API is our Bruno collection. It covers the whole API, with requests grouped into folders by resource type: stacks, runs, policies, contexts, spaces, worker pools and so on. Every request is ready to send, and its Docs pane explains what the request does and which other request lists the IDs it needs.

The collection handles authentication for you. Once you have filled in your endpoint and API key, it obtains a JWT token on the first request and refreshes it before it expires, so you never need to run an authentication request yourself.
Set up the collection»
- Install the Bruno desktop app or the Bruno VS Code extension. Bruno is free and open source.
- Create a secret-based API key and make a note of its ID and secret. OIDC-based keys will not work here, as they have no secret for you to configure.
-
Get the collection. Click the Fetch in Bruno button above, choose Open In Bruno, and pick where to keep the clone. Bruno then lists the collections it found in the repository, so select Spacelift and open it. You get a git checkout, so you can run
git pulllater to receive new requests.There are two alternatives to the button:
- Import from inside Bruno. Open Import Collection from the + menu in the sidebar, pick the Git Repository tab, and clone
https://github.com/spacelift-io/spacelift-api-bruno.git. - Clone it yourself. Run
git clone https://github.com/spacelift-io/spacelift-api-bruno.git, then click Open Collection in Bruno and select theSpacelift/folder.
The button and the in-app import are both desktop-only, and both call
git, so it must be installed and on yourPATH. The VS Code extension has no clone option, so use the second alternative there. - Import from inside Bruno. Open Import Collection from the + menu in the sidebar, pick the Git Repository tab, and clone
-
Configure the environment. The collection ships with an environment called
my-account, already selected in the environment dropdown. Open it (gear icon, then Environments, then my-account) and fill in the three values on its Secrets tab:Variable Description SPACELIFT_ENDPOINTYour account's GraphQL endpoint, for example https://my-account.app.spacelift.io/graphqlSPACELIFT_API_KEY_IDThe ID of your API key, a 26-character ULID SPACELIFT_API_KEY_SECRETThe secret of your API key, found in the file downloaded when you created it -
Open any request and send it.
All three are secret variables. Bruno keeps their values in its own encrypted store and writes only their names into the collection files, so your credentials are never committed to git. Filling in the environment also leaves every tracked file unchanged, which means that git pull will not conflict with your setup.
Tip
If you work with more than one Spacelift account, duplicate the my-account environment and name each copy after an account. Only my-account is tracked in git, so the copies stay local.
Destructive requests»
Requests that delete, revoke, reset or yank something do not carry an ID. Instead, they prompt you for one when you send them, so you cannot destroy anything by opening a request and sending it. Cancel the prompt and nothing is sent. Bruno's collection runner and CLI skip these requests, because neither can display the prompt.
Some operations cannot be protected this way, either because they name nothing to delete or because they overwrite values that cannot be recovered. These live in the Danger Zone folder, and they only run if the CONFIRM_DESTRUCTIVE environment variable is set to the exact name of the request you are sending. Read that folder's Docs pane before using any of them.
View the GraphQL schema»
If you are using the Bruno collection, you rarely need the raw schema, because every request has a Docs pane describing what it does and which IDs it needs.
Our GraphQL schema is self-documenting, so you can also read it directly in a dedicated GraphQL client such as GraphiQL or Insomnia, or through a static documentation website generator like GraphDoc. Point the client at your account's /graphql endpoint and provide a valid JWT bearer token, as described in Authenticating with the GraphQL API.
Authenticating with the GraphQL API»
If your Spacelift account were called example, you could access your GraphQL by sending POST requests to: https://example.app.spacelift.io/graphql.
All requests need to be authenticated using a JWT bearer token. There are currently three ways of obtaining this token:
- Spacelift API Key: For long-term use (recommended).
- SpaceCTL CLI: For temporary use.
- Personal GitHub Token
Spacelift API key»
You can generate the JWT token with a Spacelift API key, ideal for long-term use. Spacelift supports creating and managing machine users with programmatic access to the Spacelift GraphQL API. These "machine users" are called API Keys and can be created by Spacelift admins through the Settings panel.
There are two types of API keys: more traditional, secret-based keys, and keys based on OIDC identity federation. Both types support an optional expiration date, after which the key can no longer be used to obtain a token.
API key billing
API keys are virtual users and are billed like regular users, too. Thus, each API key used (exchanged for a token) during any given billing cycle counts against the total number of users.
Secret-based API keys»
Secret-based keys exchange an API key ID and secret for a JWT token, identical to how IAM user keys work. They're more flexible, but less secure because they involve static credentials. Here is how to create a secret-based API key in the Spacelift UI:
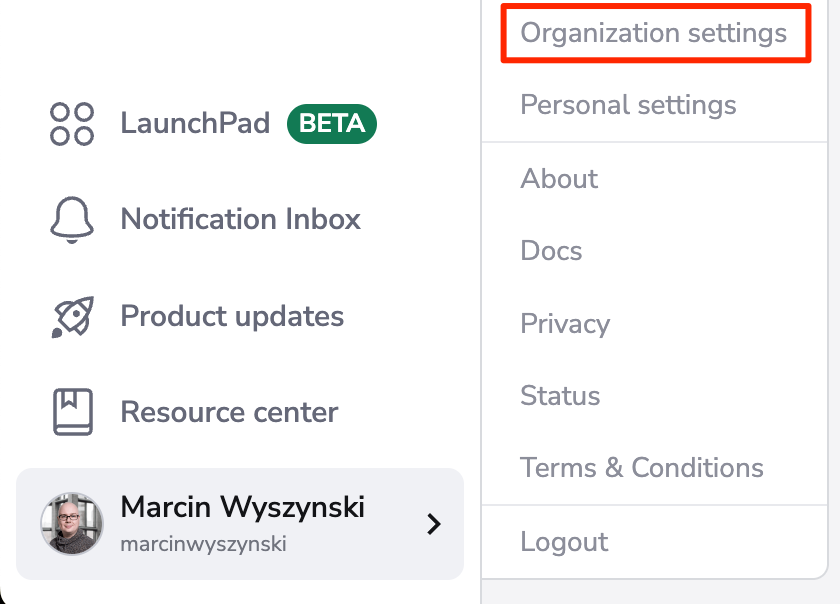
- In the lower right hand corner menu, click your account name and select Organization settings.
- In the Access section, click API keys, then Create API key.

- Fill in the details for your API key:
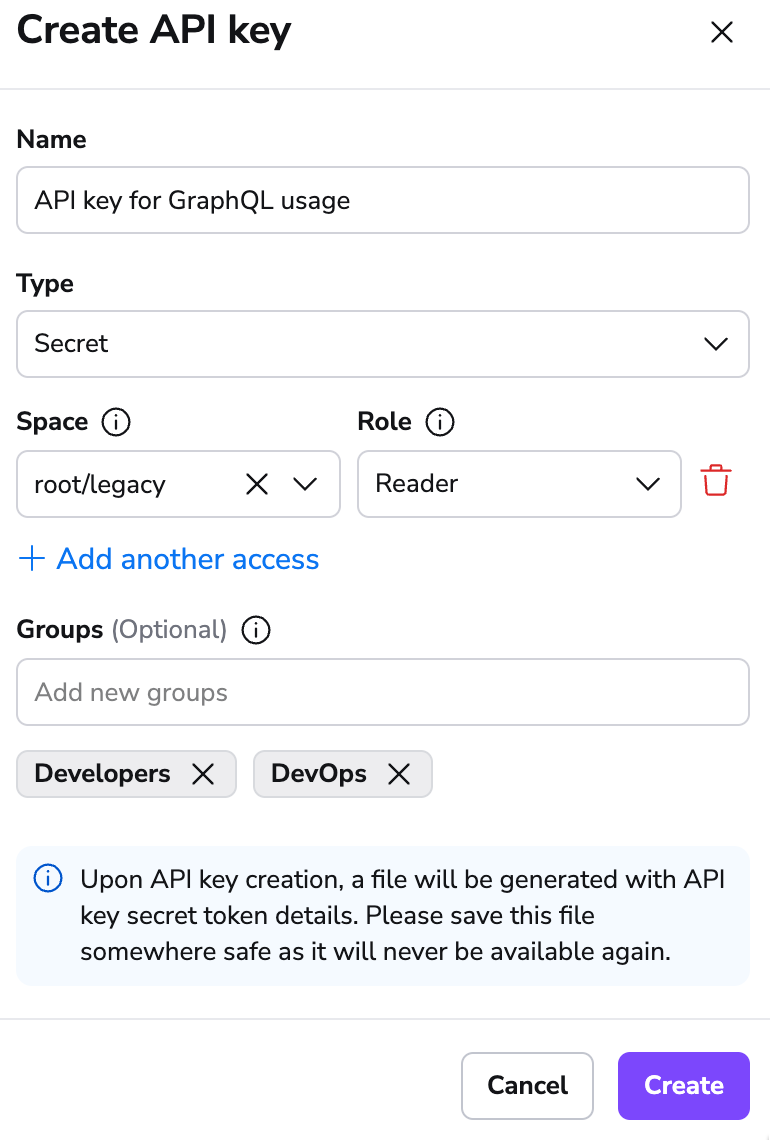
- Name: An arbitrary key name. We recommend you choose something memorable, ideally reflecting the purpose of the key.
- Type: Select Secret.
- Space: Select the spaces the key should have access to, along with access level (reader vs writer). If you are using login policies, you will need to define the API key in the policy for non-admin keys.
- Groups: Enter the group(s) the key should belong to. Groups give the API key a virtual group membership for scenarios where you'd prefer to control access to resources on group/team level rather than individual level.
-
Click Create. The API key will be generated in a file and automatically downloaded to your device.
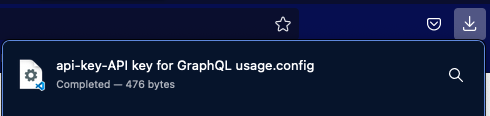
- The file contains the API token in two forms: one to be used with our API, and the other as a
.terraformrcsnippet to access your private modules outside of Spacelift.
- The file contains the API token in two forms: one to be used with our API, and the other as a
Note
Giving "admin" permissions on the "root" space makes the key administrative.
The config file looks something like this:
1 2 3 4 5 6 7 8 9 10 11 12 13 14 15 16 17 18 19 20 21 | |
Warning
Make sure you save this data somewhere on your end. Spacelift doesn't store the token, and it cannot be retrieved or recreated afterwards.
For programmatic access, exchange the key ID and secret pair for an API token using a GraphQL mutation:
1 2 3 4 5 | |
Once you obtain the token, you can use it to authenticate your requests to the Spacelift API.
OIDC-based API keys»
Info
This feature is only available on our Enterprise plan. Please check out our pricing page for more information.
OIDC-based API keys are a more secure alternative to secret-based API keys. They're based on the OpenID Connect protocol and are more secure because they don't involve static credentials. They're also more flexible because they can be used to authenticate with Spacelift using any OIDC identity provider.
- In the lower right hand corner menu, click your account name and select Organization settings.
- In the Access section, click API keys, then Create API key.
- Fill in the details for your API key:
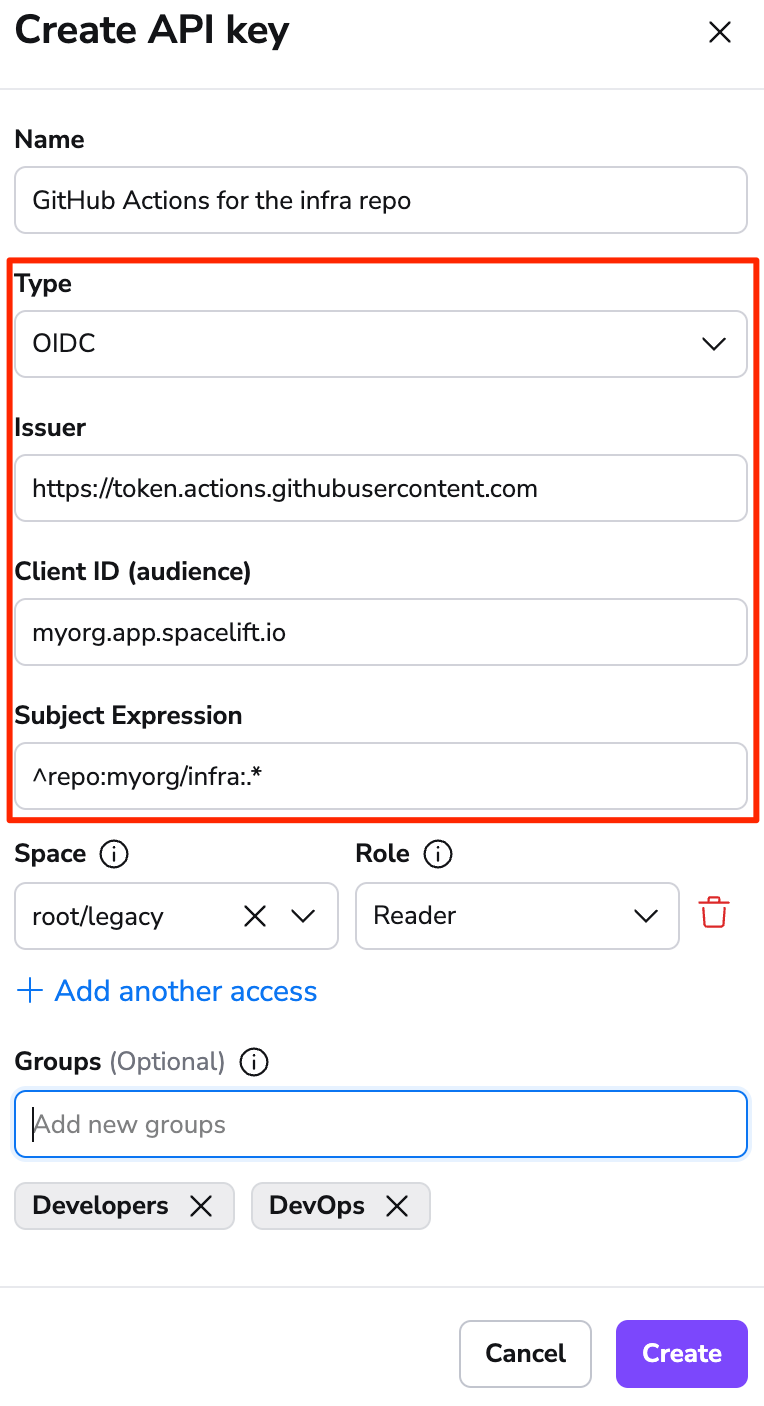
- Name: An arbitrary key name. We recommend you choose something memorable, ideally reflecting the purpose of the key.
- Type: Select OIDC.
- Issuer: The URL your OIDC provider reports as the token issuer in the
issclaim of your JWT token. For GitHub Actions, this ishttps://token.actions.githubusercontent.com. - Client ID (audience): The client ID of the OIDC application you created in the identity provider, in the
audclaim of your JWT token. Some identity providers allow this to be customized. - Subject Expression: A regular expression that must match the entire
subclaim of your JWT token. Use this to restrict API key access to a specific source. Because the match is anchored to the whole subject, a partial match is not enough —repo:my-org/my-repowill not accept a subject likerepo:my-org/my-repo-exploit. To allow a variable suffix, end the expression with.*(for example,^repo:my-org/.*). - Space: Select the spaces the key should have access to, along with access level (reader vs writer). If you are using login policies, you will need to define the API key in the policy for non-admin keys.
- Groups: Enter the group(s) the key should belong to. Groups give the API key a virtual group membership for scenarios where you'd prefer to control access to resources on group/team level rather than individual level.
- Click Create. The API key will be generated in a file and automatically downloaded to your device.
Warning
Make sure you save the data in your API key file somewhere on your end. Spacelift doesn't store the token, and it cannot be retrieved or recreated afterwards.
Claim mappings for dynamic teams»
By default, team membership on OIDC API keys is statically configured via the Groups field. Claim mappings let you instead extract teams dynamically from the OIDC token at authentication time, using the same mechanism as SSO OIDC claim mappings. You map IdP claim names to the Spacelift groups claim, and the mapped values populate session.teams for login policies.
You need to explicitly define every claim you want Spacelift to read - even the standard groups claim is not mapped automatically. If no claim mappings are set, static groups are used as before.
To configure claim mappings via Terraform, use the claim_mappings attribute inside the oidc block:
1 2 3 4 5 6 7 8 9 10 11 12 13 | |
In this example, the IdP's teams claim is mapped to the Spacelift groups claim, which populates session.teams in login policies.
Auditing the acting identity»
OIDC API keys are typically shared across many callers (CI jobs, Backstage users, etc.), so session.login resolves to the API key identifier rather than the human or workflow behind the token. To audit or authorize on the acting identity, use session.idp_subject in your login policy - it carries the raw sub claim from the JWT that was exchanged for the Spacelift token.
Here is a sample workflow using the key we just created and spacectl in GitHub Actions, without the need for any static credentials:
1 2 3 4 5 6 7 8 9 10 11 12 13 14 15 16 17 18 19 20 21 22 23 24 25 26 27 28 29 30 31 | |
Long-running workflows
The GitHub OIDC token is short-lived - GitHub issues it with roughly a 5-minute expiry. The sample above is fine because spacectl exchanges it for a Spacelift session token straight away. But if your job runs longer than a few minutes, every new spacectl process re-presents that same OIDC token, and once it expires those calls start failing.
For longer jobs, exchange the OIDC token once for a Spacelift session token (valid up to around 10 hours) and reuse it for the rest of the workflow through SPACELIFT_API_TOKEN. spacectl prefers a ready token and won't re-exchange it, so nothing is tied to the OIDC token's short lifetime:
1 2 3 4 5 6 7 8 9 10 11 12 13 14 15 16 17 18 19 20 21 22 23 24 25 26 27 28 29 30 31 32 33 34 35 36 37 38 | |
For programmatic access, exchange the key ID and secret pair for an API token using a GraphQL mutation:
1 2 3 4 5 | |
Once you obtain the token, you can use it to authenticate your requests to the Spacelift API.
Note
OIDC-based API keys do not provide special access to OpenTofu/Terraform modules. They are only used to authenticate with the Spacelift API.
SpaceCTL CLI»
You can generate the JWT token using the Spacelift spacectl CLI. We consider this the easiest method, as the heavy lifting to obtain the token is done for you.
- Follow the instructions on the
spacectlGitHub repository to install the CLI on your machine. - Authenticate to your Spacelift account using
spacectl profile login. - Once authenticated, run
spacectl profile export-tokento receive the bearer token needed for future GraphQL queries/mutations.
Personal GitHub token»
Info
This option is only available to accounts using GitHub as their identity provider. If you have enabled any other Single Sign-On methods on your account, this method will not work and you will need to use the Spacelift API Key method instead.
- Using a GitHub Account that has access to your Spacelift account, create a GitHub Personal Access Token.
- Copy the value of the token to a secure location.
- Using your favorite API Client (e.g. Insomnia or GraphiQL), make a GraphQL POST request to your account's GraphQL endpoint (example below).
Request details»
POST to https://example.app.spacelift.io/graphql. Replace "example" with your Spacelift account name.
Query»
Pass in token as a query variable for this example. When making a GraphQL query with your favorite API Client, you should see a section called GraphQL variables where you can pass in an input.
1 2 3 4 5 | |
GraphQL variables input»
1 2 3 | |
This query should return your JWT bearer token, which you can use to authenticate other queries by using it as the bearer token in your requests. If you want to automatically access the API reliably, we suggest the Spacelift API Key approach, as Spacelift tokens expire after around 10 hours.