GitHub»
Spacelift is deeply integrated with GitHub, providing organizations a simple way to manage IaC versioned in GitHub.
You can set up multiple Space-level and one default GitHub integration per account.
Using multiple GitHub accounts
If you want to use multiple GitHub accounts or organizations, or connect Spacelift to your GitHub Enterprise instance, you will need to set up a custom GitHub integration via a GitHub App.
If you used GitHub to create your Spacelift account, the flow for also connecting GitHub as your VCS provider is slightly different. Select the option that applies to your account:
- Created Spacelift account with GitHub.
- Created Spacelift account with GitLab, Google, or Microsoft.
Signed in with GitHub»
- Install the Spacelift GitHub App from the GitHub Marketplace.
- Select the GitHub repository or repositories to manage in Spacelift.
- If you do not have a GitHub repository of this kind, you can fork our terraform-starter repository. Allow the installed GitHub app access to the forked repository.
Signed in with another option»
If you used GitLab, Google, or Microsoft to create your account, you will need to create a GitHub custom application to link it to Spacelift.
Create the GitHub application»
- On the Integrate Services > Discover all integrations screen, click View on the GitHub card, then Set up GitHub.
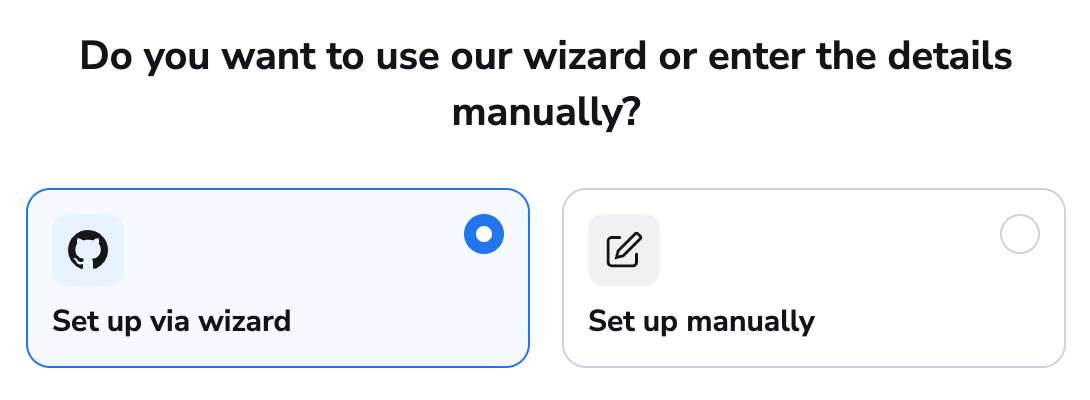
- Click Set up via wizard (recommended) or Set up manually.
Warning
Manual application setup is more prone to errors and should only be used if other methods will not work.
Set up via wizard»
- Select whether you're integrating with GitHub.com or a self-hosted installation, then click Continue.
- Select whether the GitHub integration should be owned by a personal or organization account, then click Continue.
- Click Continue to create the application on GitHub.com.
- Enter a name for your integration. This can be changed later.
- Click Create GitHub app. You will be redirected back to Spacelift.
- Fill in the additional information:
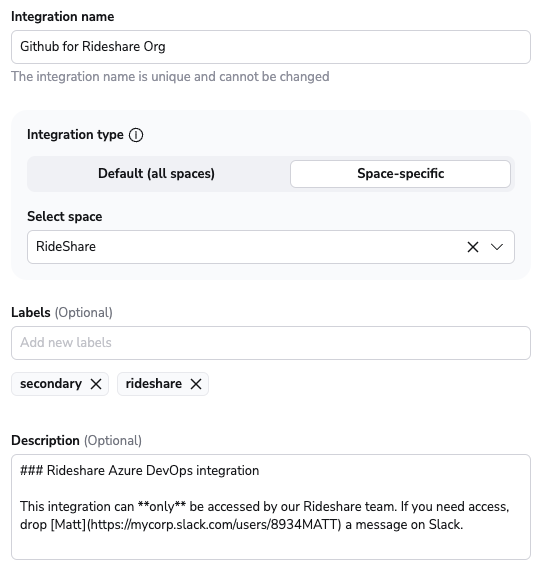
- Integration name: Must be unique, and cannot be changed after app creation because the Spacelift webhook endpoint is generated based on this name.
- Integration type: Default (all spaces) or Space-specific. Each Spacelift account can only support one default integration per VCS provider, which is available to all stacks and modules in the same Space as the integration.
- VCS checks: Individual checks (one per stack) or aggregated checks (summarized checks across all affected stacks).
- Labels: Organize integrations by assigning labels to them.
- Description: A markdown-formatted free-form text field to describe the integration.
- Use Git checkout: Toggle that defines if integration should use git checkout to download source code, otherwise source code will be downloaded as archive through API. This is required for sparse checkout to work.
- Click Set up. Once the application is created, you will automatically be redirected to install it in GitHub.
Set up manually»
After selecting the option to enter your details manually, you should see the following form:
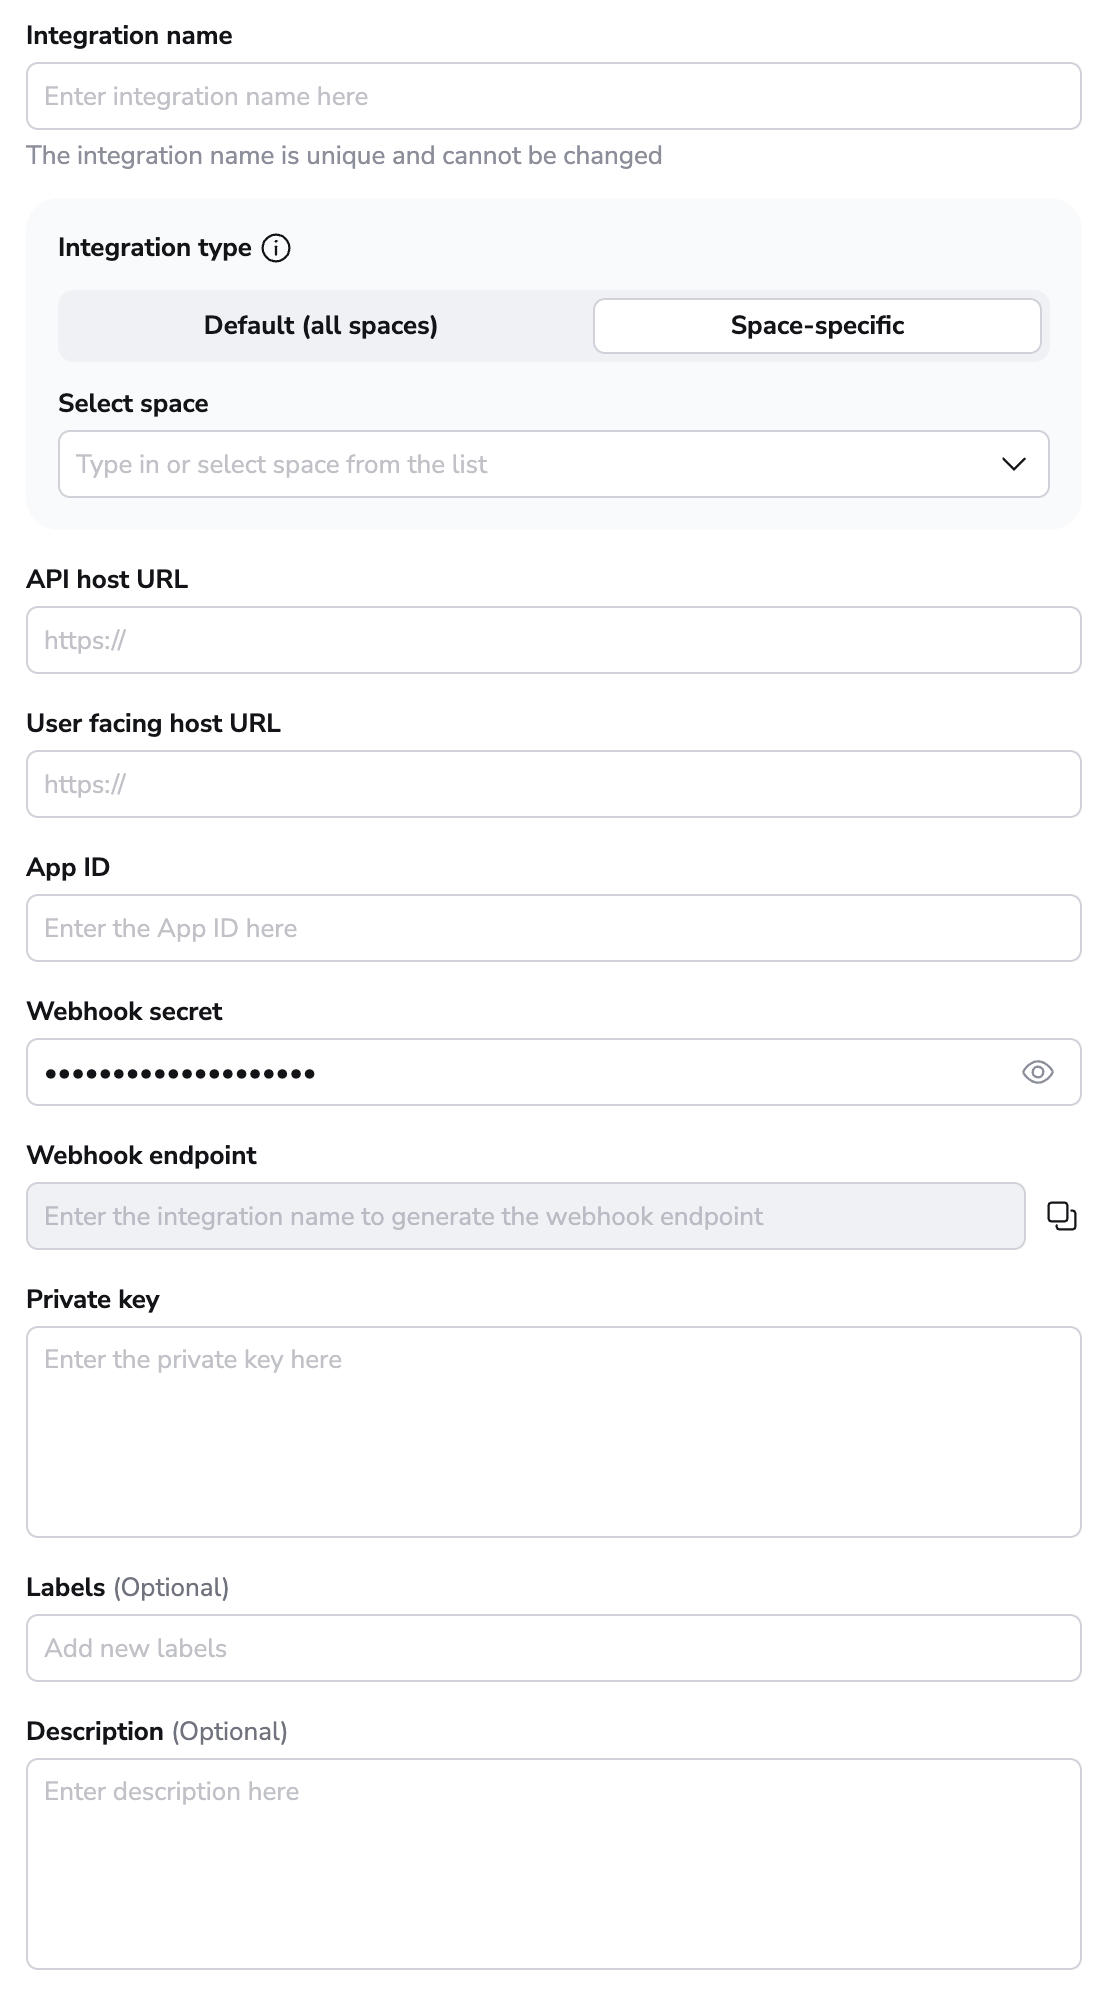
- Integration name: Enter a name for your integration. It cannot be changed later because the Spacelift webhook endpoint is generated based on this name.
- Integration type: Default (all spaces) or Space-specific. Each Spacelift account can only support one default integration per VCS provider, which is available to all stacks and modules in the same Space as the integration.
Once the integration name and the type are chosen, a webhook endpoint and a webhook secret will be generated for the GitHub app in the middle of the form.
Create app in GitHub»
Initial setup»
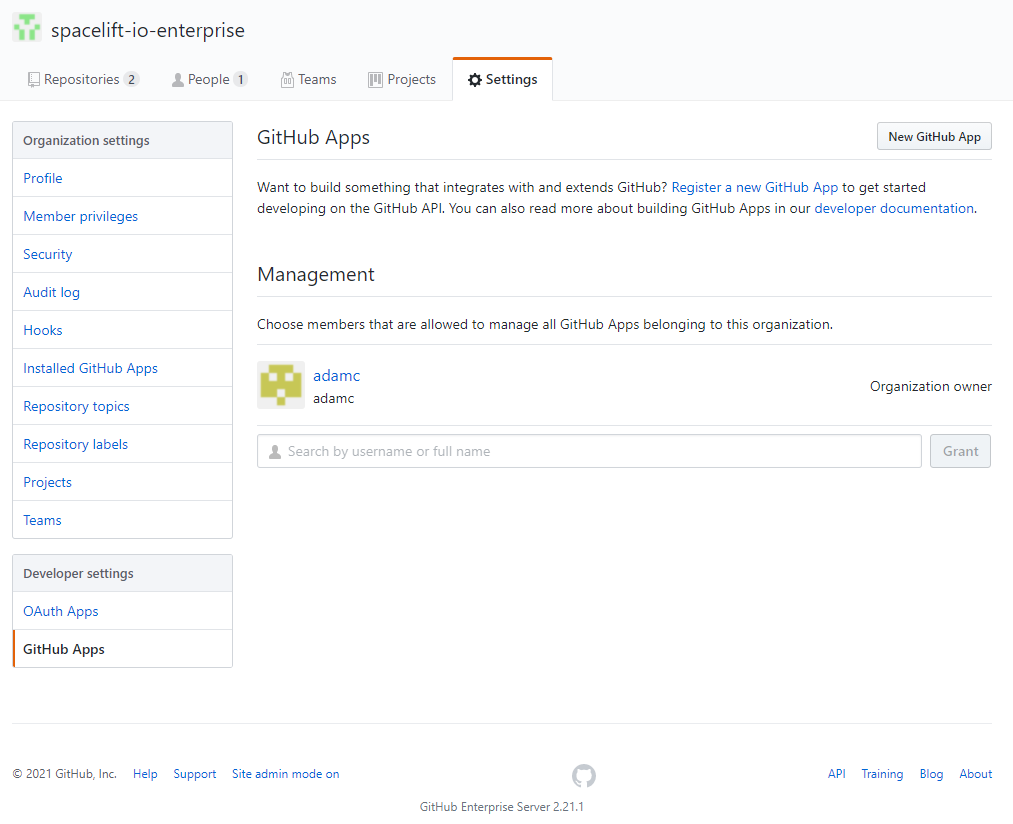
- Open GitHub, navigate to the GitHub Apps page in the Developer Settings for your account/organization, and click New GitHub App.
- You can either create the App in an individual user account or within an organization account:
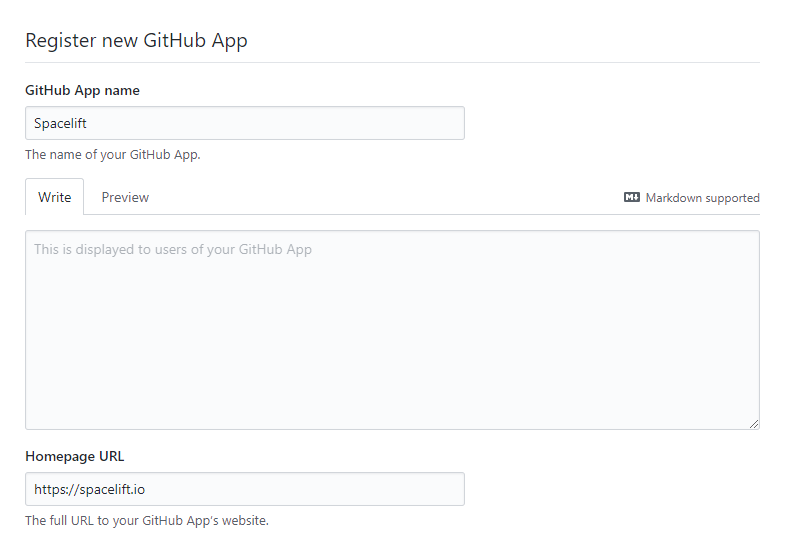
- Give your app a name and homepage URL (these are only used for informational purposes within GitHub):
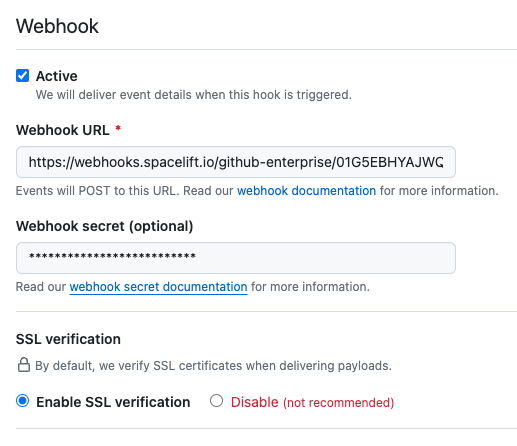
- Paste your Webhook URL and secret from Spacelift:
-
Set the following Repository permissions:
Permission Access Why it's needed Checks Read & write Report run state and results to commits and PRs, and support branch protection. Commit statuses Read & write Publish results as commit statuses for branch protection and GHE compatibility. Contents Read-only Read source code to plan and apply runs. Deployments Read & write Track run progress as GitHub Deployments and clean them up on teardown. Metadata Read-only Read basic repository metadata required by the GitHub App. Pull requests Read & write Detect affected stacks; write only adds and updates Spacelift PR comments. Webhooks Read & write Receive triggering events and maintain the webhook endpoint and secret. -
Set the following Organization permissions:
- Check run
- Issue comment
- Organization
- Pull request
- Pull request review
- Push
- Repository
-
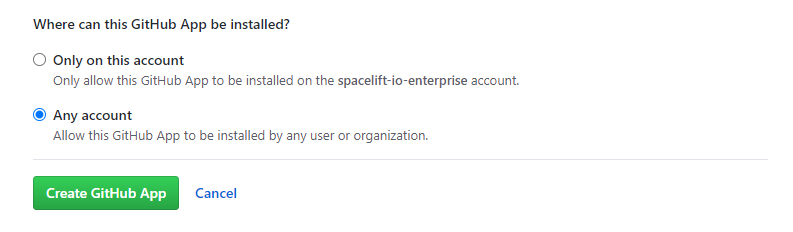
Choose whether you want to allow the App to be installed on any account or only the current account, then click Create GitHub App:
Generate key»
- Copy the App ID in the About section:
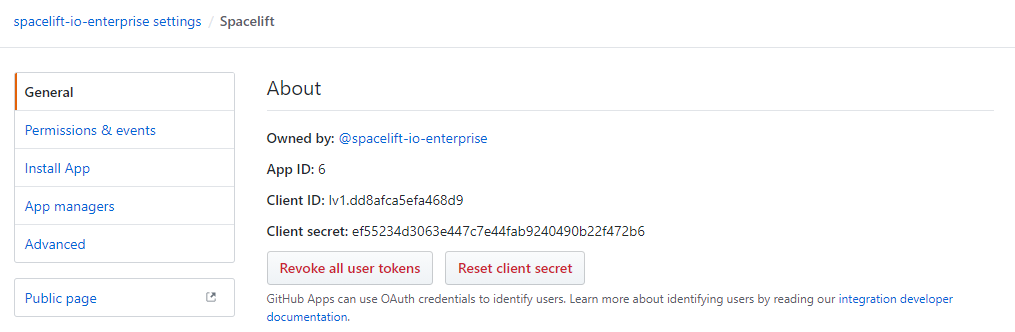
- Scroll down to the Private keys section of the page and click Generate a private key:
 This will download the private key file for your GitHub app named
 <app-name>.<date>.private-key.pem(for example:spacelift.2025-05-11.private-key.pem).
Copy API details into Spacelift»
Now that your GitHub App has been created, return to the integration configuration screen in Spacelift.
- API host URL: Enter the URL to your GitHub server, which should be https://api.github.com.
- User facing host URL: Enter the URL that will be shown to the user and displayed in the Spacelift UI. This will be the same as the API host URL unless you are using VCS Agents, in which case it should be
private://<vcs-agent-pool-name>. - App ID: Enter the App ID you copied before generating the private key.
- Private key: Paste the contents of your private key file.
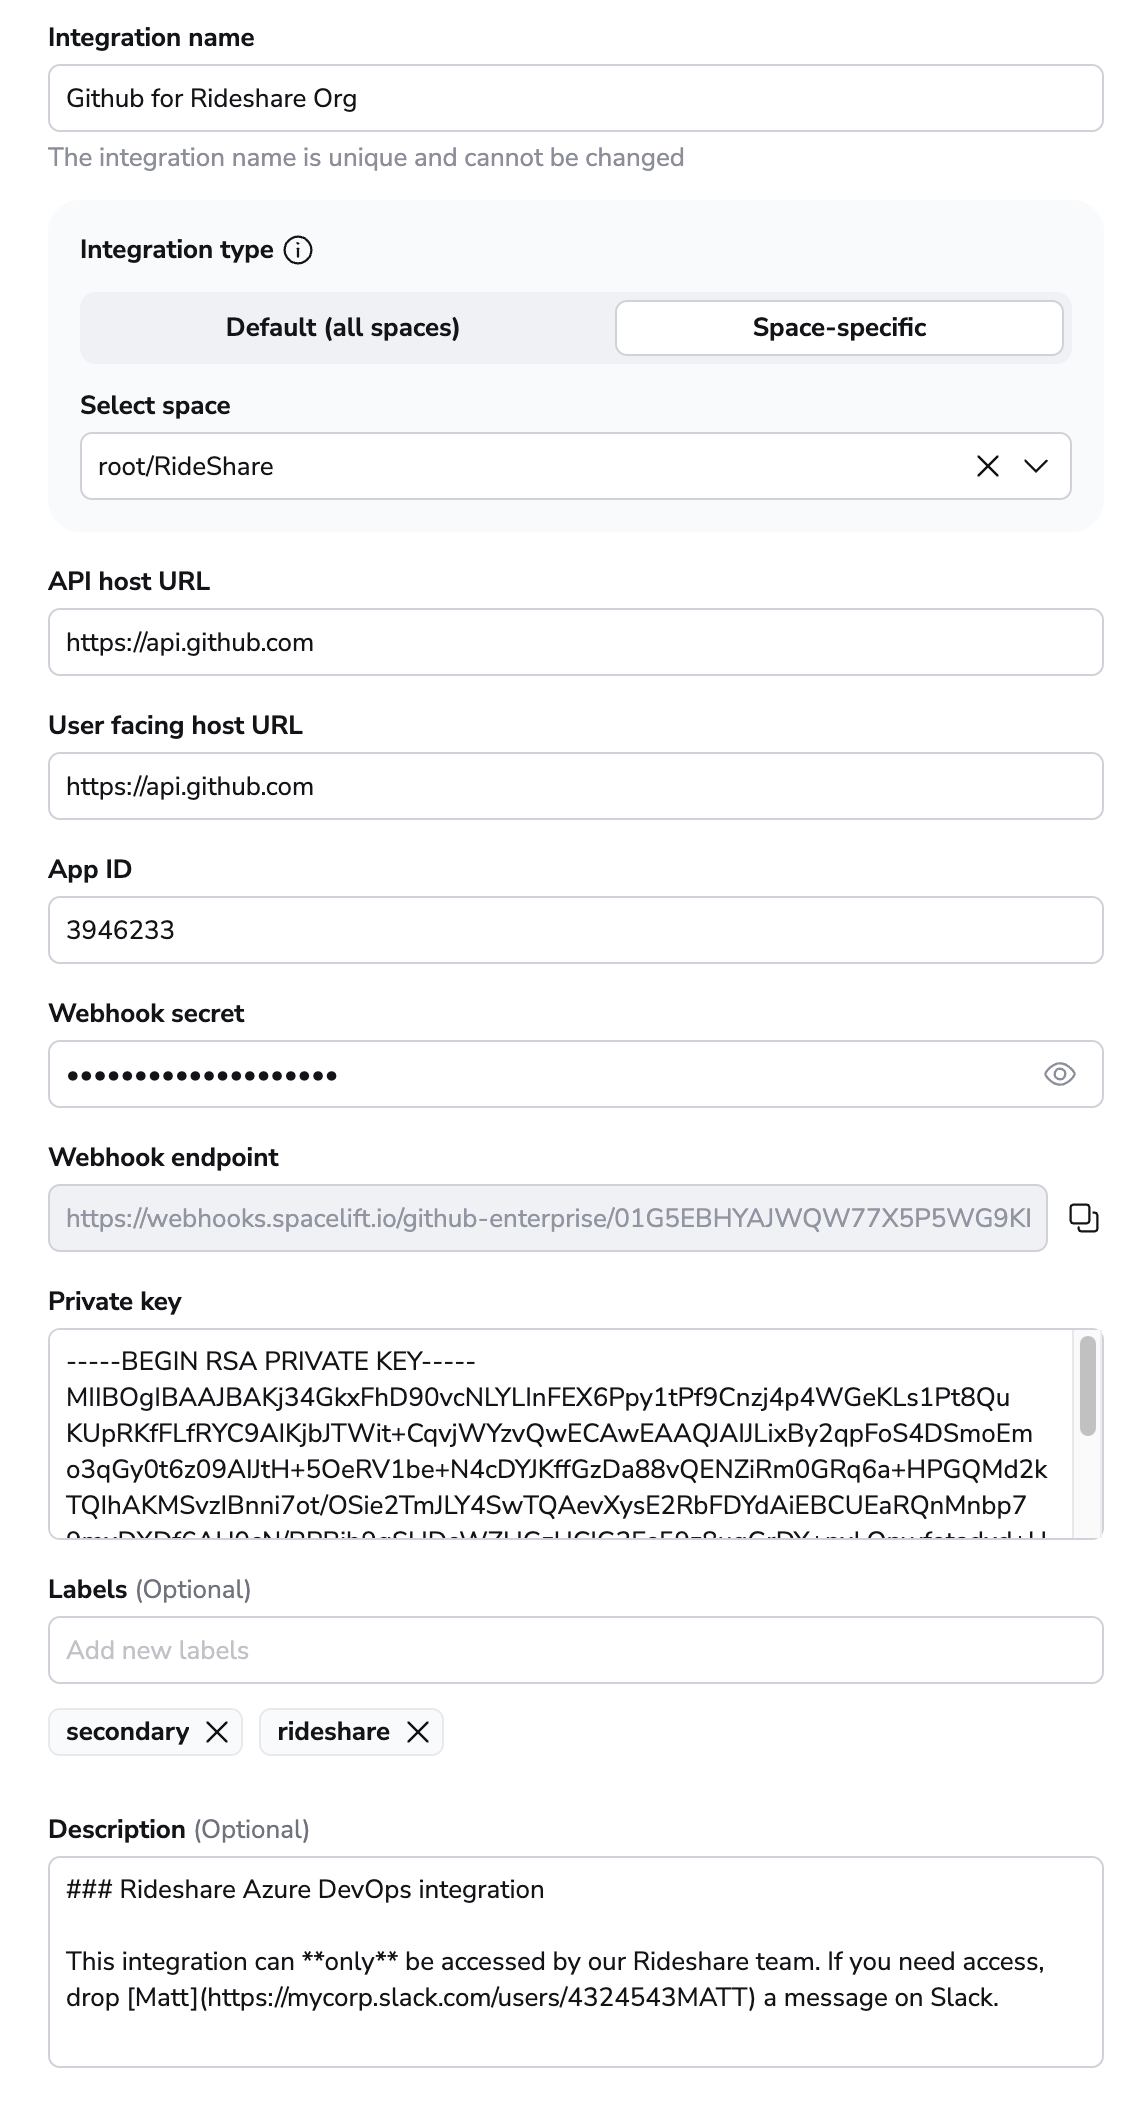
- Labels: Organize integrations by assigning labels to them.
- Description: A markdown-formatted free-form text field to describe the integration.
- Use Git checkout: Toggle that defines if integration should use git checkout to download source code, otherwise source code will be downloaded as archive through API. This is required for sparse checkout to work.
- Click Set up to save your integration settings.
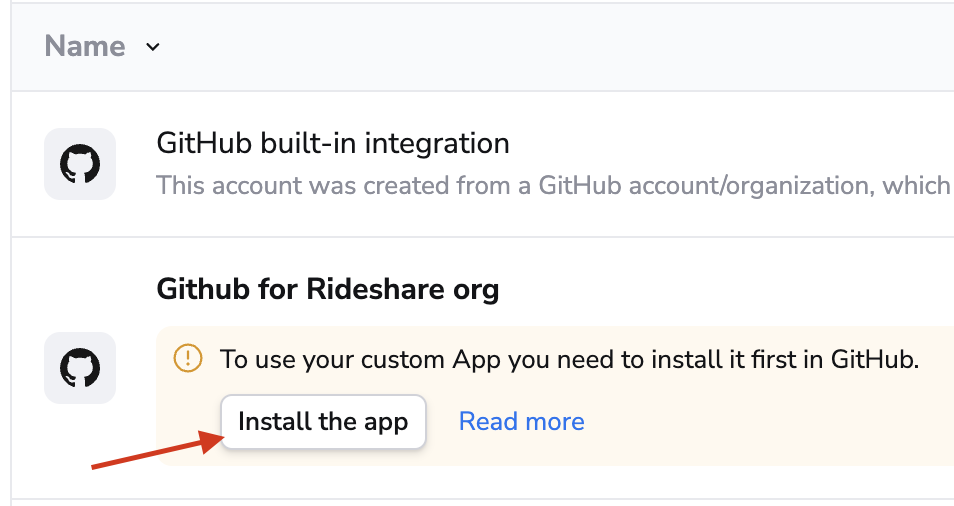
Install the GitHub application»
Once your GitHub app has been created and configured in Spacelift, you can install it on one or more accounts or organizations you have access to.
-
On the Integrations > GitHub page, click Install the app:
-
On GitHub, click Install.
-
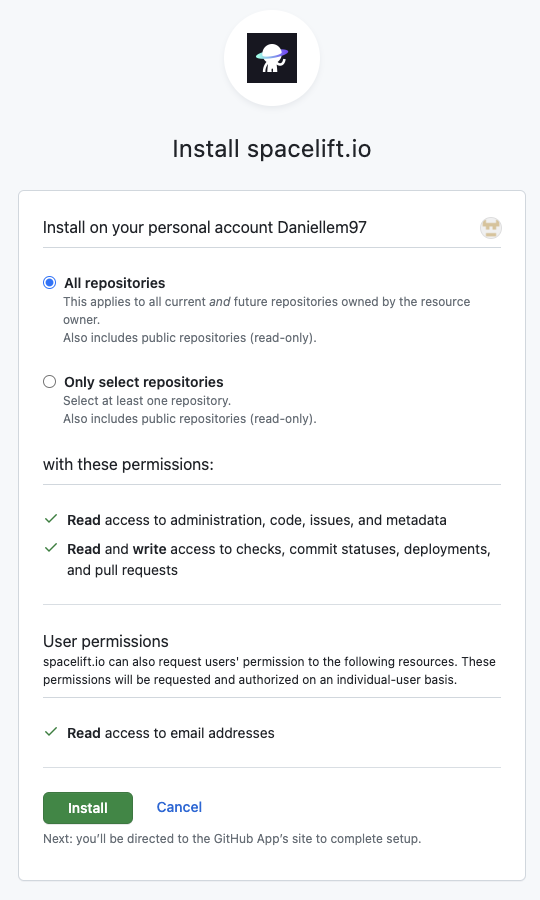
Choose whether you want to allow Spacelift access to all repositories or only specific ones in the account:
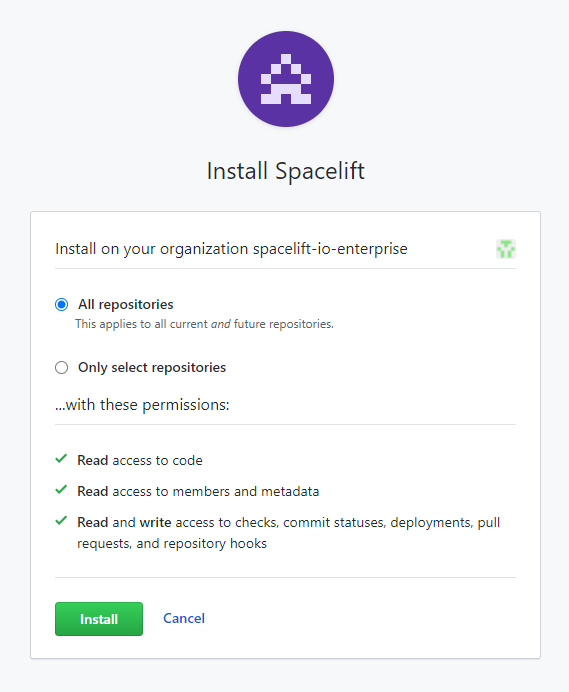
-
Click Install to link your GitHub account to Spacelift.
- Find your Spacelift app on the GitHub Apps page in your account settings, and click Edit:
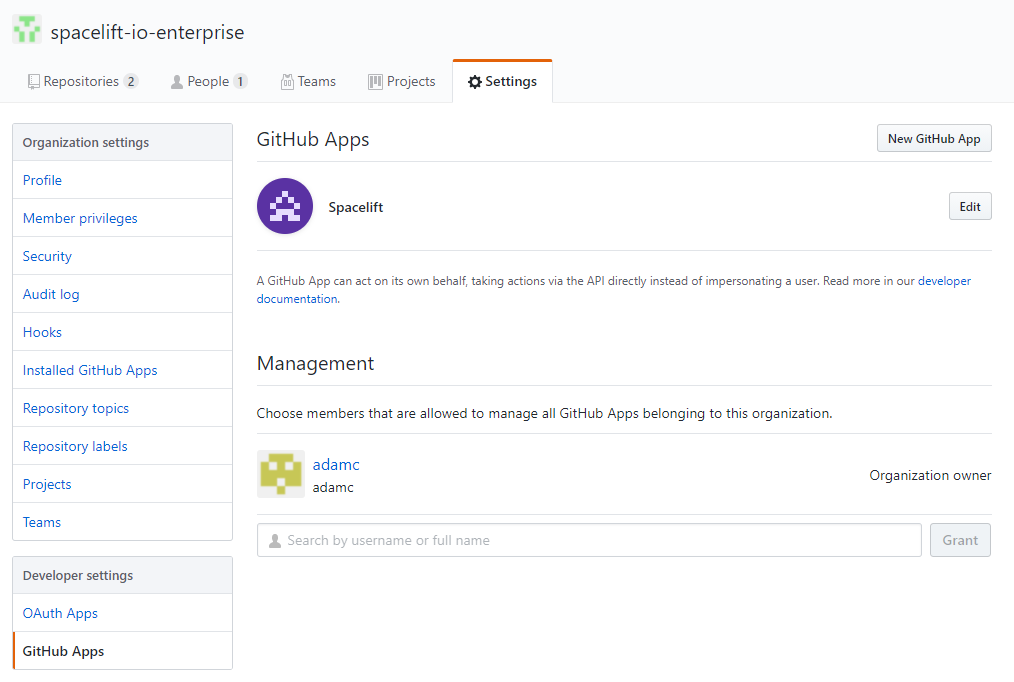
- In the Install App section, click Install next to the account you want Spacelift to access:
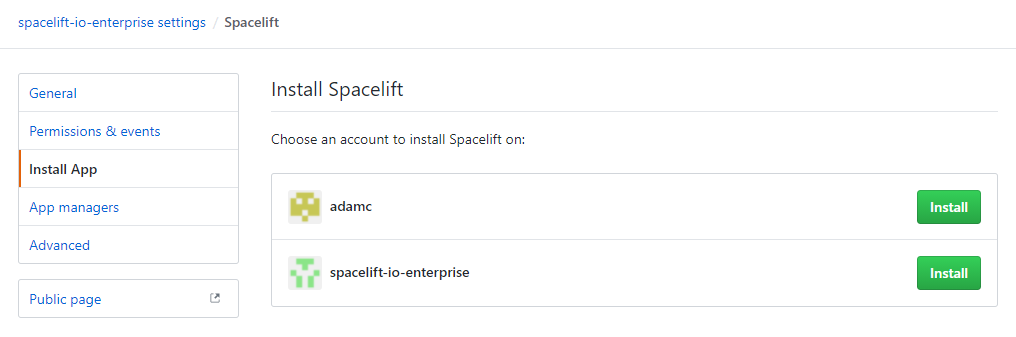
-
Choose whether you want to allow Spacelift access to all repositories or only specific ones in the account:
-
Click Install to link your GitHub account to Spacelift.
Access controls»
Space-level integrations»
Hint
This feature is only available on the Enterprise plan. Please check out our pricing page for more information.
You can use the Spaces to control what can access your integrations. For example, if you have a Space called Rideshare, you can create a GitHub integration in that Space, and that can only be attached to those stacks and modules that are in the same Space (or inherit permissions through a parent Space).
Integration details visibility»
Only Space admins will be able to see the webhook URLs and secrets of Space-level integrations. Space readers will only be able to see the name, description, and labels of the integration.
The details of default integrations are only visible to root Space admins.
Legacy method»
You can also use GitHub's native teams. If you're using GitHub as your identity provider (which is the default), upon login, Spacelift uses the GitHub API to determine organization membership level and team membership within an organization and persists it in the session token which is valid for one hour. Based on that token, you can set up login policies to determine who can log in to your Spacelift account, and stack access policies that can grant an appropriate level of access to individual Stacks.
Info
The list of teams is empty for individual/private GitHub accounts.
Notifications»
Commit status notifications»
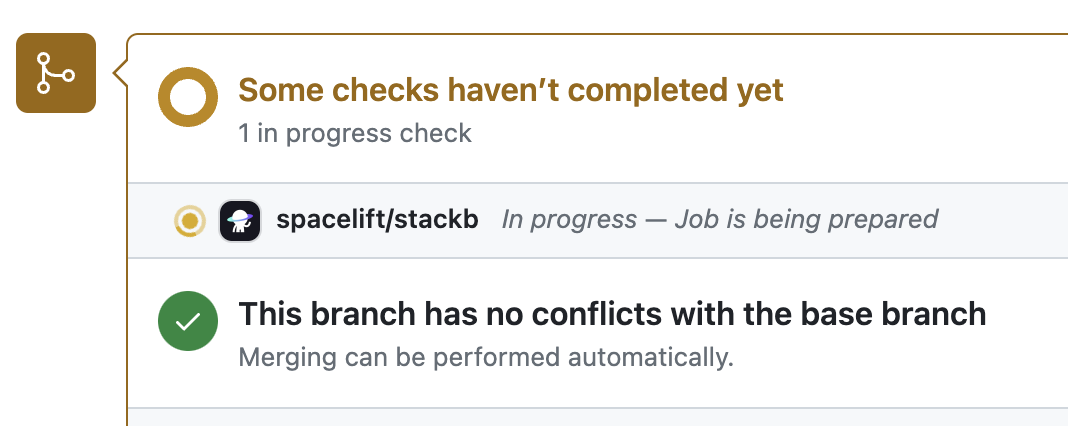
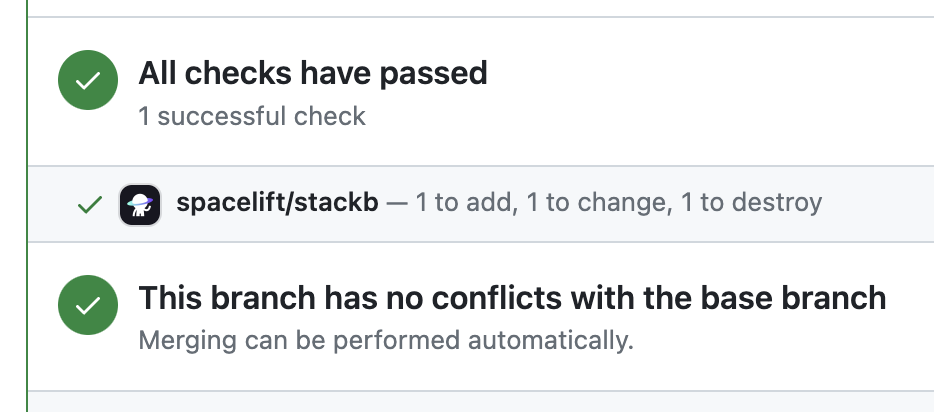
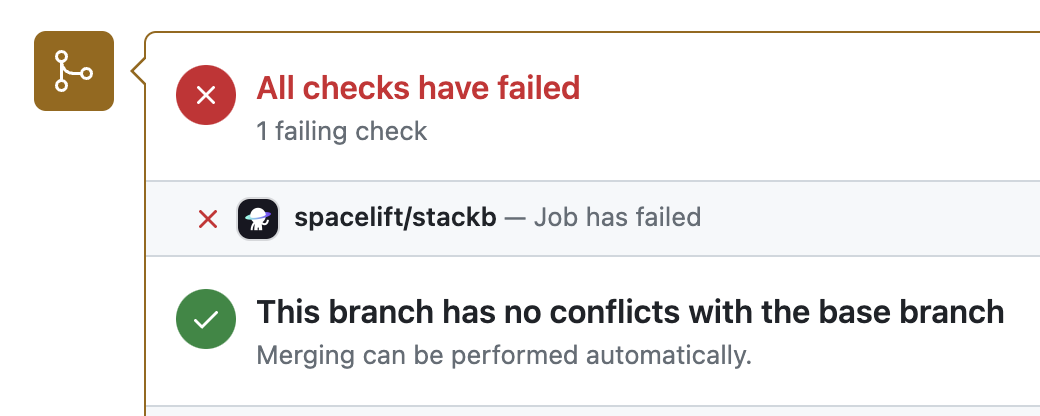
Commit status notifications are triggered for proposed runs to provide feedback on the proposed changes to your stack. You can trigger a proposed run using a preview command (e.g. terraform plan for Terraform) with the source code of a short-lived feature branch with the state and config of the stack that's pointing to another, long-lived branch. Here's what commit status notifications looks like:
1. When the run is in progress (initializing):
2. When it succeeds without changes:
3. When it succeeds with changes:
4. And when it fails:
In each case, clicking on the Details link will take you to the GitHub check view showing more details about the run:
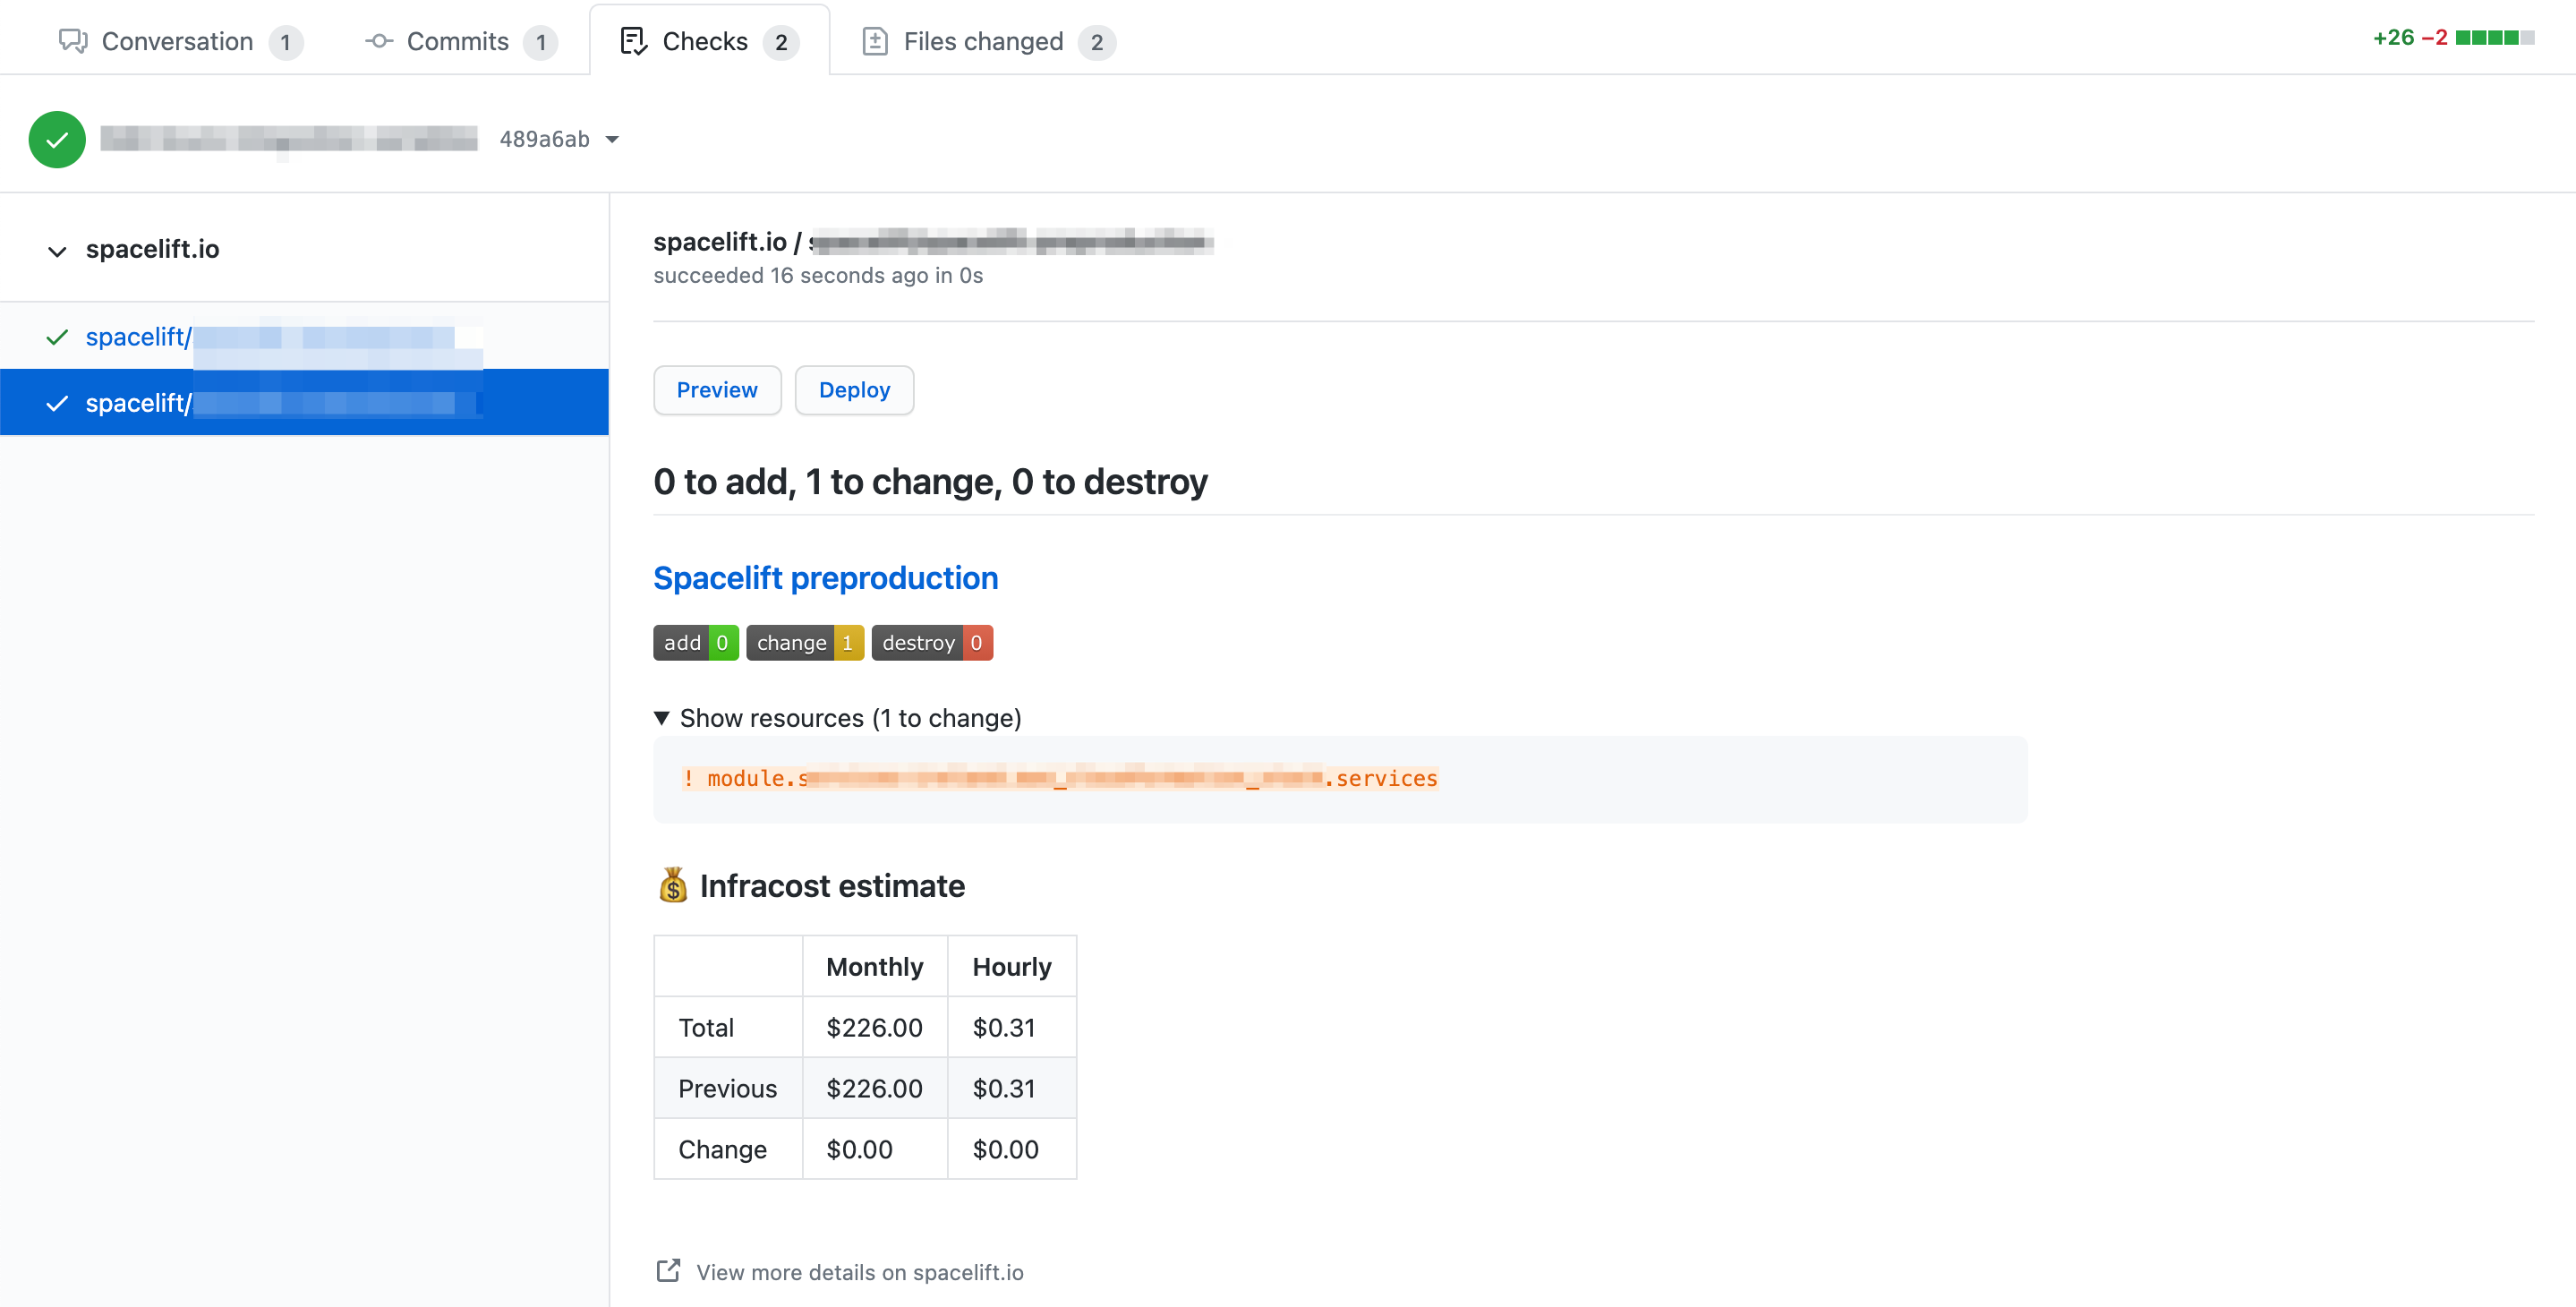
The check view provides high-level information about the changes introduced by the push, including the list of changing resources and cost data if Infracost is set up.
From this view you can also perform two types of Spacelift actions:
- Preview: Execute a proposed run against the tested commit.
- Deploy: Execute a tracked run against the tested commit.
PR (Pre-merge) Deployments»
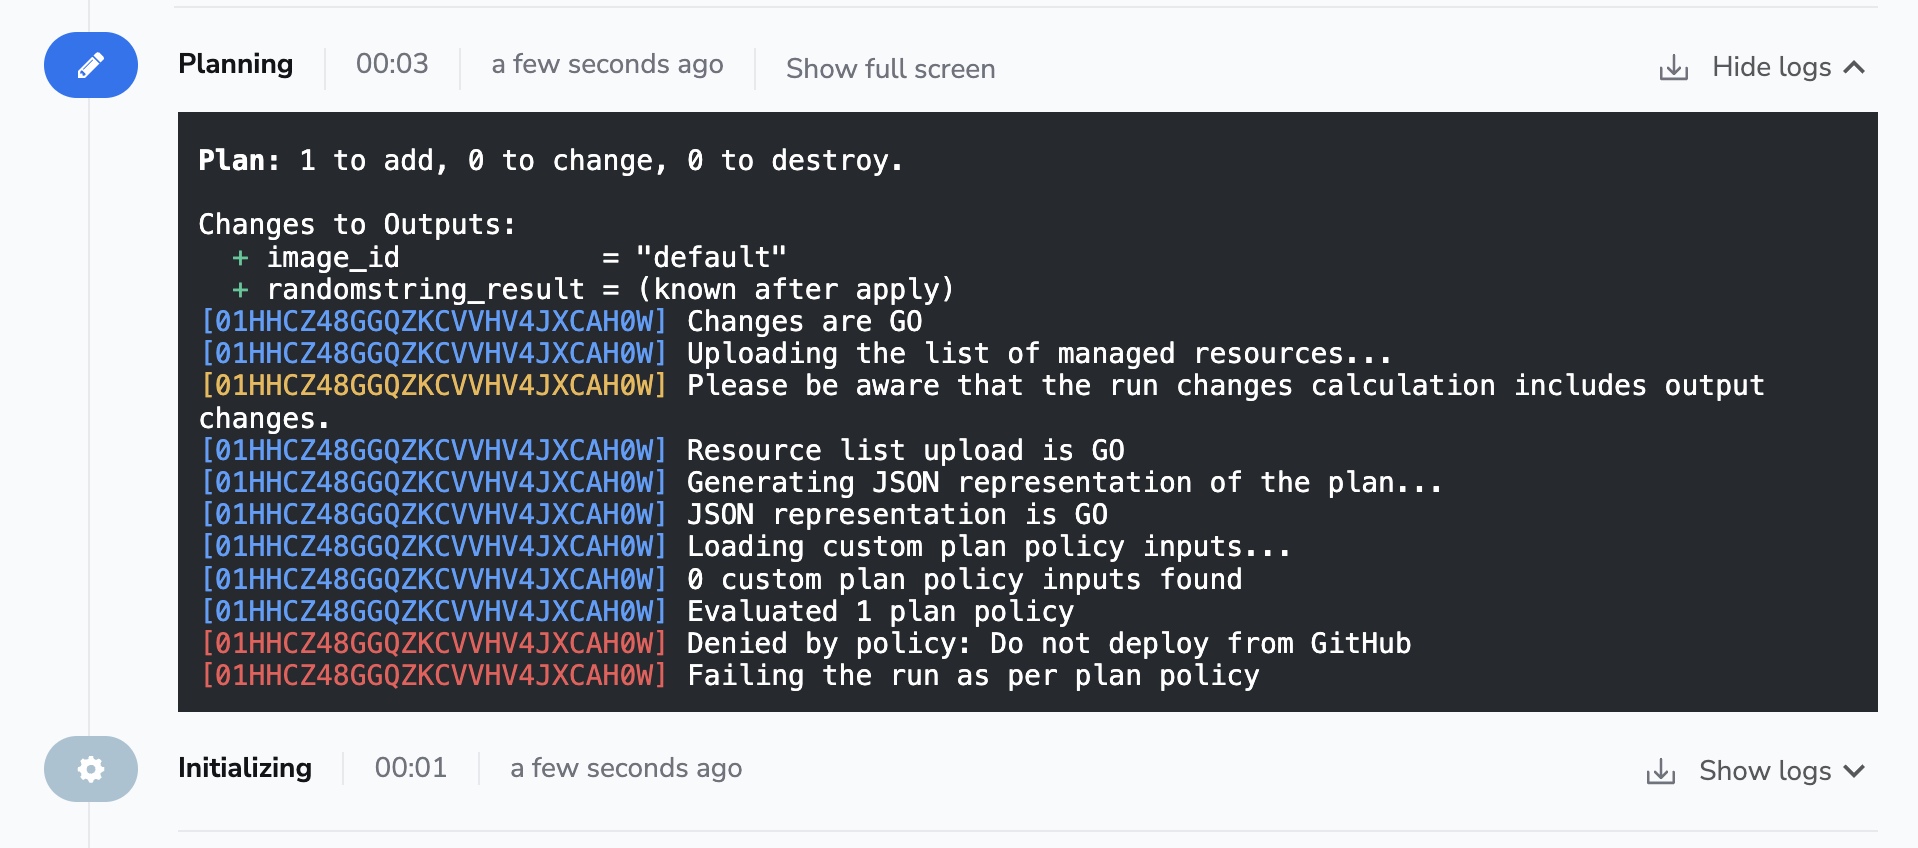
The Deploy functionality has been introduced in response to customers used to the Atlantis approach, where the deployment happens from within a Pull Request itself rather than on merge, which we see as the default and most typical workflow.
If you want to prevent users from deploying directly from GitHub, you can add a simple plan policy to that effect, based on the fact that the run trigger always indicates GitHub as the source (the exact format is github/$username).
1 2 3 4 5 6 | |
1 2 3 4 5 6 | |
The effect is this:
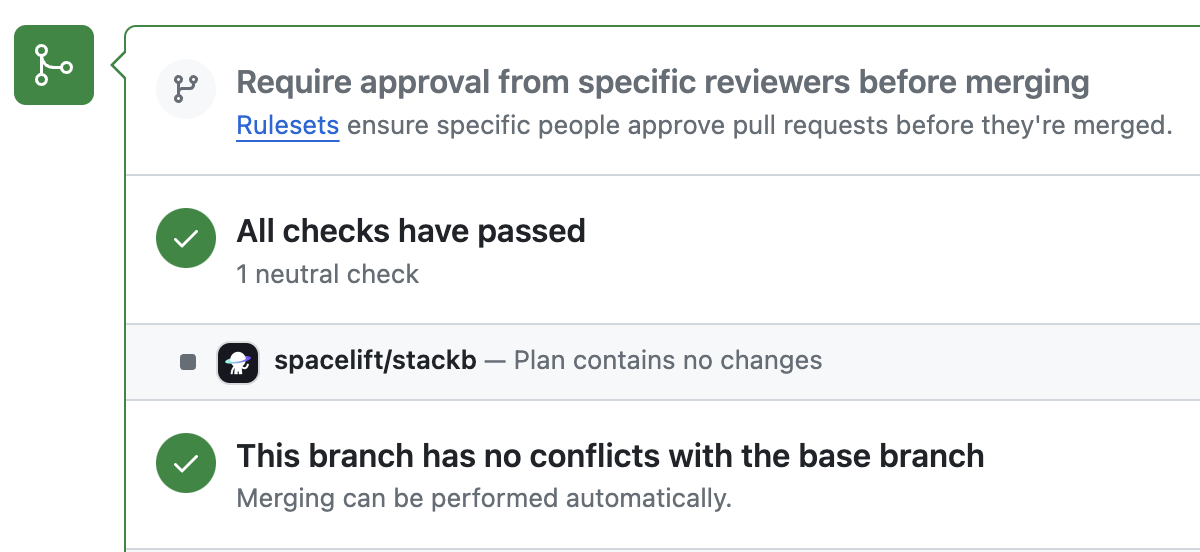
Using Spacelift checks to protect branches»
You can use commit statuses to protect your branches tracked by Spacelift stacks by ensuring that proposed runs succeed before merging their Pull Requests:
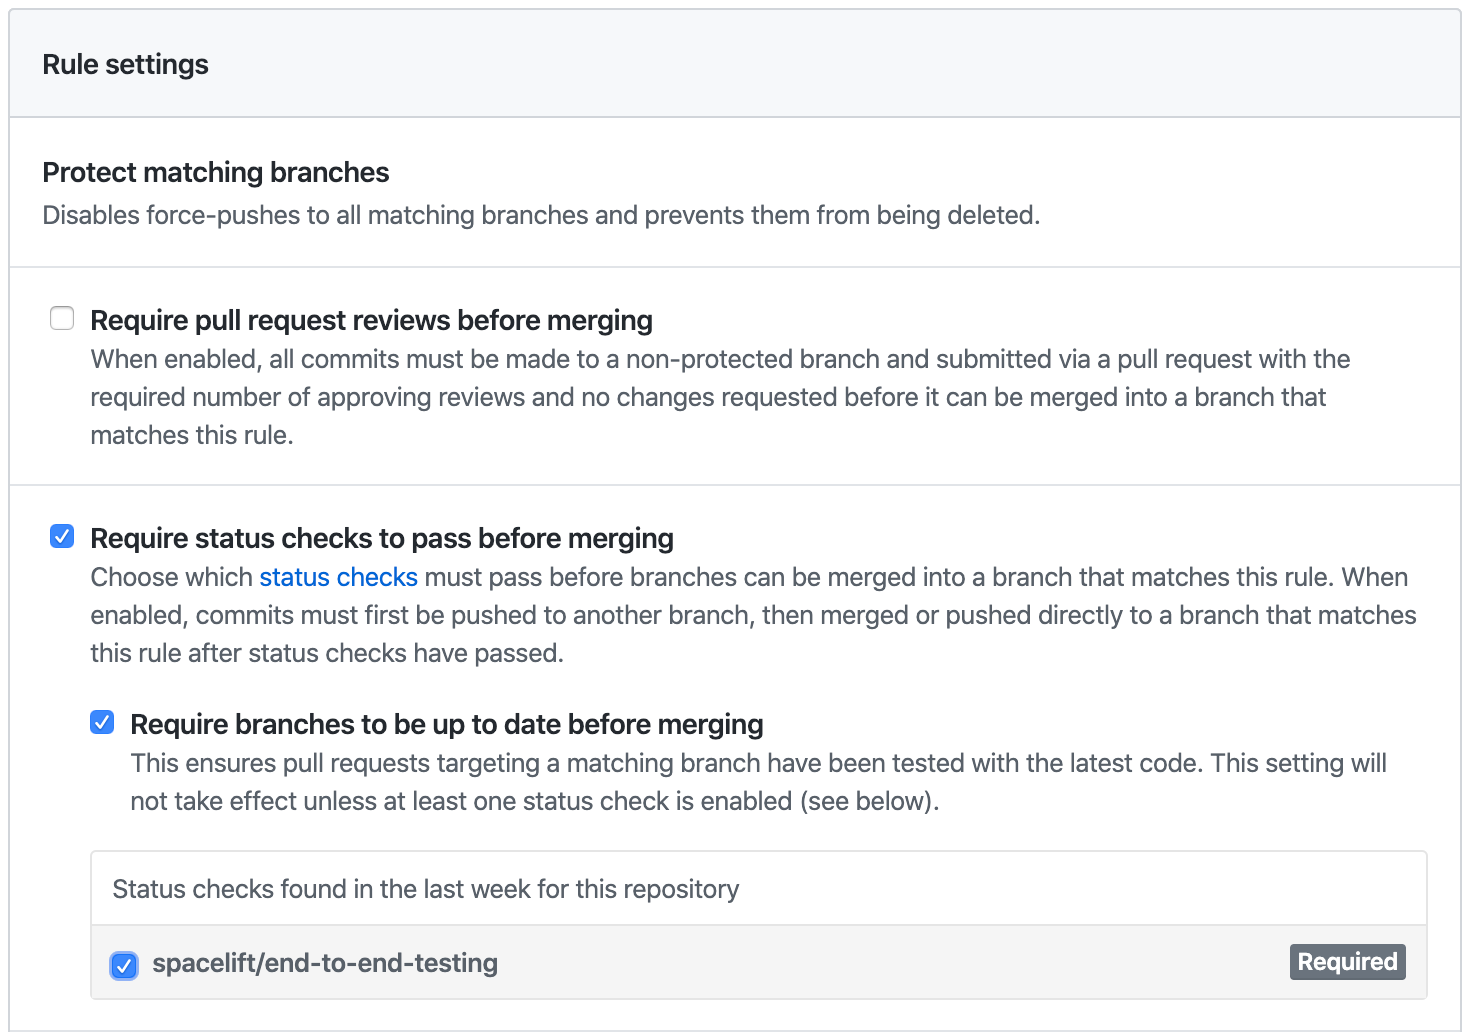
This is an important part of our proposed workflow.
Aggregated checks»
Info
This feature is only available to Business plan and above. Please check out our pricing page for more information.
If you have multiple stacks tracking the same repository, you can enable the Aggregate VCS checks feature in the integration's settings.
This will group all the checks from the same commit into a predefined set of checks, making it easier to see the overall status of the commit.

When the aggregated option is enabled, Spacelift will post the following checks:
- spacelift/tracked: Groups all checks from tracked runs.
- spacelift/proposed: Groups all checks from proposed runs.
- spacelift/modules: Groups all checks from module runs.
Here's how the summary looks:
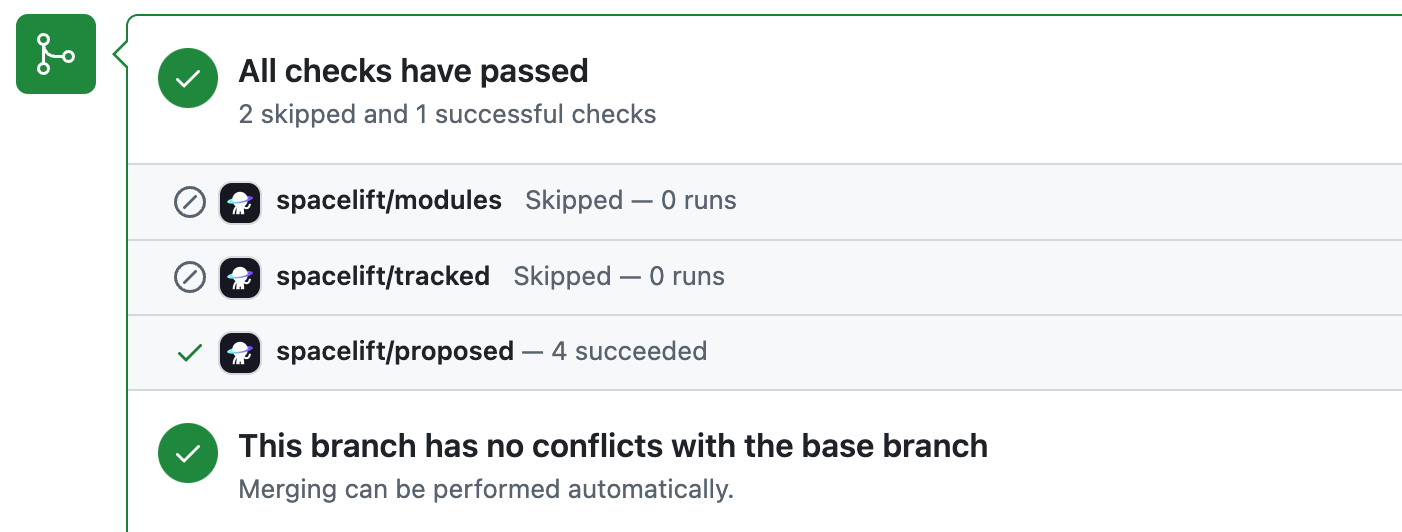
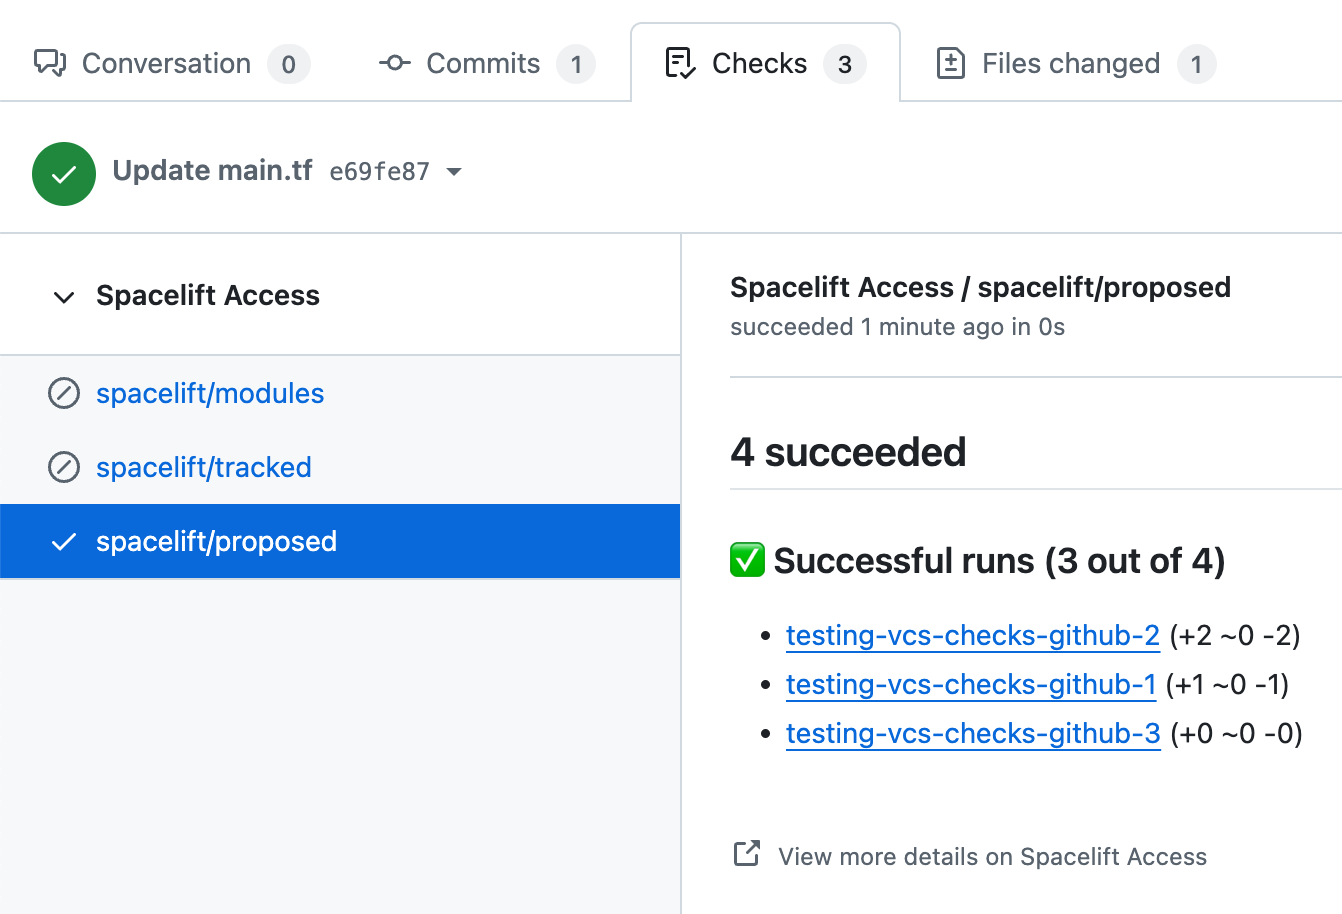
In each case, clicking on the Details link will take you to the GitHub check view showing more details about stacks or modules included in the aggregated check:
Deployment status notifications»
Deployments and their associated statuses are created by tracked runs to indicate that changes are being made to the Terraform state. A GitHub deployment is created and marked as Pending when the planning phase detects changes and a tracked run either transitions to the Unconfirmed state or automatically starts applying the diff:

If the user does not like the proposed changes and discards the tracked run during the manual review, its associated GitHub deployment is immediately marked as a Failure. The same thing happens when the user confirms the tracked run but the Applying phase fails:

If the Applying phase succeeds, the deployment is marked as Active:

Your repository's Environments section displays the entire deployment history broken down by stack:
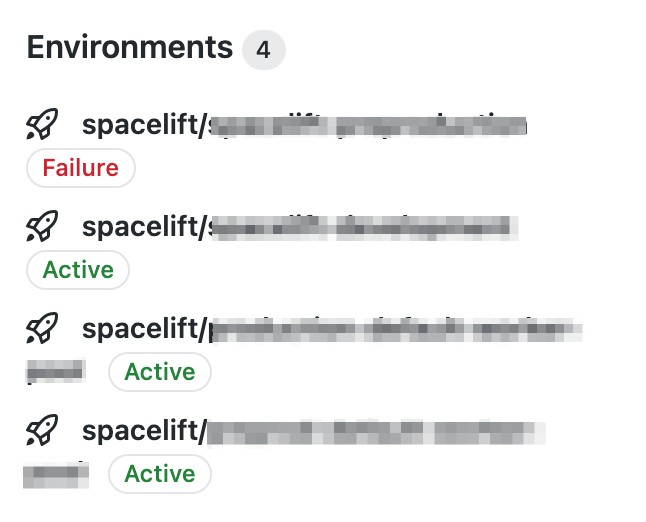
That's what it looks like for our test repo, with a single stack pointing at it:
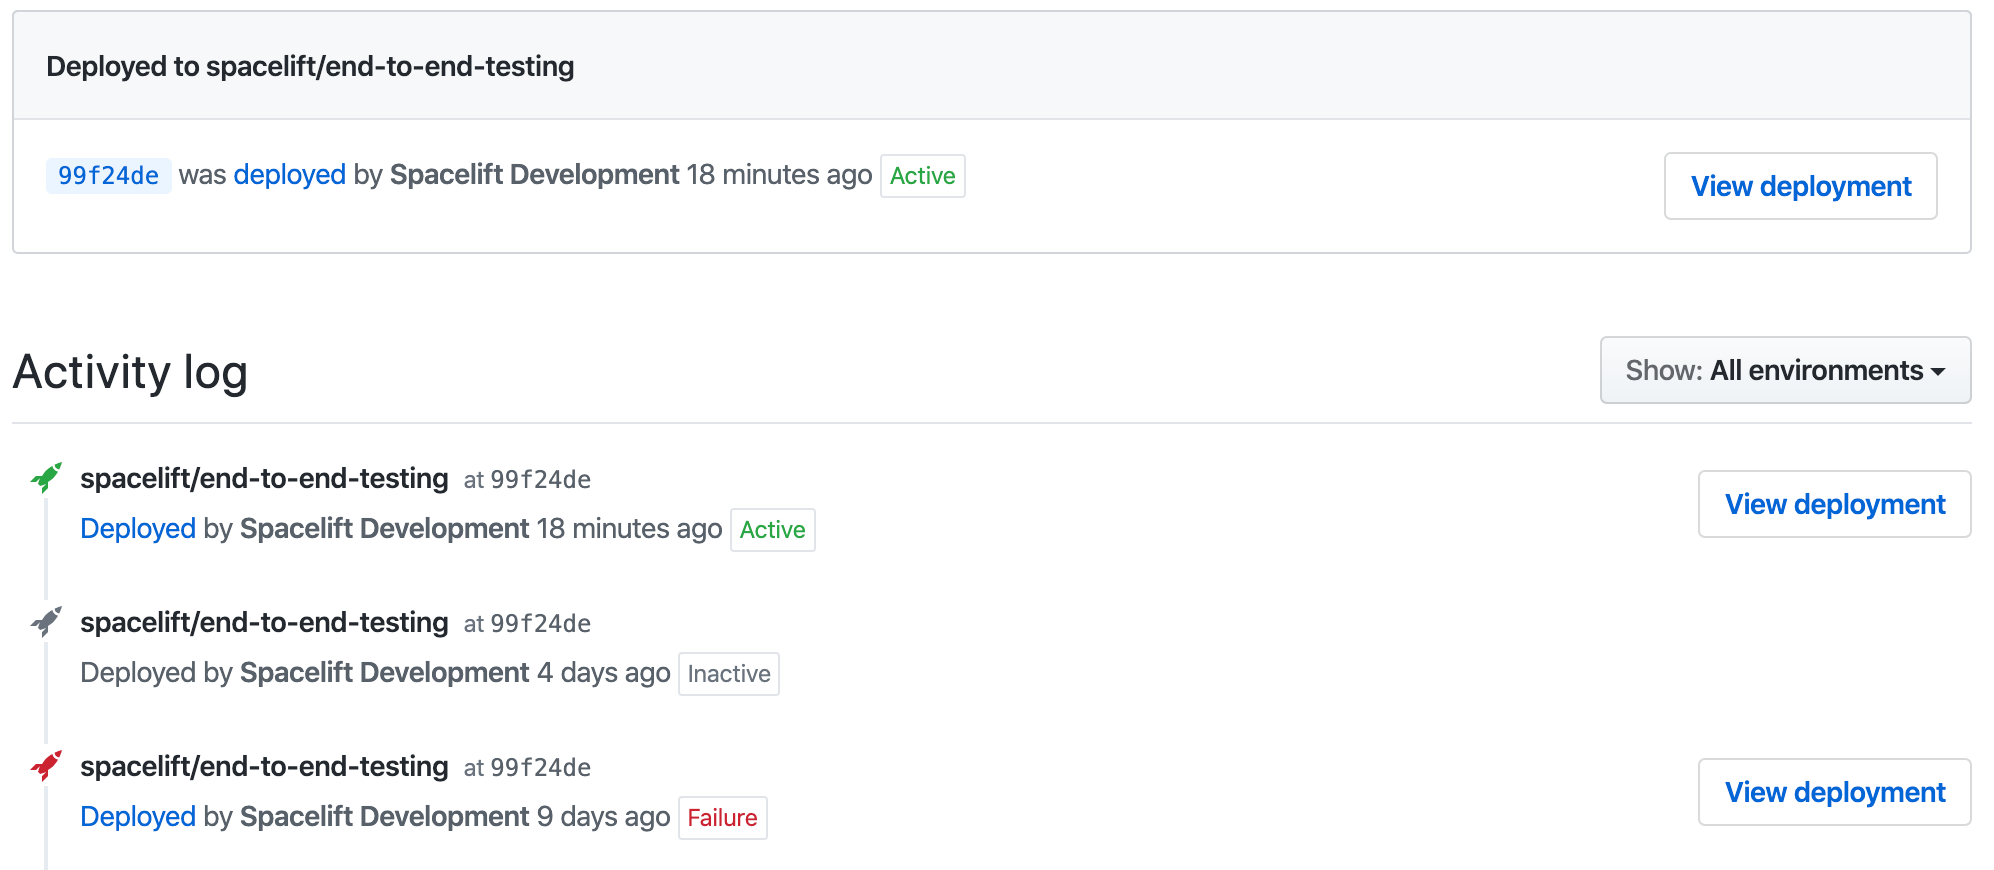
GitHub deployment environment names are derived from their respective stack names. This can be customized by setting the ghenv: label on the stack. For example, if you have a stack named Production and you want to name the deployment environment I love bacon, you can set the ghenv:I love bacon label on the stack. You can also disable the creation of a GitHub deployments by setting the ghenv:- label on the stack.
Info
The Deployed links lead to their corresponding Spacelift tracked runs.
Pull Requests»
In order to help you keep track of all the pending changes to your infrastructure, Spacelift also has a PRs tab that lists all the active Pull Requests against your tracked branch. Each of the entries shows the current status of the change as determined by Spacelift, and a link to the most recent Run responsible for determining that status:
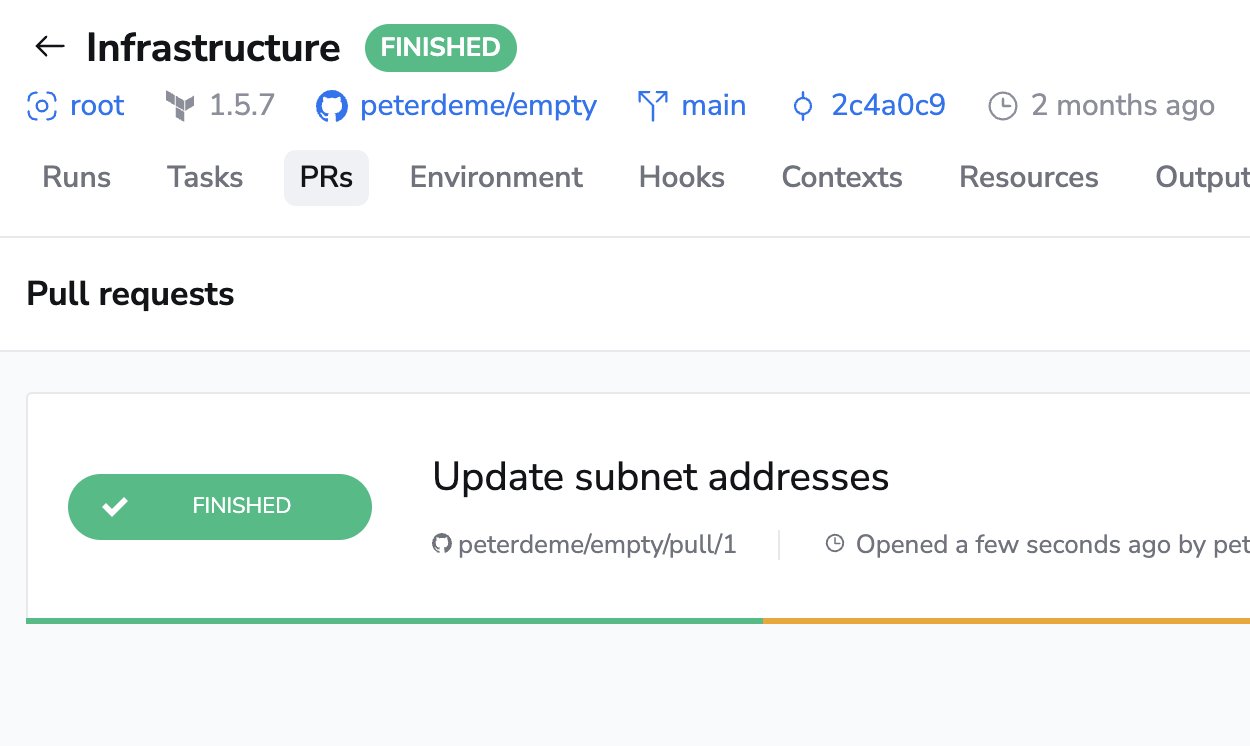
Note that this view is read-only. You can't change a Pull Request through the Spacelift UI, but clicking on the PR name will take you to GitHub where you can make changes.
Once a Pull Request is closed, either with or without merging, it disappears from this list.
Proposed workflow»
This proposed workflow has been effective for us and many other DevOps professionals working with infrastructure-as-code. Its simplest version is based on a single stack tracking a long-lived branch like main, and short-lived feature branches temporarily captured in Pull Requests. A more sophisticated version can involve multiple stacks and a process like GitFlow.
Tip
These are simply suggestions and Spacelift will fit almost any Git workflow. Feel free to experiment and find what works best for you.
Single stack version»
You have a single stack named Infra tracking the default master branch in your repository, also called infra. If you want to introduce some changes, for example define an Amazon S3 bucket, we suggest this workflow:
- Open a short-lived feature branch.
- Make your changes on the branch.
- Open a Pull Request from that branch to
master.
At this point, a proposed run is triggered by the push notification, and the result of running terraform plan with the new code (but existing state and configuration) is reported to the Pull Request.
- Ensure that the Pull Request does not get merged to
masterwithout a successful run by requiring a successful status check from your stack. - Decide whether you should require a manual review before merging the Pull Request on top of Spacelift's automated checks.
- If coworkers are also modifying the branch, require branches be up-to-date before merging.
If the current feature branch is behind the PR target branch, it needs to be rebased, which triggers a fresh Spacelift run that will ultimately produce the newest and most relevant commit status.
Multi-stack version»
A common setup involves two similar (or even identical) environments, for example, staging and production. One approach would be to have them in a single repository but different directories, setting the project_root runtime configuration accordingly. This approach means changing the staging directory often and using as much or little duplication as necessary to keep things moving. Many commits will be no-ops for the production stack. This is a very flexible approach, but it leaves Git history messy.
If you prefer a cleaner Git history:
- Create two long-lived Git branches, each linked to a different stack: the default
stagingbranch linked to the staging stack, and aproductionbranch linked to the production stack. - Develop and perfect the code on the
stagingbranch. - Open a Pull Request from the
stagingtoproductionbranch, incorporating all the changes.
We've seen many teams use this workflow to implement GitFlow. This approach keeps the history of the production branch clean and allows plenty of experimentation in the staging branch.
With this GitFlow-like setup, we propose protecting both staging and production branches in GitHub. To maximize flexibility, the staging branch may require a green commit status from its associated stack but not necessarily a manual review. In the meantime, the production branch should require both a manual approval and a green commit status from its associated stack.
Webhook integrations»
We subscribe to many GitHub webhooks:
| Webhook | How Spacelift uses it |
|---|---|
| Push events | Any time we receive a repository code push notification, we match it against Spacelift repositories and, if necessary, create runs. We'll also stop proposed runs that have been superseded by a newer commit on their branch. |
| App installation creation | When the Spacelift GitHub app is installed on an account, we create a corresponding Spacelift account. |
| Organization renamed | If a GitHub organization name is changed, we change the name of the corresponding account in Spacelift. (Only applicable for accounts that were created using GitHub originally.) |
| Pull request events | Whenever a Pull Request is opened or reopened, we generate a record in our database to show it on the Stack's PRs page. When it's closed, we delete that record. When it's synchronized (eg. new push) or renamed, we update the record accordingly. This way, what you see in Spacelift should be consistent with what you see in GitHub. |
| Pull request review events | Whenever a review is added or dismissed from a Pull Request, we check whether a new run should be triggered based on any push policies attached to your stacks. This allows you to make decisions about whether or not to trigger runs based on the approval status of your Pull Request. |
| Repository renamed | If a GitHub repository is renamed, we update its name in all the stacks pointing to it. |
| GitHub Action | You can use the Setup Spacectl GitHub Action to install our spacectl CLI tool to easily interact with Spacelift. |
| Git checkout support | By default Spacelift uses the GitHub API to download a tarball containing the source code for your stack or module. We are introducing experimental support for downloading the code using a standard Git checkout. To enable this feature for your stacks/modules, either add a label called feature:enable_git_checkout to each stack or module that you want to use Git checkout on (which allows you to test without switching all stacks over), or contact our support team and ask us to enable the feature for all stacks/modules in your account. |
Pointing Spacelift at another GitHub account»
If you want to point Spacelift at another GitHub organization or account in order to allow Spacelift to access source code stored in repositories that the new account owns, please follow the instructions here to setup another GitHub integration.
If you originally created your Spacelift account by installing the Spacelift GitHub App and you want to point your Spacelift account at another GitHub organization for user authentication, please contact our support team for assistance.
Unlinking GitHub and Spacelift»
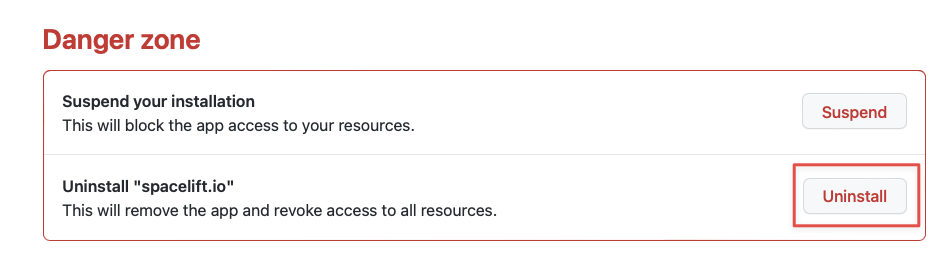
To uninstall the Spacelift application you installed on the GitHub Marketplace:
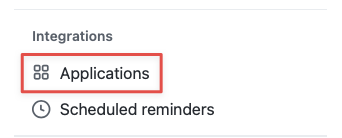
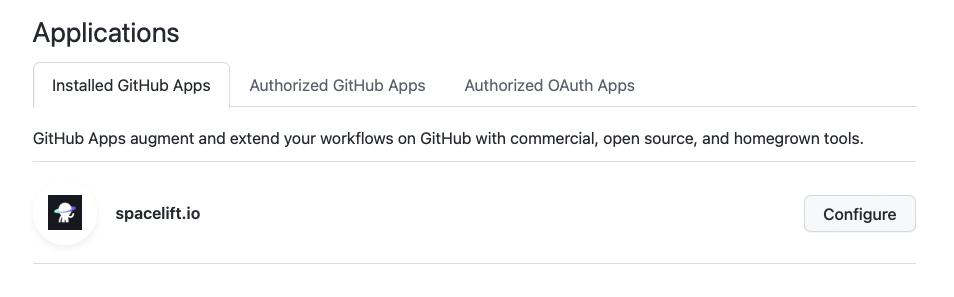
- Go to your GitHub account settings and select Applications.
- Click Configure for the spacelift.io application.
- Click Uninstall.
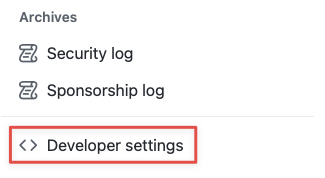
- Go to the Developer settings of your GitHub account.
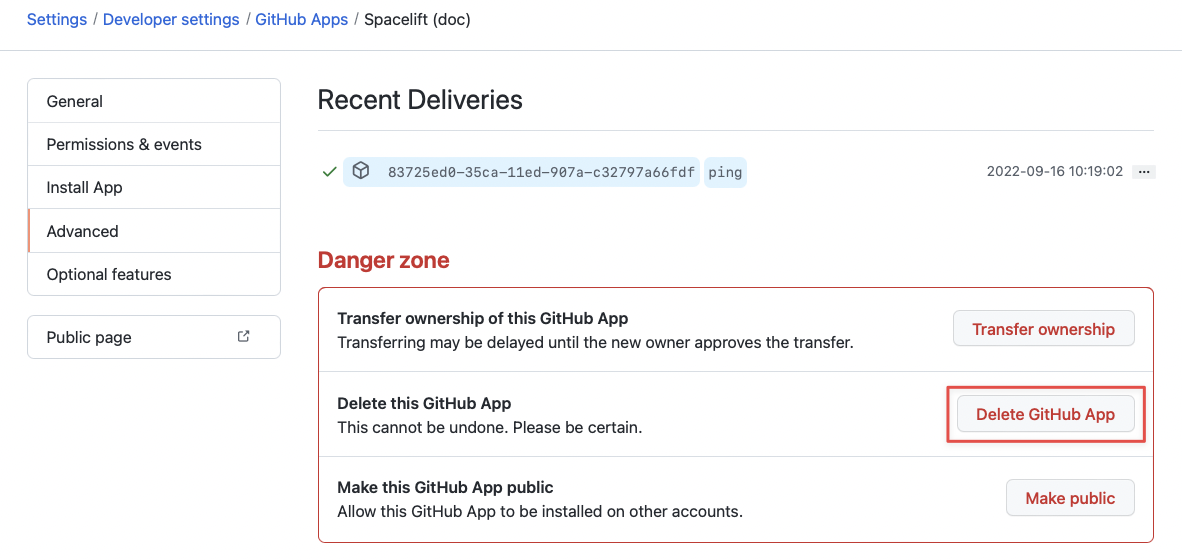
- In the GitHub Apps section, click Edit for the Spacelift application.
- On the page for the Spacelift application, go to the Advanced section and click Delete GitHub App. Confirm by typing the name of the application.
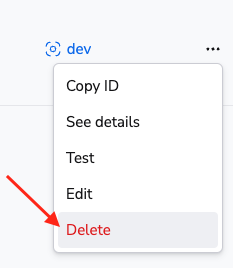
- You can now remove the integration via Delete on the Integrations > GitHub page in Spacelift:
Warning
Please note that you can delete integrations while stacks are still using them. As a consequence, when a stack has a detached integration, it will no longer be able to receive webhooks from Github and you won't be able to trigger runs manually either.
To fix it, you'll need to open the stack, go to the Settings tab and choose a new integration.