User management»
Spacelift is made for collaboration. In order to collaborate, you need collaborators. User Management is an easy way to invite new members to your organization and manage their permissions, together with third-party integrations and group access. If you prefer to write a policy rather than using our UI, please check out login policies.
Warning
User Management doesn't affect GitHub organization or SSO admins and private account owners who always get admin access to their respective Spacelift accounts. This is to avoid a situation where a mistake in User Management locks out everyone from the account.
User»
Users are individuals who can access Spacelift after being invited through their email (or via policies) and authenticated using your account's identity provider. Users can have personal permissions assigned.
If a user gains Spacelift access through both invites/login policy and IdP group mapping, the permissions ultimately applied to them are a combination of the user permission set and group permission set.
Roles in User Management»
User Management leverages Spacelift's RBAC system to assign roles to users and groups for selected spaces.
Access through user invites»
New users can be invited through email by account admins and owners. Detailed instructions can be found on the Admin page. If you are using IdP group mapping, you do not need to manually invite users.
Once a user is invited, they will receive an email from Spacelift that will take them to your identity provider page.
Once the user authenticates with your identity provider, they will be redirected to the application.
Migrating from login policy»
If you were previously using login policy you can queue invites to User Management for your users while still having login policy enabled. Once you switch to the User Management strategy, the invites will be sent to your users' emails and allow them to sign in through your Identity Provider. Remember, that you can always go back if it turns out something was misconfigured.
Access through IdP group mapping»
With IdP mapping, you can assign permissions in Spacelift to groups as provided by your identity provider. Anyone assigned to those groups in the IdP will automatically gain access with the correct permissions to Spacelift.
To map your IdP groups to matching user groups in Spacelift:
- Hover over your name in the bottom-left corner, then click Organization settings.
- Under Identity Management, click IdP group mapping.
- Click Map IdP group.
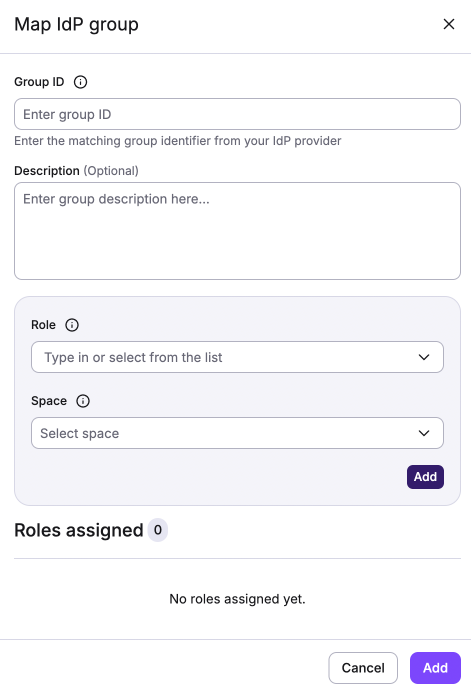
- Fill in the mapping details for a single IdP group:
- Group ID: Enter the group identifier from your identity provider.
- Description (optional): Enter a (markdown-supported) description of the group and relevant details, such as intended permissions and restrictions.
- Role: Type in or check the boxes for the role(s) to assign to the group. Roles directly relate to permissions.
- Space: Select the space(s) where the group should have the assigned role(s).
- In the Role/Space box, click Add. The role(s) and space(s) you've assigned to the specific group ID will appear in the Roles assigned section.
- Once all role(s) and space(s) have been added for a single IdP group, click Add at the bottom of the drawer.
- Repeat steps 3-6 until all IdP groups have been mapped to Spacelift groups.
For more details on IdP group mapping and RBAC roles and permissions, see IdP group role binding.
Important
If a user was previously invited to Spacelift manually and granted permissions higher than their IdP group mapping, the higher permissions will still apply.
Related topics»
- Authorization & RBAC: Complete guide to Spacelift's authorization system
- Assigning Roles to Users: Detailed role assignment guide
- Assigning Roles to Groups: Team-based permission management