Deploying to AKS»
This guide provides a way to quickly get Spacelift up and running on an Azure Kubernetes Service (AKS) cluster. In this guide we show a relatively simple networking setup where Spacelift is accessible via a public load balancer.
To deploy Spacelift on AKS you need to take the following steps:
- Deploy your cluster and other infrastructure components.
- Push the Spacelift images to your container registry.
- Deploy the Spacelift backend services using our Helm chart.
Overview»
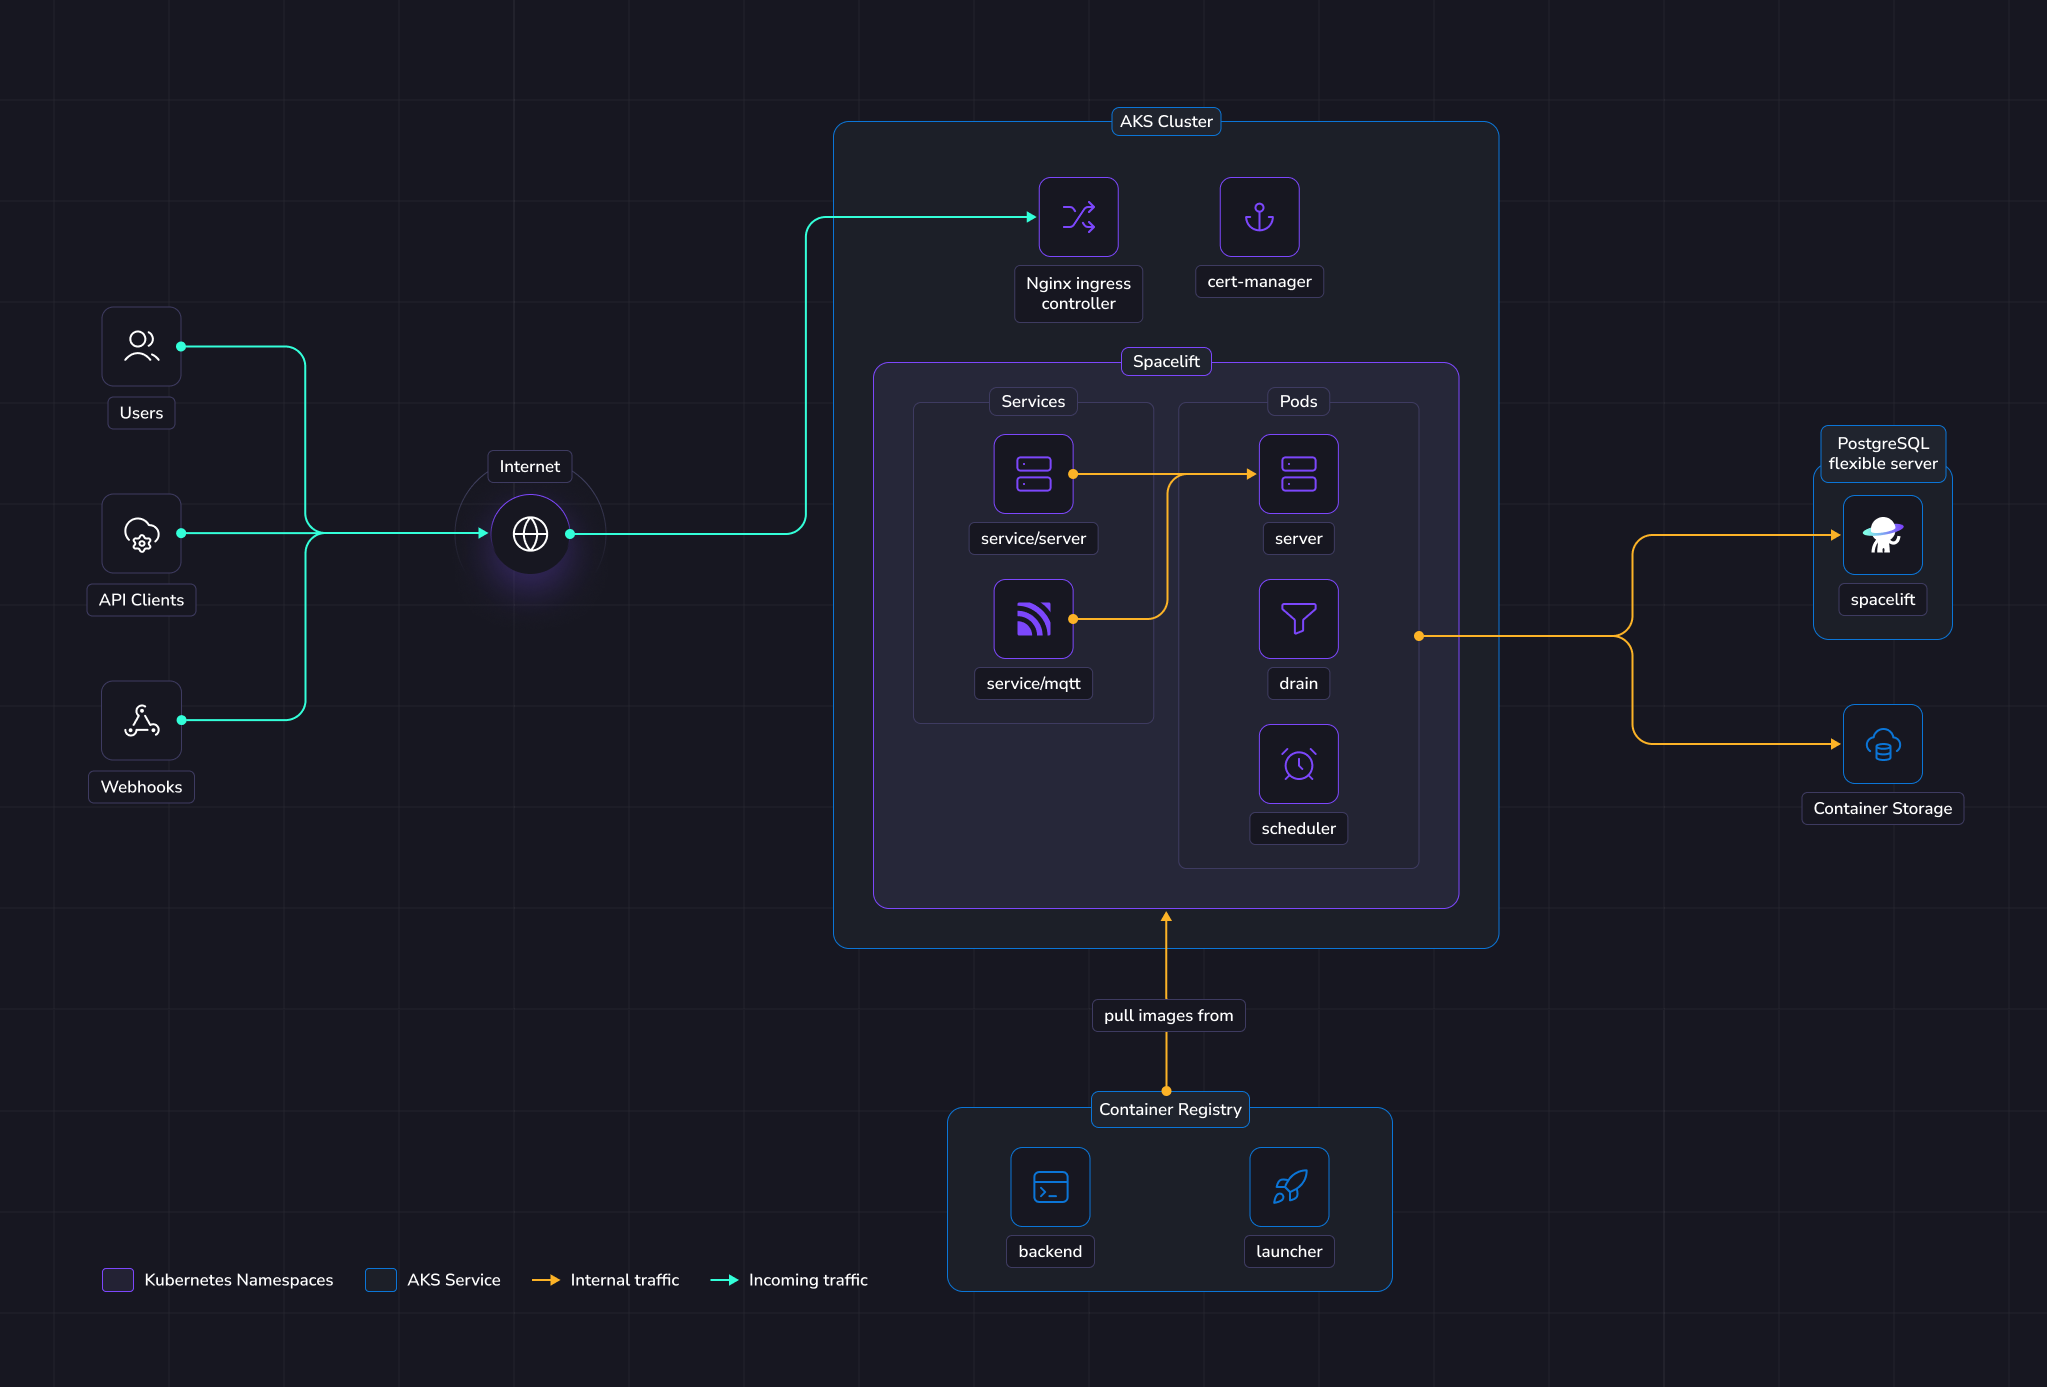
The illustration below shows what the infrastructure looks like when running Spacelift in AKS.
Networking»
Info
More details regarding networking requirements for Spacelift can be found on this page.
This section will solely focus on how the Azure infrastructure will be configured to meet Spacelift's requirements.
In this guide we'll create a new Virtual Network and subnetwork to allocate IPs for nodes, pods and services running in the cluster.
The database will allocate a private IP in the VPC, and we'll connect directly to it from pods running in the cluster.
Incoming HTTPS traffic will be handled by an nginx ingress controller. It will bind to a reserved static IPv4 address that you can add to your DNS zone.
Object Storage»
The Spacelift instance needs an object storage backend to store Terraform state files, run logs, and other things. Several Azure Storage containers will be created in this guide. This is a hard requirement for running Spacelift.
Spacelift supports flexible authentication methods for Azure Blob Storage, including environment variables and Workload Identity. More details about object storage requirements and authentication can be found here.
Database»
Spacelift requires a PostgreSQL database to operate. In this guide we'll create a new dedicated Postgresql Flexible Server instance.
More details about database requirements for Spacelift can be found here.
AKS»
In this guide, we'll create a new AKS cluster to run Spacelift. The Spacelift application can be deployed to that cluster using a Helm chart.
The chart will deploy 3 main components:
- The scheduler.
- The drain.
- The server.
The scheduler is the component that handles recurring tasks. It creates new entries in a message queue when a new task needs to be performed.
The drain is an async background processing component that picks up items from message queues and processes events.
The server hosts the Spacelift GraphQL API, REST API and serves the embedded frontend assets.
It also contains the MQTT server to handle interactions with workers.
The server is exposed to the outside world using Ingress resources. There is also a MQTT Service to expose the broker to workers.
Workers»
In this guide Spacelift workers will be also deployed in AKS. That means that your Spacelift runs will be executed in the same environment as the app itself (we recommend using a separate K8s namespace).
We recommend running your Spacelift workers in a separate namespace inside the same cluster as your Spacelift installation unless you have a specific requirement to deploy your workers elsewhere. This approach simplifies your infrastructure deployment, and reduces the surface area of your installation.
Requirements»
Before proceeding with the next steps, the following tools must be installed on your computer.
Info
In the following sections of the guide, OpenTofu will be used to deploy the infrastructure needed for Spacelift. If you are using Terraform, simply swap tofu for terraform.
Generate encryption key»
Spacelift requires an RSA key to encrypt sensitive information stored in the Postgres database. Please follow the instructions in the RSA Encryption section of our reference documentation to generate a new key.
Deploy infrastructure»
Warning
Before attempting to apply the following Terraform module, make sure you have the correct permissions on your Azure subscription. You can create a least-privileges role based on the architecture overview above, or use Azure's built-in Owner role. The Contributor role does not provide sufficient permissions because the Terraform module makes IAM role assignments.
We provide a Terraform module to help you deploy Spacelift's infrastructure requirements.
Before you start, set a few environment variables that will be used by the Spacelift modules:
1 2 3 4 5 6 7 8 9 10 11 12 13 14 15 16 17 18 19 20 21 22 23 24 25 26 27 28 29 | |
Note
The admin login/password combination is only used for the very first login to the Spacelift instance. It can be removed after the initial setup. More information can be found in the initial setup section.
Below is a small example of how to use this module:
1 2 3 4 5 6 7 8 9 10 11 12 13 14 15 16 17 18 19 20 21 22 23 24 25 26 27 28 29 30 31 32 33 34 35 36 37 38 39 40 41 42 43 44 45 46 47 48 49 50 51 52 53 54 55 56 57 58 59 60 61 62 63 64 65 66 67 68 69 70 71 72 73 74 75 76 | |
Feel free to take a look at the documentation for the terraform-azure-spacelift-selfhosted module before applying your infrastructure in case there are any settings that you wish to adjust. Once you are ready, apply your changes:
1 | |
Once applied, grab all the variables that need to be exported in your shell for the rest of this guide. We expose a shell output in terraform that you can source directly for convenience:
1 2 | |
Info
During this guide you'll export shell variables that will be useful in future steps. So please keep the same shell open for the entire guide.
Configure your DNS zone»
Configure the following record in your DNS zone. The ${PUBLIC_IP_ADDRESS} environment variable should be available in your shell from the previous step.
1 | |
Info
It is useful to configure this entry as early as possible since it will be used by the Let's Encrypt handshake later. So it's better to do this right now, and continue the setup while records are being propagated.
Push images to Container Registry»
From the previous terraform apply step, you need to grab the URL of the registry from the output and push our docker images to it.
1 2 3 4 | |
1 2 3 4 5 6 7 8 9 | |
Deploy Spacelift»
First, we need to configure Kubernetes credentials to interact with the AKS cluster.
1 2 3 | |
Warning
Make sure the above KUBECONFIG environment variable is present when running following helm commands.
NGINX controller»
1 2 3 4 5 6 7 8 9 | |
Cert manager»
Spacelift should run under valid HTTPS endpoints, so you need to provide valid certificates to Ingress resources deployed by Spacelift. One simple way to achieve that is to use cert-manager to generate Let's Encrypt certificates.
If you already have cert-manager running in your cluster and know how to configure Certificates on Ingress, you can skip this step.
1 2 3 4 5 6 7 8 9 10 11 12 13 14 15 16 17 18 | |
Info
Note that this command can take a few minutes to finish.
Next, we will configure an issuer to tell cert-manager how to generate certificates. In this guide we'll use ACME with Let's Encrypt and HTTP01 challenges.
Note
It is highly recommended testing against the Let's Encrypt staging environment before using the production environment. This will allow you to get things right before issuing trusted certificates and reduce the chance of hitting rate limits. Note that the staging root CA is untrusted by browsers, and Spacelift workers won't be able to connect to the server endpoint either.
1 2 3 4 5 6 7 8 9 10 11 12 13 14 15 16 17 18 | |
1 2 3 4 5 6 7 8 9 10 11 12 13 14 15 16 17 18 | |
Install Spacelift»
Create Kubernetes namespace»
1 | |
Create secrets»
The Spacelift services need various environment variables to be configured in order to function correctly. In this guide we will create three Spacelift secrets to pass these variables to the Spacelift backend services:
spacelift-shared- contains variables used by all services.spacelift-server- contains variables specific to the Spacelift server.spacelift-drain- contains variables specific to the Spacelift drain.
For convenience, the terraform-azure-spacelift-selfhosted Terraform module provides a kubernetes_secrets output that you can pass to kubectl apply to create the secrets:
1 2 | |
Deploy application»
You need to provide a number of configuration options to Helm when deploying Spacelift to configure it correctly for your environment.
You can generate a Helm values.yaml file to use via the helm_values output variable of the terraform-azure-spacelift-selfhosted Terraform module:
1 | |
Feel free to take a look at this file to understand what is being configured. Once you're happy, run the following command to deploy Spacelift:
1 2 3 4 5 6 7 | |
Tip
You can follow the deployment progress with: kubectl logs -n ${K8S_NAMESPACE} deployments/spacelift-server
VCS Gateway Service»
Ideally, your VCS provider should be accessible from both the Spacelift backend and its workers. If direct access is not possible, you can use VCS Agent Pools to proxy the connections from the Spacelift backend to your VCS provider.
The VCS Agent Pool architecture introduces a VCS Gateway service, deployed alongside the Spacelift backend, and exposed via an Ingress. External VCS Agents connect over gRPC (port 443 with TLS termination), while internal Spacelift services (server, drain) communicate with the gateway via HTTP using pod IP addresses within the cluster.
To enable this setup, add the following variable to your module configuration:
1 2 3 4 5 6 | |
After applying the Terraform changes, regenerate your spacelift-values.yaml from the helm_values output and redeploy the Helm chart to enable the VCS Gateway service.
Configure a DNS A record pointing your VCS Gateway domain to the same {PUBLIC_IP_ADDRESS} used by the Spacelift server. The nginx ingress controller supports host-based routing, allowing both the Spacelift server and VCS Gateway to share the same IP address while routing traffic to their respective services based on the Host header.
With the backend now configured, proceed to the VCS Agent Pools guide to complete the setup.
Next steps»
Now that your Spacelift installation is up and running, take a look at the initial installation section for the next steps to take.
Configure telemetry»
You can configure telemetry collection to monitor your installation's performance and troubleshoot issues. See our telemetry configuration guides for step-by-step instructions on setting up Datadog, OpenTelemetry with Jaeger, or OpenTelemetry with Grafana Stack.
Create a worker pool»
We recommend that you deploy workers in a dedicated namespace.
1 2 3 | |
Warning
When creating your WorkerPool, make sure to configure resources. This is highly recommended because otherwise very high resources requests can be set automatically by your admission controller.
Also make sure to deploy the WorkerPool and its secrets into the correct namespace we just created by adding -n ${K8S_WORKER_POOL_NAMESPACE} to the commands in the guide below.
➡️ You need to follow this guide for configuring Kubernetes Workers.
Deletion / uninstall»
Before running tofu destroy on the infrastructure, we recommended that you do a proper cleanup in the K8s cluster. That's because the Spacelift helm chart links a couple of Azure resources (such as an external IP) that are not managed by Terraform. If you do not remove them from K8s, tofu destroy will complain because some resources like networks cannot be removed if not empty.
1 2 3 4 5 6 7 8 | |
Note
Namespace deletions in Kubernetes can take a while or even get stuck. If that happens, you need to remove the finalizers from the stuck resources.