This guide provides a way to quickly get Spacelift up and running on your Kubernetes cluster.
Warning
1
Creating a database in Kubernetes, while possible, is not recommended. If you choose to do so, set up a volume for continuity of operations in the event of a power outage.
To deploy Spacelift on-premises, you need to take the following steps:
The Spacelift instance needs an object storage backend to store Terraform state files, run logs, and other artifacts.
For on-premises deployment, we expect that MinIO will be deployed in your cluster.
Please check the official docs for deployment options.
MinIO should also be exposed outside the cluster to make presigned URLs accessible to clients, such as users uploading state files, workers downloading workspaces as well as spacectl's local preview feature.
You must configure CORS policies on the MinIO side to allow your Spacelift installation to perform cross-origin requests.
Indeed, files uploaded from the browser are directly sent to the MinIO endpoint without going through Spacelift.
Warning
Spacelift adds metadata on uploaded objects using underscore in their names. Some reverse proxies filter out those headers, and that might cause uploads to fail.
If you are deploying ingress-nginx using Helm to expose your MinIO instance, you need to configure the following values:
Spacelift requires a PostgreSQL database to operate.
More details about database requirements for Spacelift can be found here.
Warning
1
Creating a database in Kubernetes, while possible, is not recommended. If you choose to do so, set up a volume for continuity of operations in the event of a power outage.
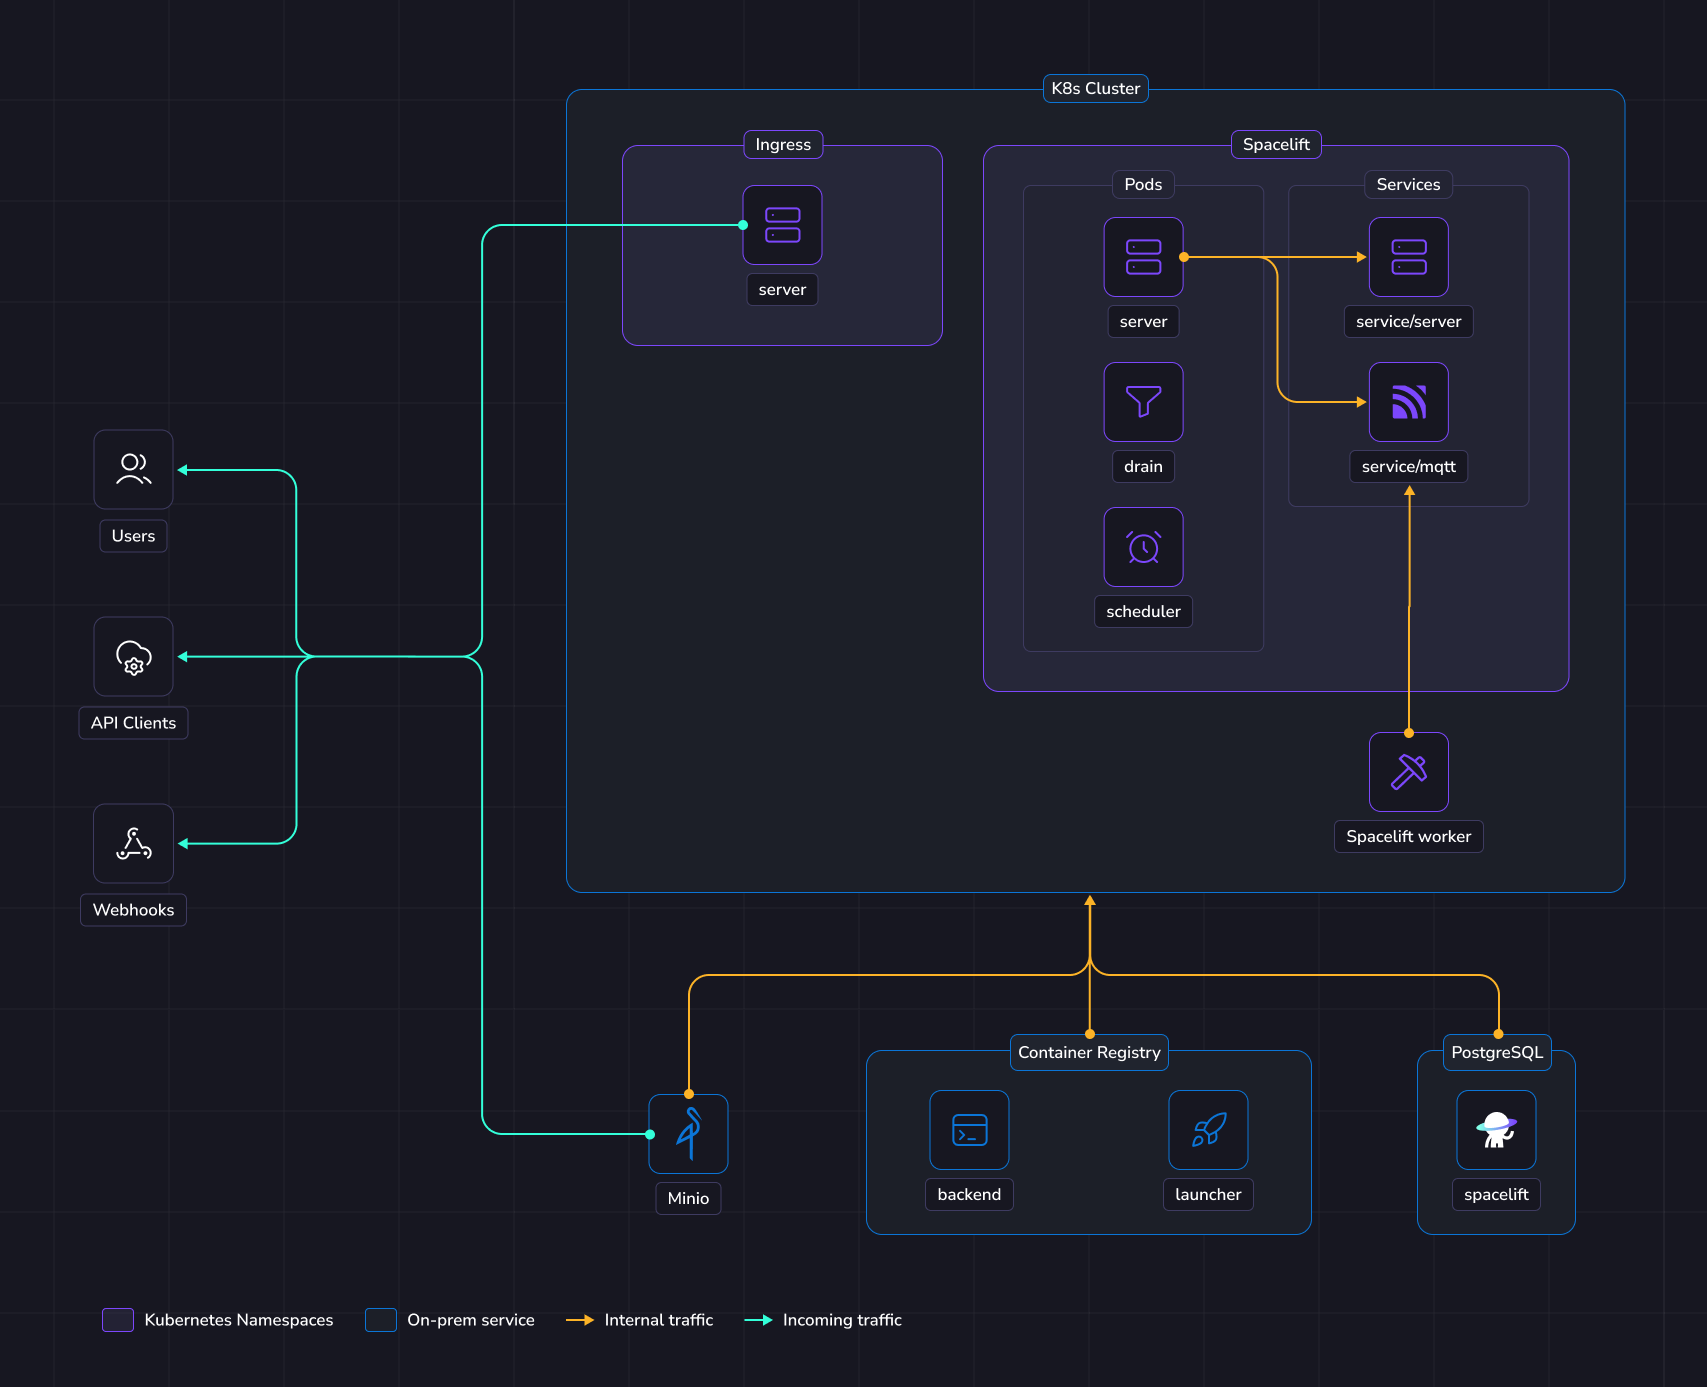
The Spacelift application can be deployed using a Helm chart.
The chart will deploy the 3 main components:
The scheduler.
The drain.
The server.
The scheduler is the component that handles recurring tasks. It creates new entries in a message queue when a new task needs to be performed.
The drain is an async background processing component that picks up items from message queues and processes events.
The server hosts the Spacelift GraphQL API, REST API and serves the embedded frontend assets.
It also contains the MQTT server to handle interactions with workers.
The server is exposed to the outside world using an Ingress resource. There is also an MQTT Service that exposes the broker to workers.
In this guide, Spacelift workers will also be deployed in your Kubernetes cluster.
That means your Spacelift runs will be executed in the same environment as the app itself (we recommend using a separate K8s namespace).
We highly recommend running your Spacelift workers within the same cluster, in a dedicated namespace.
This simplifies the infrastructure deployment and makes it more secure since your runs are executed in the same environment since you don't need to expose the MQTT server with a load balancer.
Spacelift requires an RSA key to encrypt sensitive information stored in the Postgres database. Please follow the instructions in the RSA Encryption section of our reference documentation to generate a new key.
Before you start, set a few environment variables that will be used in this guide:
1 2 3 4 5 6 7 8 91011121314151617
# Extract this from your archive: self-hosted-v6.3.0.tar.gzexportSPACELIFT_VERSION=v6.3.0
exportSERVER_DOMAIN="your domain of self-hosted Spacelift"# The Kubernetes namespace to deploy Spacelift toexportK8S_NAMESPACE="spacelift"# Configure a default temporary admin account that could be used to setup the instance.exportADMIN_USERNAME="admin"exportADMIN_PASSWORD="<password-here>"# Configure the Spacelift licenseexportLICENSE_TOKEN="<license-received-from-Spacelift>"# Set this to the base64-encoded RSA private key that you generated earlier in the "Generate encryption key" section of this guide.exportENCRYPTION_RSA_PRIVATE_KEY="<base64-encoded-private-key>"
terraform{required_providers{minio={source="aminueza/minio"version="3.5.0"}}}provider"minio"{ # minio_ssl = true # enable if using ssl}variable"retain_on_destroy"{default=false}resource"minio_s3_bucket""binaries"{bucket="spacelift-binaries"force_destroy=!var.retain_on_destroy}resource"minio_s3_bucket""deliveries"{bucket="spacelift-deliveries"force_destroy=!var.retain_on_destroy}resource"minio_s3_bucket""large_queue"{bucket="spacelift-large-queue-messages"force_destroy=!var.retain_on_destroy}resource"minio_s3_bucket""metadata"{bucket="spacelift-metadata"force_destroy=!var.retain_on_destroy}resource"minio_s3_bucket""modules"{bucket="spacelift-modules"force_destroy=!var.retain_on_destroy}resource"minio_s3_bucket""policy"{bucket="spacelift-policy-inputs"force_destroy=!var.retain_on_destroy}resource"minio_s3_bucket""run_logs"{bucket="spacelift-run-logs"force_destroy=!var.retain_on_destroy}resource"minio_s3_bucket""states"{bucket="spacelift-states"force_destroy=!var.retain_on_destroy}resource"minio_s3_bucket""uploads"{bucket="spacelift-uploads"force_destroy=!var.retain_on_destroy}resource"minio_s3_bucket""user_uploads"{bucket="spacelift-user-uploaded-workspaces"force_destroy=!var.retain_on_destroy}resource"minio_s3_bucket""workspace"{bucket="spacelift-workspaces"force_destroy=!var.retain_on_destroy}resource"minio_s3_bucket_versioning""binaries"{bucket=minio_s3_bucket.binaries.bucketversioning_configuration{status="Enabled"}}resource"minio_s3_bucket_versioning""modules"{bucket=minio_s3_bucket.modules.bucketversioning_configuration{status="Enabled"}}resource"minio_s3_bucket_versioning""policy"{bucket=minio_s3_bucket.policy.bucketversioning_configuration{status="Enabled"}}resource"minio_s3_bucket_versioning""run_logs"{bucket=minio_s3_bucket.run_logs.bucketversioning_configuration{status="Enabled"}}resource"minio_s3_bucket_versioning""states"{bucket=minio_s3_bucket.states.bucketversioning_configuration{status="Enabled"}}resource"minio_s3_bucket_versioning""uploads"{bucket=minio_s3_bucket.uploads.bucketversioning_configuration{status="Enabled"}}resource"minio_s3_bucket_versioning""user_uploads"{bucket=minio_s3_bucket.user_uploads.bucketversioning_configuration{status="Enabled"}}resource"minio_s3_bucket_versioning""workspace"{bucket=minio_s3_bucket.workspace.bucketversioning_configuration{status="Enabled"}}resource"minio_ilm_policy""deliveries"{bucket=minio_s3_bucket.deliveries.bucketrule{id="expire-after-1-day"status="Enabled"expiration="1d"}}resource"minio_ilm_policy""large_queue"{bucket=minio_s3_bucket.large_queue.bucketrule{id="expire-after-2-days"status="Enabled"expiration="2d"}}resource"minio_ilm_policy""metadata"{bucket=minio_s3_bucket.metadata.bucketrule{id="expire-after-2-days"status="Enabled"expiration="2d"}}resource"minio_ilm_policy""policy"{bucket=minio_s3_bucket.policy.bucketrule{id="expire-after-120-days"status="Enabled"expiration="120d"}}resource"minio_ilm_policy""run_logs"{bucket=minio_s3_bucket.run_logs.bucketrule{id="expire-after-60-days"status="Enabled"expiration="60d"}}resource"minio_ilm_policy""uploads"{bucket=minio_s3_bucket.uploads.bucketrule{id="expire-after-1-day"status="Enabled"expiration="1d"}}resource"minio_ilm_policy""user_uploads"{bucket=minio_s3_bucket.user_uploads.bucketrule{id="expire-after-1-day"status="Enabled"expiration="1d"}}resource"minio_ilm_policy""workspace"{bucket=minio_s3_bucket.workspace.bucketrule{id="expire-after-90-days"status="Enabled"expiration="90d"}}
Export the buckets env vars that will be used in the service configurations.
This guide uses an Ingress resource to expose the Spacelift server to users.
In order for this to work, you will need to already have an Ingress Controller available in your Kubernetes cluster.
The choice and installation of ingress controller is outside the scope of this guide.
Spacelift should run under valid HTTPS endpoints, so you need to provide valid certificates to the Ingress resources deployed by Spacelift.
One simple way to achieve that is to use cert-manager to generate Let's Encrypt certificates.
The Spacelift services need various environment variables to be configured in order to function correctly.
In this guide we will create three Spacelift secrets to pass these variables to the Spacelift backend services:
spacelift-shared - contains variables used by all services.
spacelift-server - contains variables specific to the Spacelift server.
spacelift-drain - contains variables specific to the Spacelift drain.
# Reference here the MinIO service of your clusterexportOBJECT_STORAGE_MINIO_ENDPOINT="myminio-hl.tenant-ns.svc.cluster.local:9000"# Set this to false if you're not using a secure connection for MinIOexportOBJECT_STORAGE_MINIO_USE_SSL="true"# Set to "true" if you are using a self signed certificate for MinIOexportOBJECT_STORAGE_MINIO_ALLOW_INSECURE="false"# Configure credentials that you should have created in the previous stepexportOBJECT_STORAGE_MINIO_ACCESS_KEY_ID="CHANGEME"exportOBJECT_STORAGE_MINIO_SECRET_ACCESS_KEY="CHANGEME"# Replace this with your database credentialsexportDATABASE_URL="postgres://<username>:<password>@<db-url>/<db-name>?statement_cache_capacity=0"
kubectlapply-f-<<EOFapiVersion: v1kind: Secretmetadata: name: spacelift-shared namespace: ${K8S_NAMESPACE}type: OpaquestringData: SERVER_DOMAIN: ${SERVER_DOMAIN} MQTT_BROKER_TYPE: builtin MQTT_BROKER_ENDPOINT: tls://spacelift-mqtt.${K8S_NAMESPACE}.svc.cluster.local:1984 ENCRYPTION_TYPE: rsa ENCRYPTION_RSA_PRIVATE_KEY: ${ENCRYPTION_RSA_PRIVATE_KEY} MESSAGE_QUEUE_TYPE: postgres OBJECT_STORAGE_TYPE: minio OBJECT_STORAGE_MINIO_ENDPOINT: ${OBJECT_STORAGE_MINIO_ENDPOINT} OBJECT_STORAGE_MINIO_USE_SSL: "${OBJECT_STORAGE_MINIO_USE_SSL}" OBJECT_STORAGE_MINIO_ALLOW_INSECURE: "${OBJECT_STORAGE_MINIO_ALLOW_INSECURE}" OBJECT_STORAGE_MINIO_ACCESS_KEY_ID: ${OBJECT_STORAGE_MINIO_ACCESS_KEY_ID} OBJECT_STORAGE_MINIO_SECRET_ACCESS_KEY: ${OBJECT_STORAGE_MINIO_SECRET_ACCESS_KEY} OBJECT_STORAGE_BUCKET_DELIVERIES: ${OBJECT_STORAGE_BUCKET_DELIVERIES} OBJECT_STORAGE_BUCKET_LARGE_QUEUE_MESSAGES: ${OBJECT_STORAGE_BUCKET_LARGE_QUEUE_MESSAGES} OBJECT_STORAGE_BUCKET_MODULES: ${OBJECT_STORAGE_BUCKET_MODULES} OBJECT_STORAGE_BUCKET_POLICY_INPUTS: ${OBJECT_STORAGE_BUCKET_POLICY_INPUTS} OBJECT_STORAGE_BUCKET_RUN_LOGS: ${OBJECT_STORAGE_BUCKET_RUN_LOGS} OBJECT_STORAGE_BUCKET_STATES: ${OBJECT_STORAGE_BUCKET_STATES} OBJECT_STORAGE_BUCKET_USER_UPLOADED_WORKSPACES: ${OBJECT_STORAGE_BUCKET_USER_UPLOADED_WORKSPACES} OBJECT_STORAGE_BUCKET_WORKSPACE: ${OBJECT_STORAGE_BUCKET_WORKSPACE} OBJECT_STORAGE_BUCKET_USAGE_ANALYTICS: "" OBJECT_STORAGE_BUCKET_UPLOADS_URL: ${OBJECT_STORAGE_BUCKET_UPLOADS_URL} DATABASE_URL: ${DATABASE_URL} LICENSE_TYPE: jwt LICENSE_TOKEN: ${LICENSE_TOKEN}EOF
kubectlapply-f-<<EOFapiVersion: v1kind: Secretmetadata: name: spacelift-server namespace: ${K8S_NAMESPACE}type: OpaquestringData: ADMIN_USERNAME: ${ADMIN_USERNAME} ADMIN_PASSWORD: ${ADMIN_PASSWORD} OBJECT_STORAGE_BUCKET_UPLOADS: ${OBJECT_STORAGE_BUCKET_UPLOADS} WEBHOOKS_ENDPOINT: https://${SERVER_DOMAIN}/webhooksEOF
kubectlapply-f-<<EOFapiVersion: v1kind: Secretmetadata: name: spacelift-drain namespace: ${K8S_NAMESPACE}type: OpaquestringData: LAUNCHER_IMAGE: ${LAUNCHER_IMAGE} LAUNCHER_IMAGE_TAG: ${SPACELIFT_VERSION} OBJECT_STORAGE_BUCKET_METADATA: ${OBJECT_STORAGE_BUCKET_METADATA}EOF
We recommend that you deploy workers in a dedicated namespace.
123
# Choose a namespace to deploy the workers toexportK8S_WORKER_POOL_NAMESPACE="spacelift-workers"
kubectlcreatenamespace$K8S_WORKER_POOL_NAMESPACE--dry-run=client-oyaml|kubectlapply-f-
Warning
When creating your WorkerPool, make sure to configure resources. This is highly recommended because otherwise very high resources requests can be set automatically by your admission controller.
Also make sure to deploy the WorkerPool and its secrets into the correct namespace we just created by adding -n ${K8S_WORKER_POOL_NAMESPACE} to the commands in the guide below.