OpenID Connect (OIDC)»
Hint
For this feature to work, the service you are integrating with needs to be able to access your Spacelift instance. For example, if you have deployed your Spacelift instance with an internal rather than public-facing load balancer, you will not be able to use OIDC Federation for AWS role assumption.
OpenID Connect is a federated identity technology that allows you to exchange short-lived Spacelift credentials for temporary credentials valid for external service providers like AWS, GCP, Azure, HashiCorp Vault etc. This allows you to use Spacelift to manage your infrastructure on these cloud providers without the need of using static credentials.
OIDC is also an attractive alternative to our native AWS integration in that it implements a common protocol, requires no additional configuration on the Spacelift side, supports a wider range of external service providers and empowers the user to construct more sophisticated access policies based on JWT claims.
It is not the purpose of this document to explain the details of the OpenID Connect protocol. If you are not familiar with it, we recommend you read the OpenID Connect specification or GitHub's excellent introduction to security hardening with OpenID Connect.
About the Spacelift OIDC token»
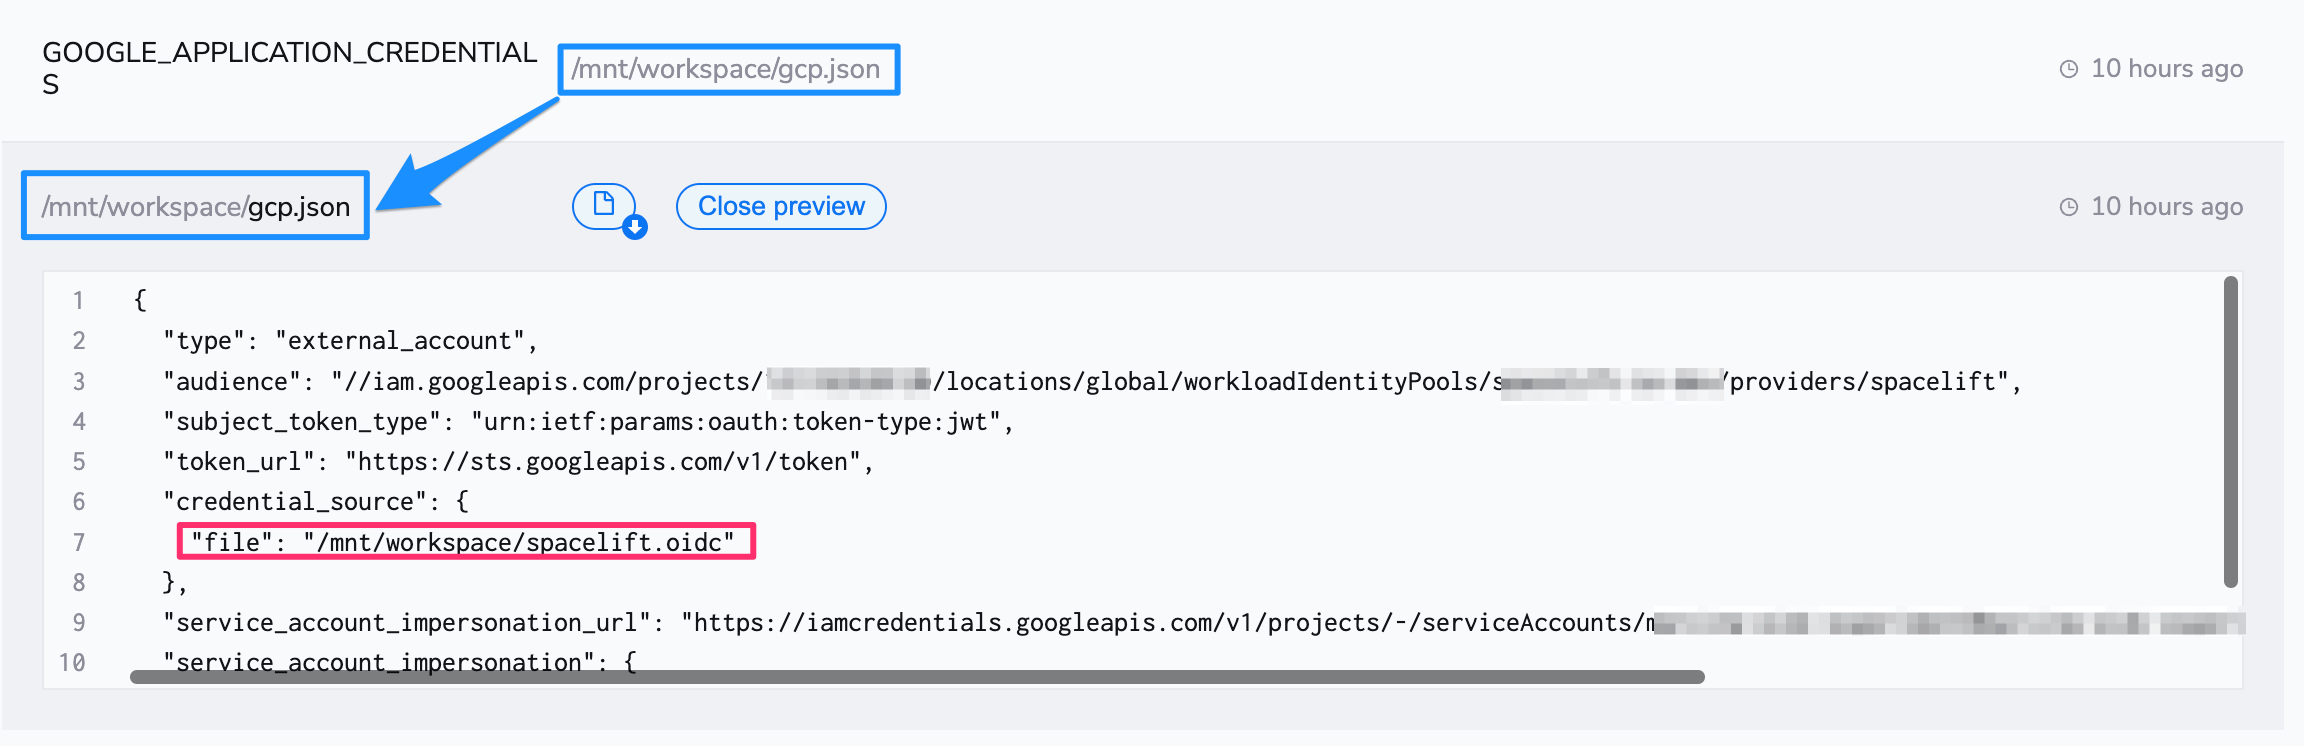
The Spacelift OIDC token is a JSON Web Token that is signed by Spacelift and contains a set of claims that can be used to construct a set of temporary credentials for the external service provider. The token is valid for an hour and is available to every run in any paid Spacelift account. The token is available in the SPACELIFT_OIDC_TOKEN environment variable and in the /mnt/workspace/spacelift.oidc file.
Standard claims»
The token contains the following standard claims:
iss- the issuer of the token - the URL of your Spacelift account, for examplehttps://demo.app.spacelift.io. This is unique for each Spacelift account;sub- the subject of the token - some information about the Spacelift run that generated this token. The subject claim is constructed as follows:space:<space_id>:(stack|module):<stack_id|module_id>:run_type:<run_type>:scope:<read|write>. For example,space:legacy:stack:infra:run_type:TRACKED:scope:write. Individual values are also available as separate custom claims - see below;aud- the audience of the token - the hostname of your Spacelift account. For example,demo.app.spacelift.io. This is unique for each Spacelift account;exp- the expiration time of the token - the time at which the token will expire, in seconds since the Unix epoch. The token is valid for one hour;iat- the time at which the token was issued, in seconds since the Unix epoch;jti- the unique identifier of the token;nbf- the time before which the token is not valid, in seconds since the Unix epoch. This is always set to the same value asiat;
Custom claims»
The token also contains the following custom claims:
spaceId- the ID of the space in which the run that owns the token was executed;callerType- the type of the caller, ie. the entity that owns the run - eitherstackormodule;callerId- the ID of the caller, ie. the stack or module that generated the run;runType- the type of the run (PROPOSED,TRACKED,TASK,TESTINGorDESTROY;runId- the ID of the run that owns the token;scope- the scope of the token - eitherreadorwrite.
About scopes»
Whether the token is given read or write scope depends on the type of the run that generated the token. Proposed runs get a read scope, while tracked, testing and destroy runs as well as tasks get a write scope. The only exception to that rule are tracked runs whose stack is not set to autodeploy. In that case, the token will have a read scope during the planning phase, and a write scope during the apply phase. This is because we know in advance that the tracked run requiring a manual approval should not perform write operations before human confirmation.
Note that the scope claim, as well as other claims presented by the Spacelift token are merely advisory. It depends on you whether you want to control access to your external service provider based on the scope of the token or on some other claim like space, caller or run type. In other words, Spacelift just gives you the data and it's up to you to decide whether and how to use it.
Using the Spacelift OIDC token»
In this section we will show you how to use the Spacelift OIDC token to authenticate with AWS, GCP, Azure, and HashiCorp Vault. In particular, we will focus on setting up the integration and using it from these services' respective Terraform providers
AWS»
Warning
While the Terraform AWS provider supports authenticating with OIDC, the AWS S3 state backend does not support it yet.
If you need to use the AWS S3 state backend, you can use the following workaround:
- Add the following command as a
before_inithook (make sure to replace<ROLE ARN>with your IAM role ARN)
1 | |
- Comment out the
role_arnargument in thebackendblock - Comment out the
assume_role_with_web_identitysection in the AWS provider block
Alternatively, you can use the dedicated AWS Cloud Integration that uses AWS STS to obtain temporary credentials.
Configuring Spacelift as an Identity Provider»
In order to be able to do that, you will need to set up Spacelift as a valid identity provider for your AWS account. This is done by creating an OpenID Connect identity provider . You can do it declaratively using any of the IaC providers, programmatically using the AWS CLI or simply use the console. For illustrative purposes, we will use the console:
- Go to the AWS console and select the IAM service;
- Click on the "Identity providers" link in the left-hand menu;
- Click on the "Add provider" button in the top bar

- Select "OpenID Connect" as the provider type
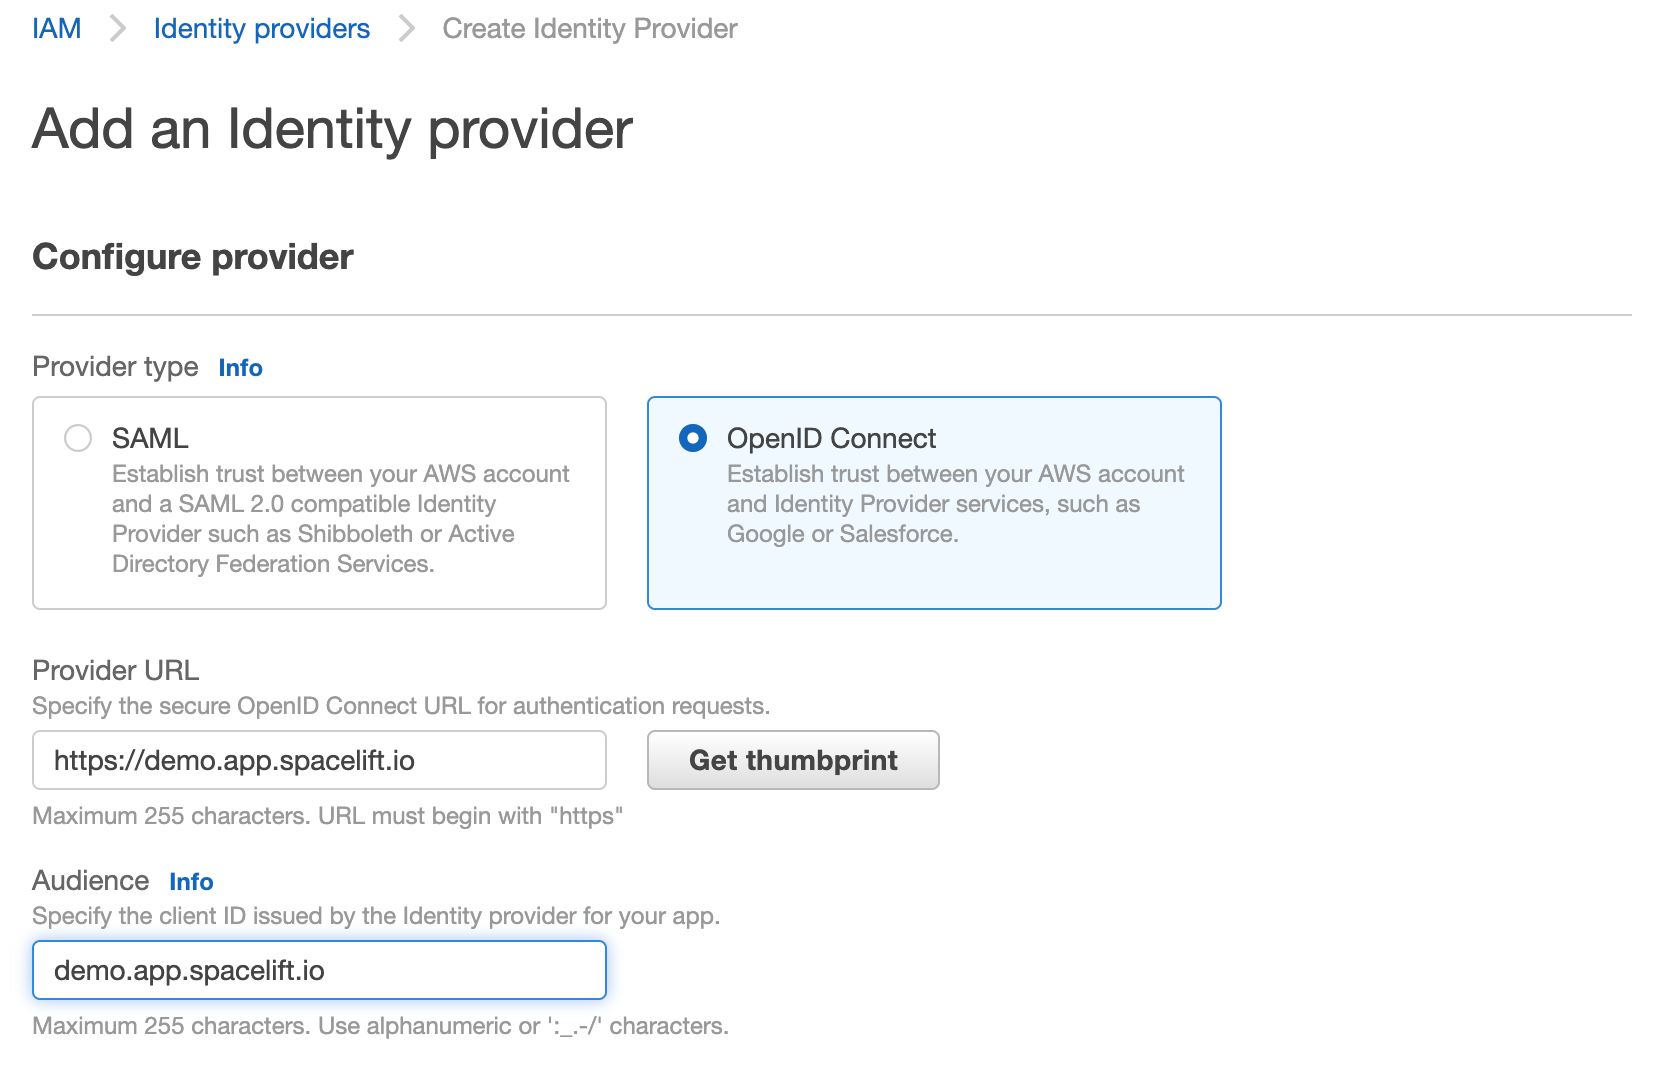
- Make sure to get the host thumbprint by clicking the "Get thumbprint" button. This is required by AWS and protects you from a certain class of MitM attacks.
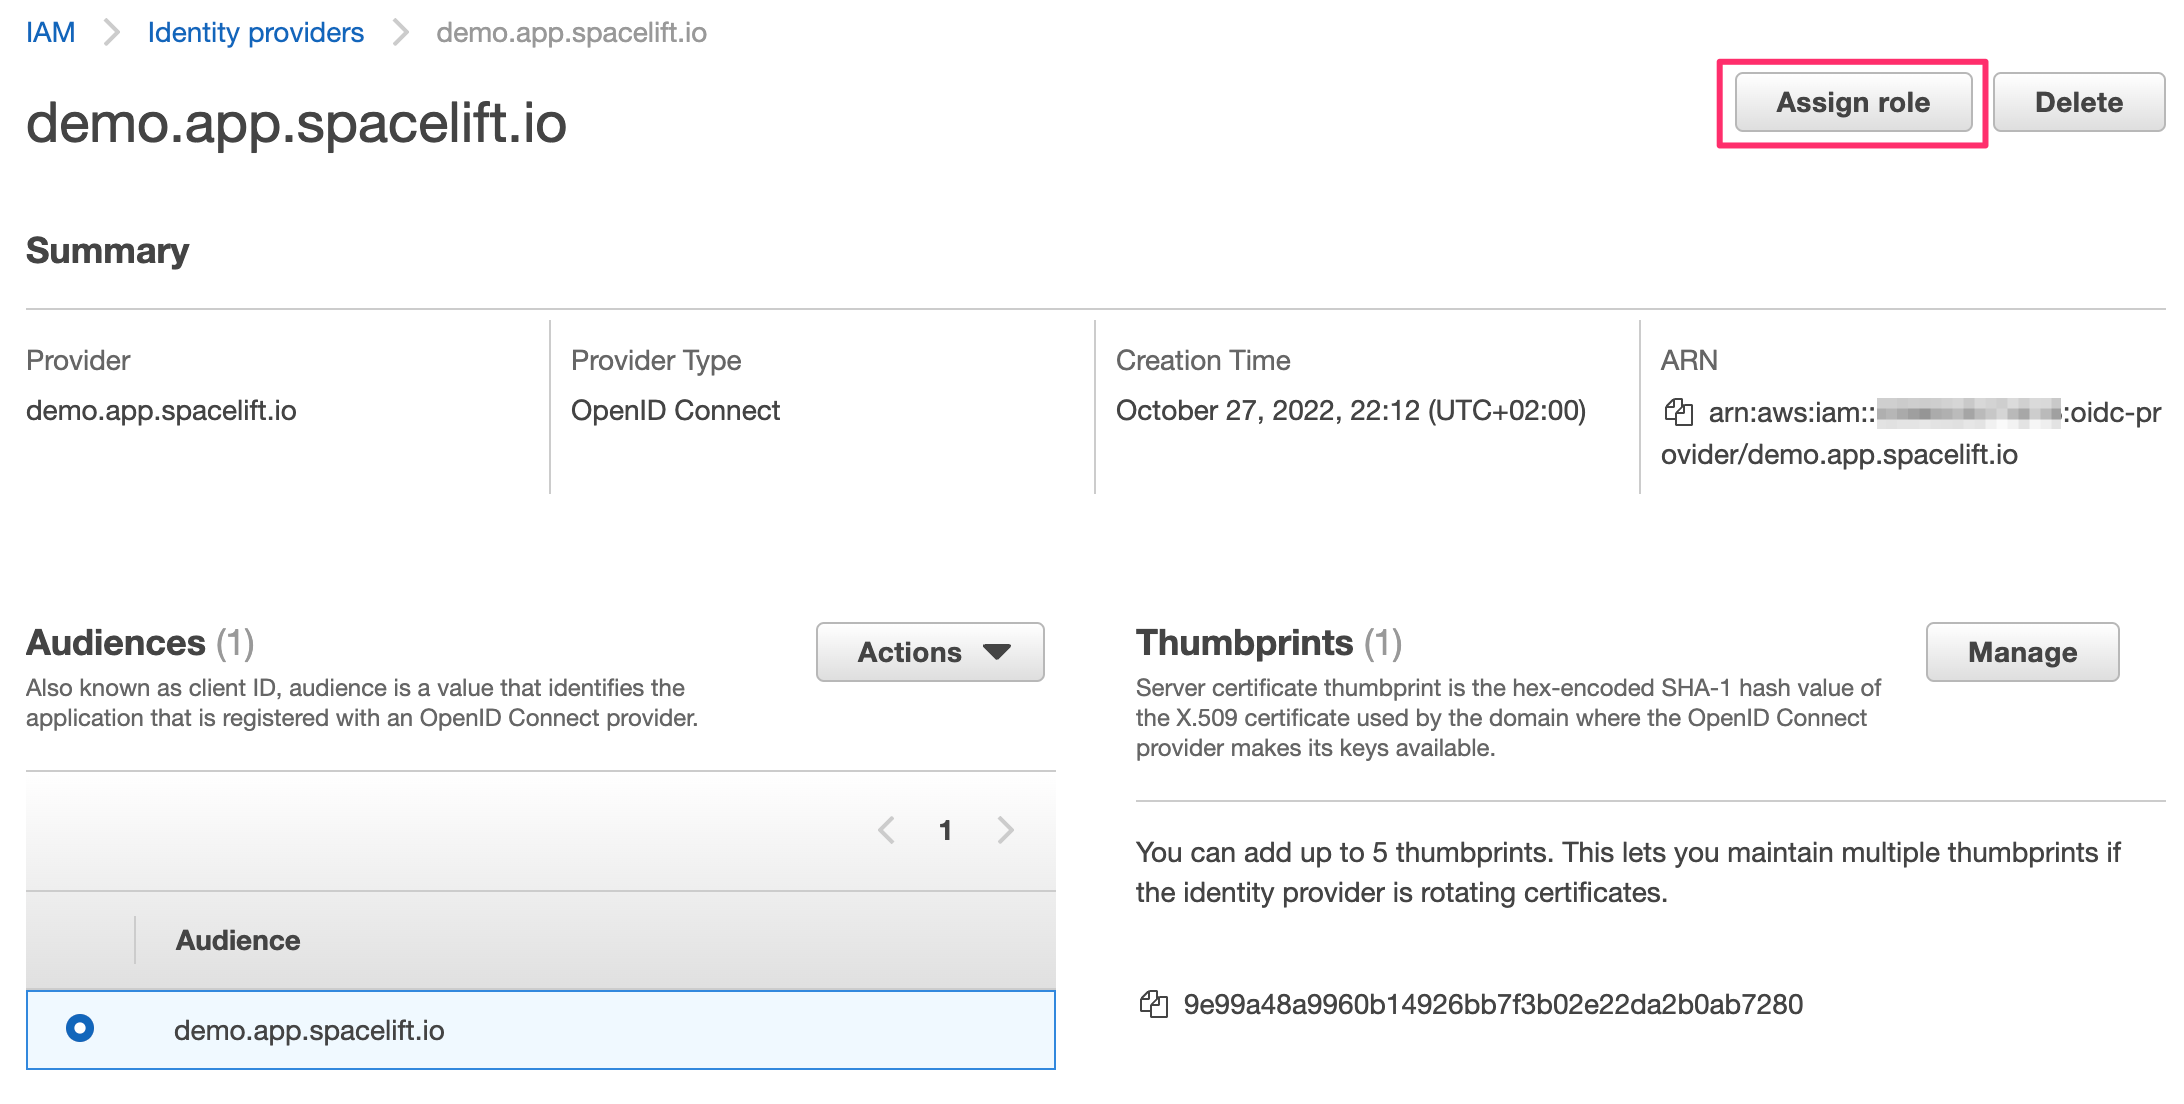
Once created, the identity provider will be listed in the "Identity providers" table. You can click on the provider name to see the details. From here, you will also be able to assign an IAM role to this new identity provider:
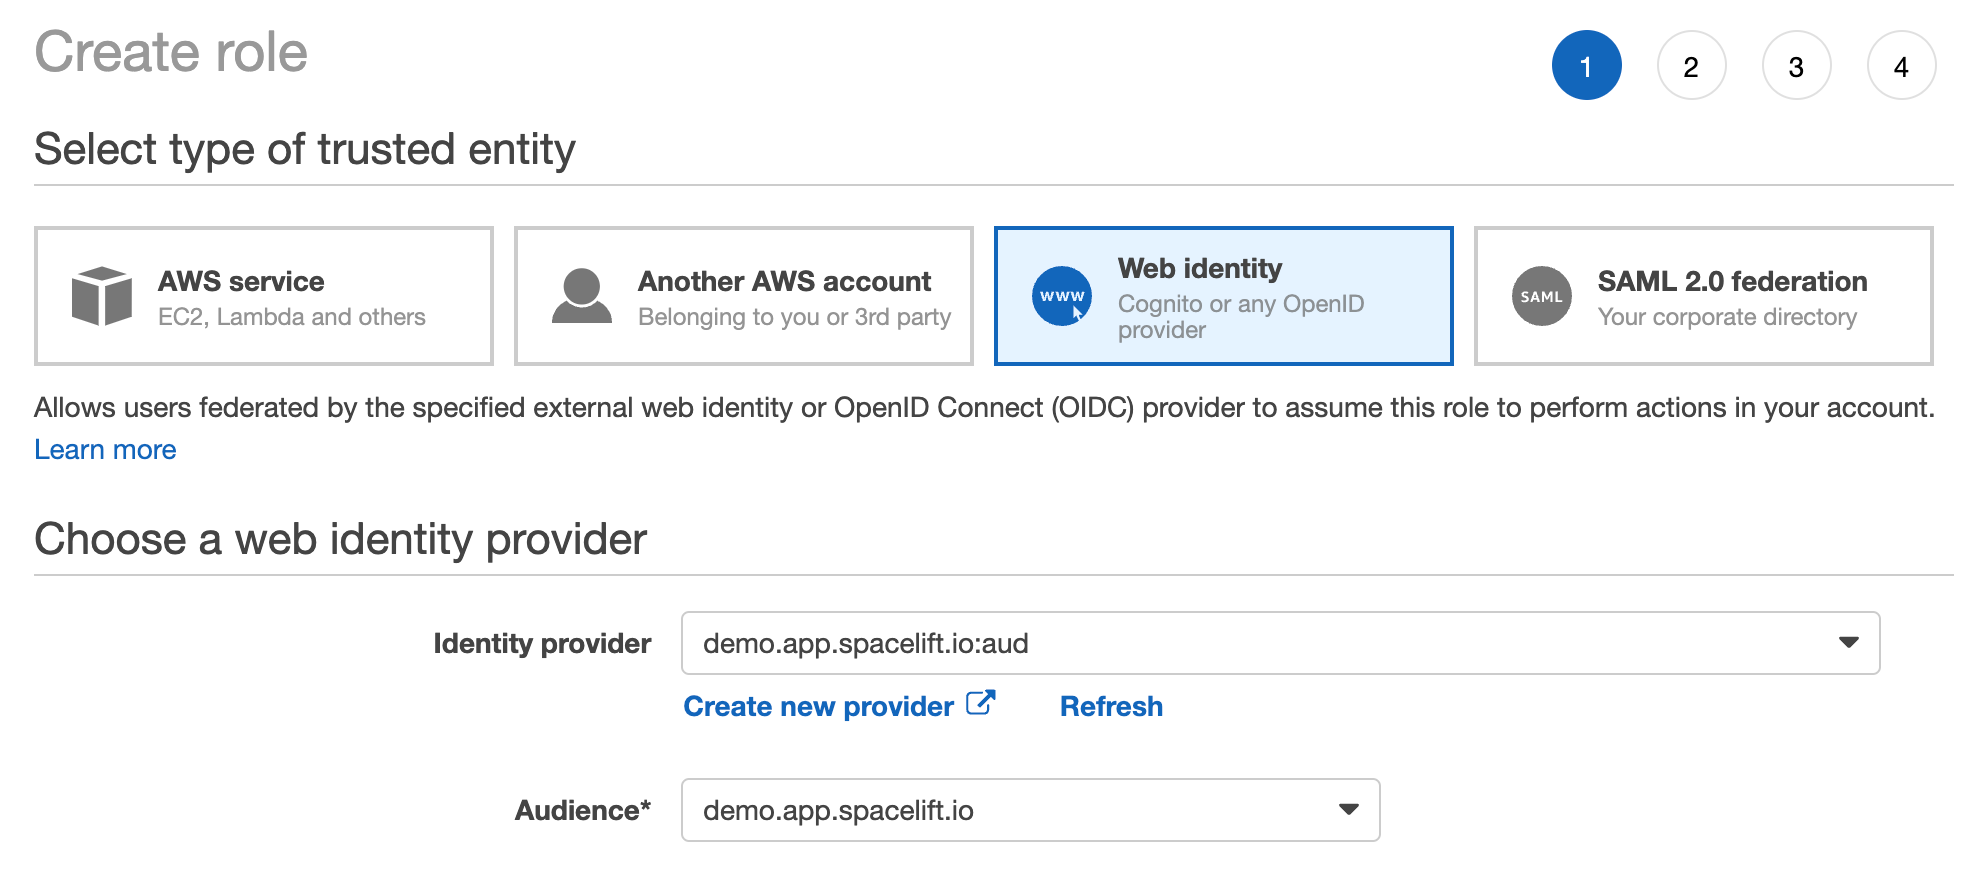
A dialog will pop up, asking you to select whether you want to create a new role or use an existing one. Let's create a brand new role. The most important thing for us is to select the right trusted entity - the new Spacelift OIDC provider. Make sure you select the audience from the dropdown - there should be just one option to choose from:
The rest of the process is the same as for any other role creation. You will be asked to select the policies that you want to attach to the role. You can also add tags and a description. Once you're done, click the "Create role" button.
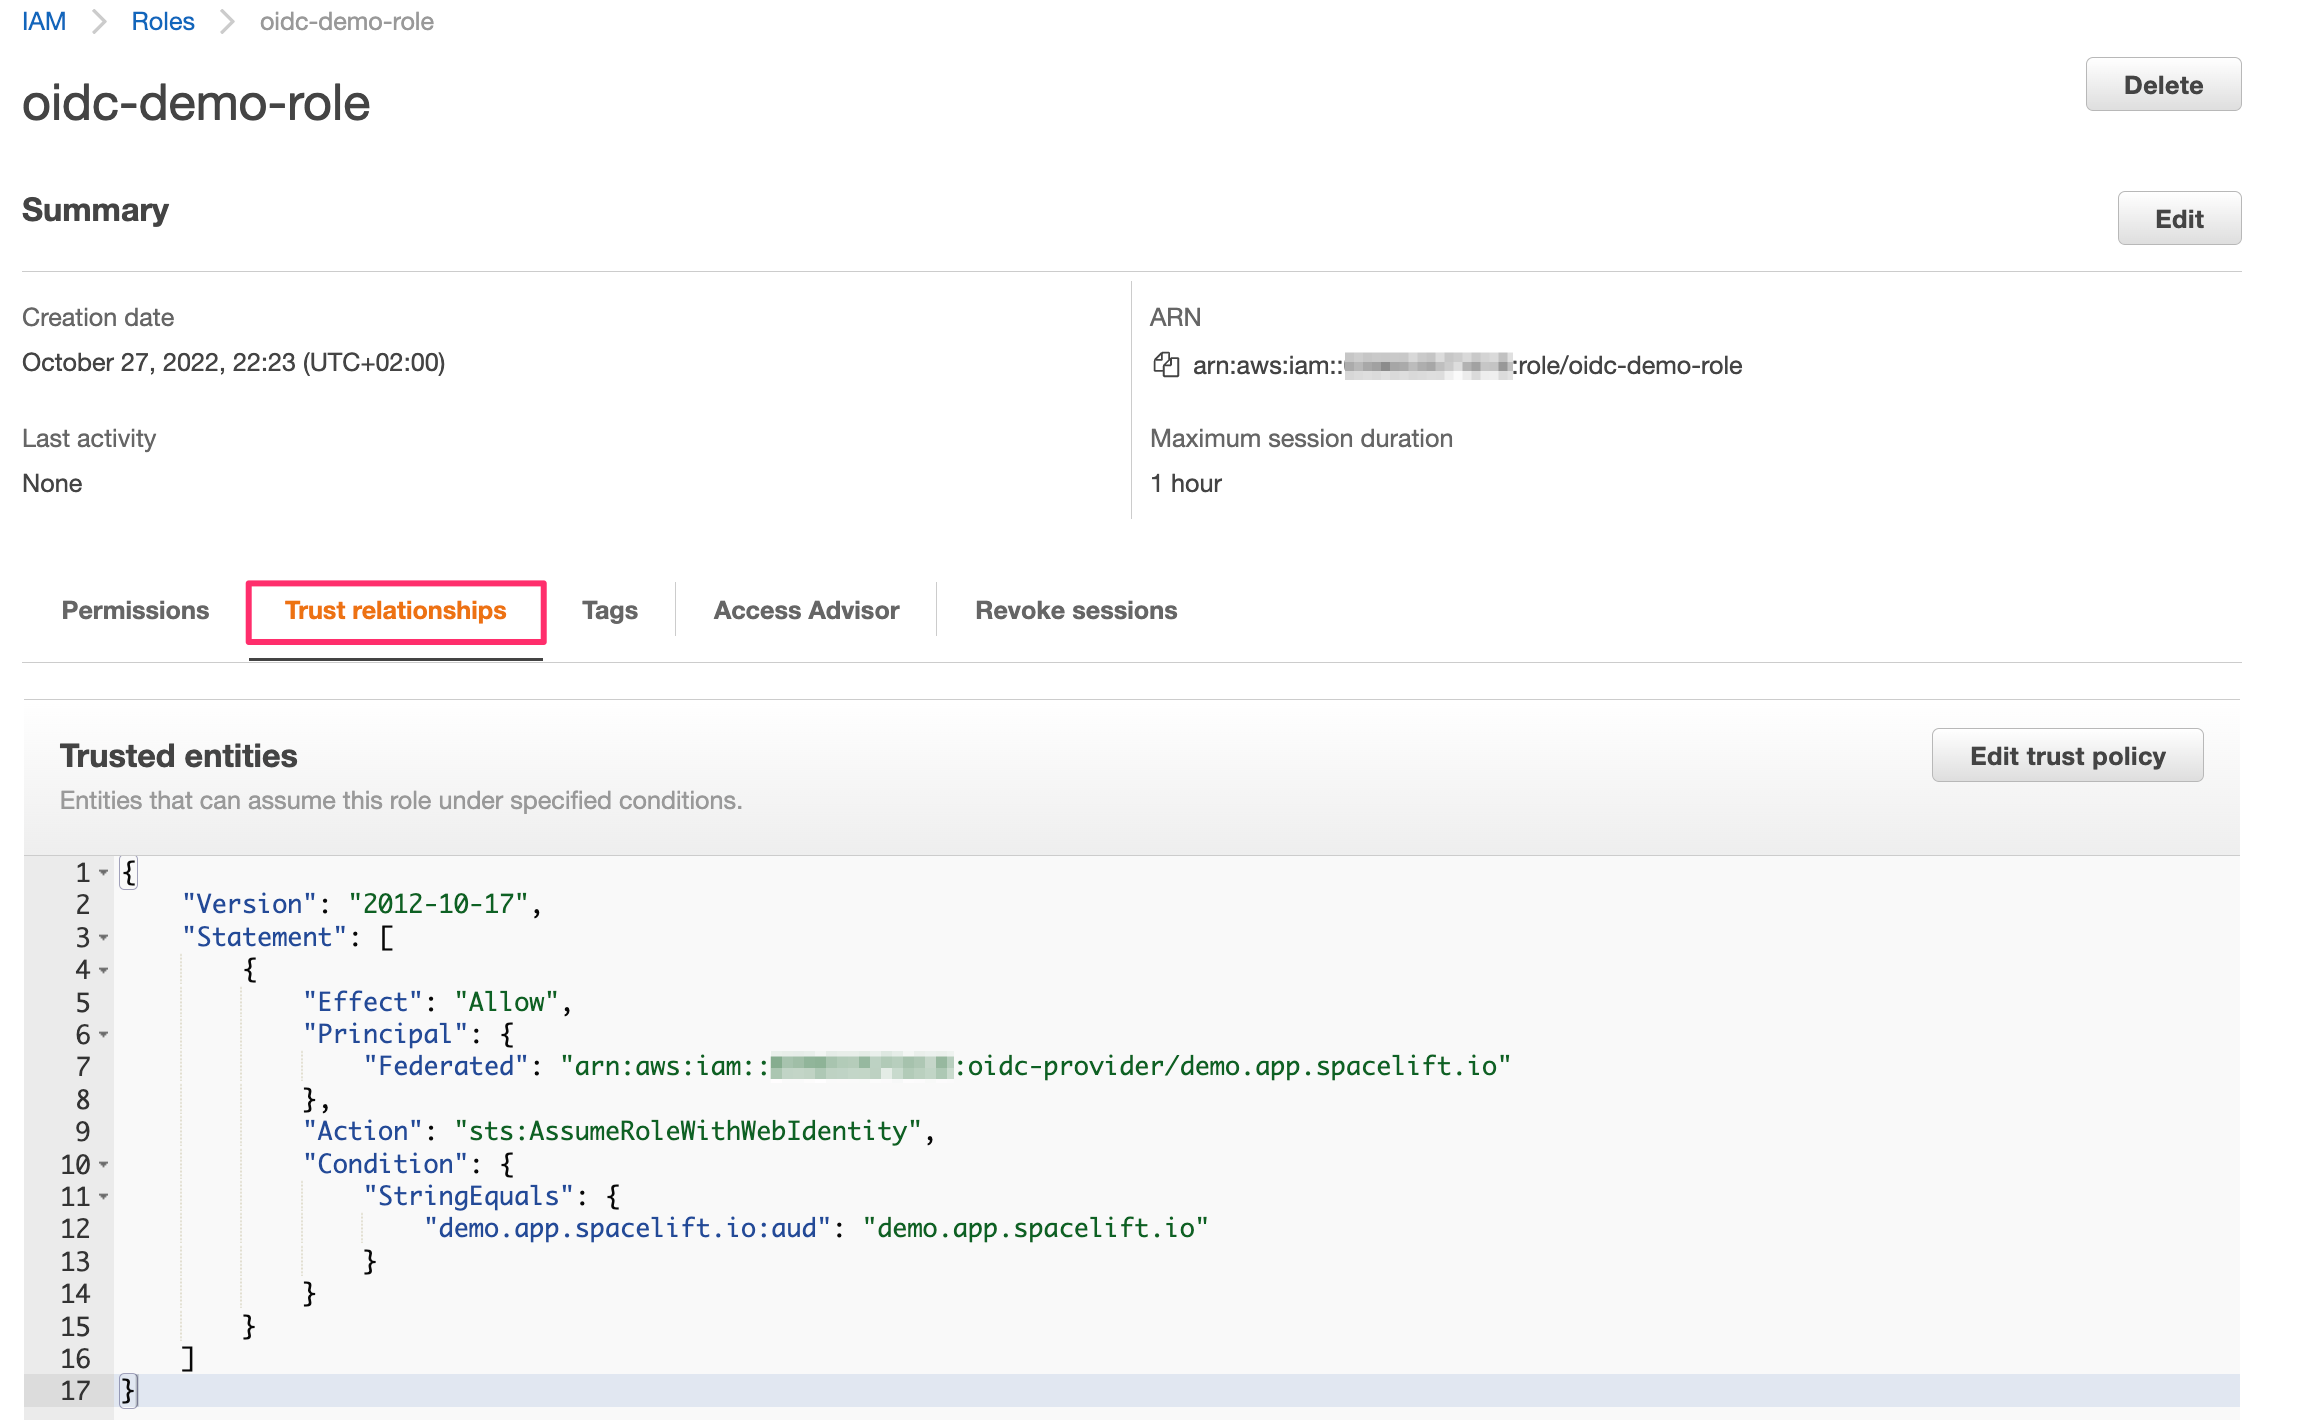
If you go to your new role's details page, in the Trust relationships section you will notice that it is now associated with the Spacelift OIDC provider:
This trust relationship is very relaxed and will allow any stack or module in the demo Spacelift account to assume this role. If you want to be more restrictive, you will want to add more conditions. For example, we can restrict the role to be only assumable by stacks in the production space by adding the following condition:
1 2 3 | |
Hint
You will need to replace demo.app.spacelift.io with the hostname of your Spacelift account.
You can also restrict the role to be assumable only by a specific stack by matching on the stack ID:
1 2 3 | |
You can mix and match these to get the exact constraints you need. It is not the purpose of this guide to go into the intricacies of AWS IAM conditions - you can learn all about these in the official doc. One important thing to remember though is that AWS does not seem to support custom claims so you will need to use the standard ones to do the matching - primarily sub, as shown above.
Configuring the Terraform Provider»
Once the Spacelift-AWS OIDC integration is set up, the provider can be configured without the need for any static credentials. The aws_role_arn variable should be set to the ARN of the role that you want to assume:
1 2 3 4 5 6 | |
GCP»
Configuring Workload Identity»
In order to enable Spacelift runs to access GCP resources, you need to set up Spacelift as a valid identity provider for your account. To do this you need to perform a number of steps within GCP:
- Create a workload identity pool and set up the Spacelift OIDC provider as an identity provider for it;
- Create a service account that will be used by Spacelift;
- Connect the service account to the workload identity pool;
Let's go through these steps one by one. First, you will want to go to the GCP console and select the IAM service, then click on the "Workload Identity Federation" link in the left-hand menu:
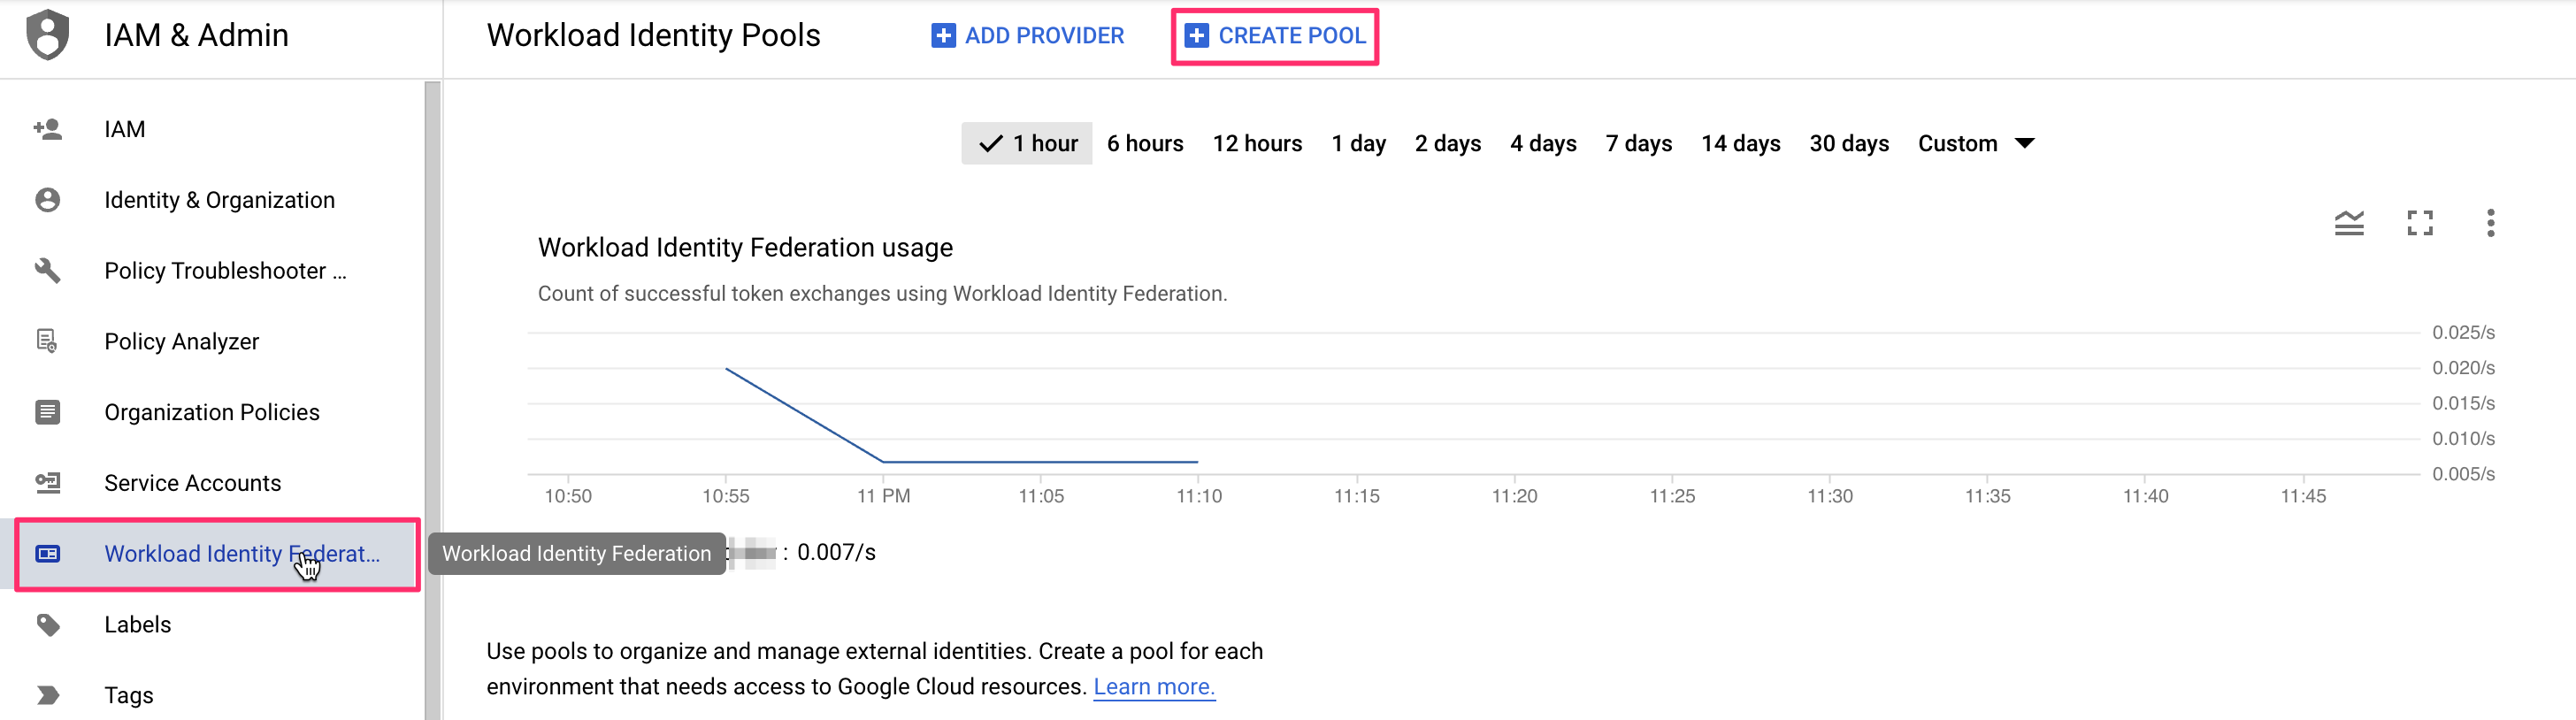
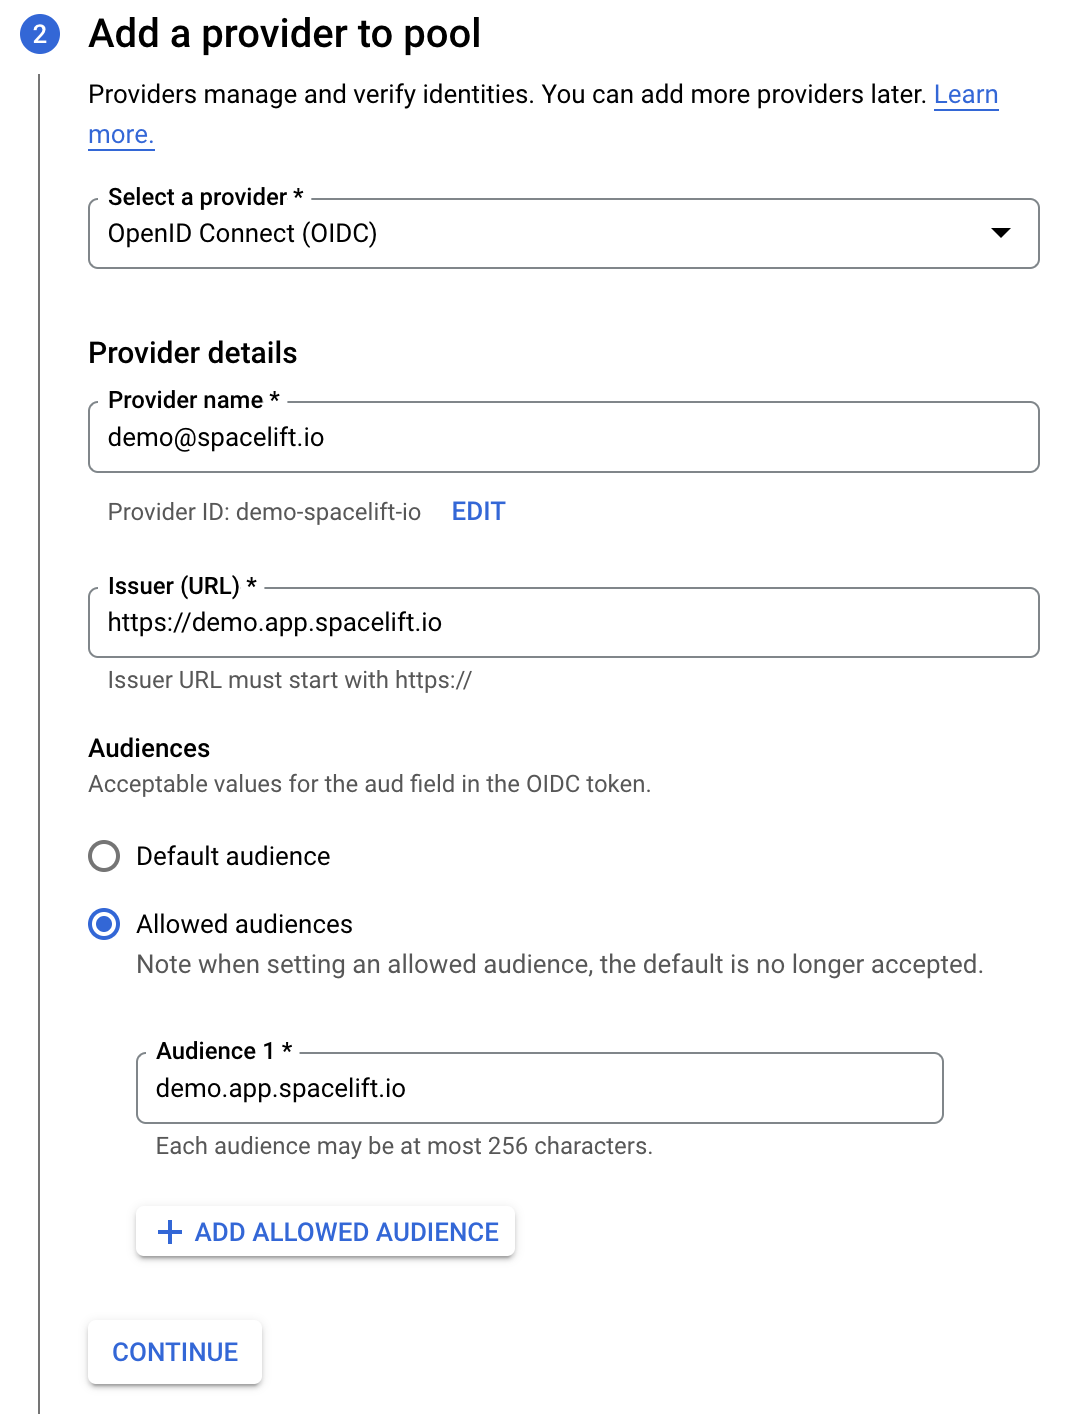
There, you will want to click on the Create pool button, which will take you to the pool creation form. First, give your new identity pool a name and optionally set a description. The next step is more interesting - you will need to set up an identity provider. The name is pretty much arbitrary but the rest of the fields are important to get right. The Issuer URL needs to be set to the URL of your Spacelift account (including the scheme). You will want to manually specify allowed audiences. There's just one you need - the hostname of your Spacelift account. Here is what a properly filled out form would look like:
In the last step, you will need to configure a mapping between provider Spacelift token claims (assertions) and Google attributes. google.subject is a required mapping and should generally map to assertion.sub. Custom claims can be mapped to custom attributes, which need to start with the attribute. prefix. In the below example, we are also mapping Spacelift's spaceId claim to GCP's custom space attribute:
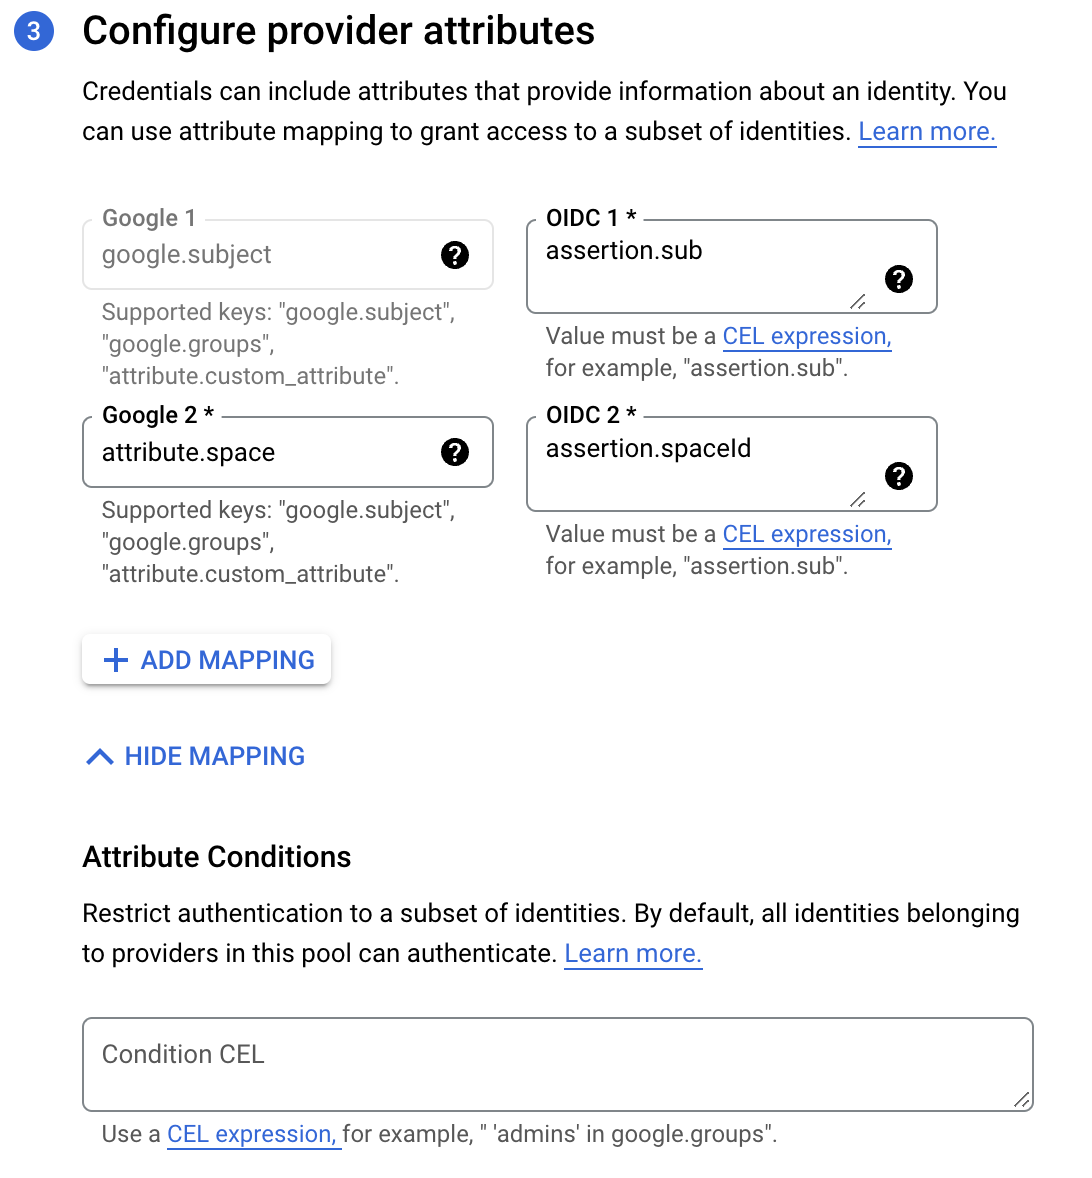
To restrict which identities can authenticate using your workload identity pool you can specify extra conditions using Google's Common Expression Language.
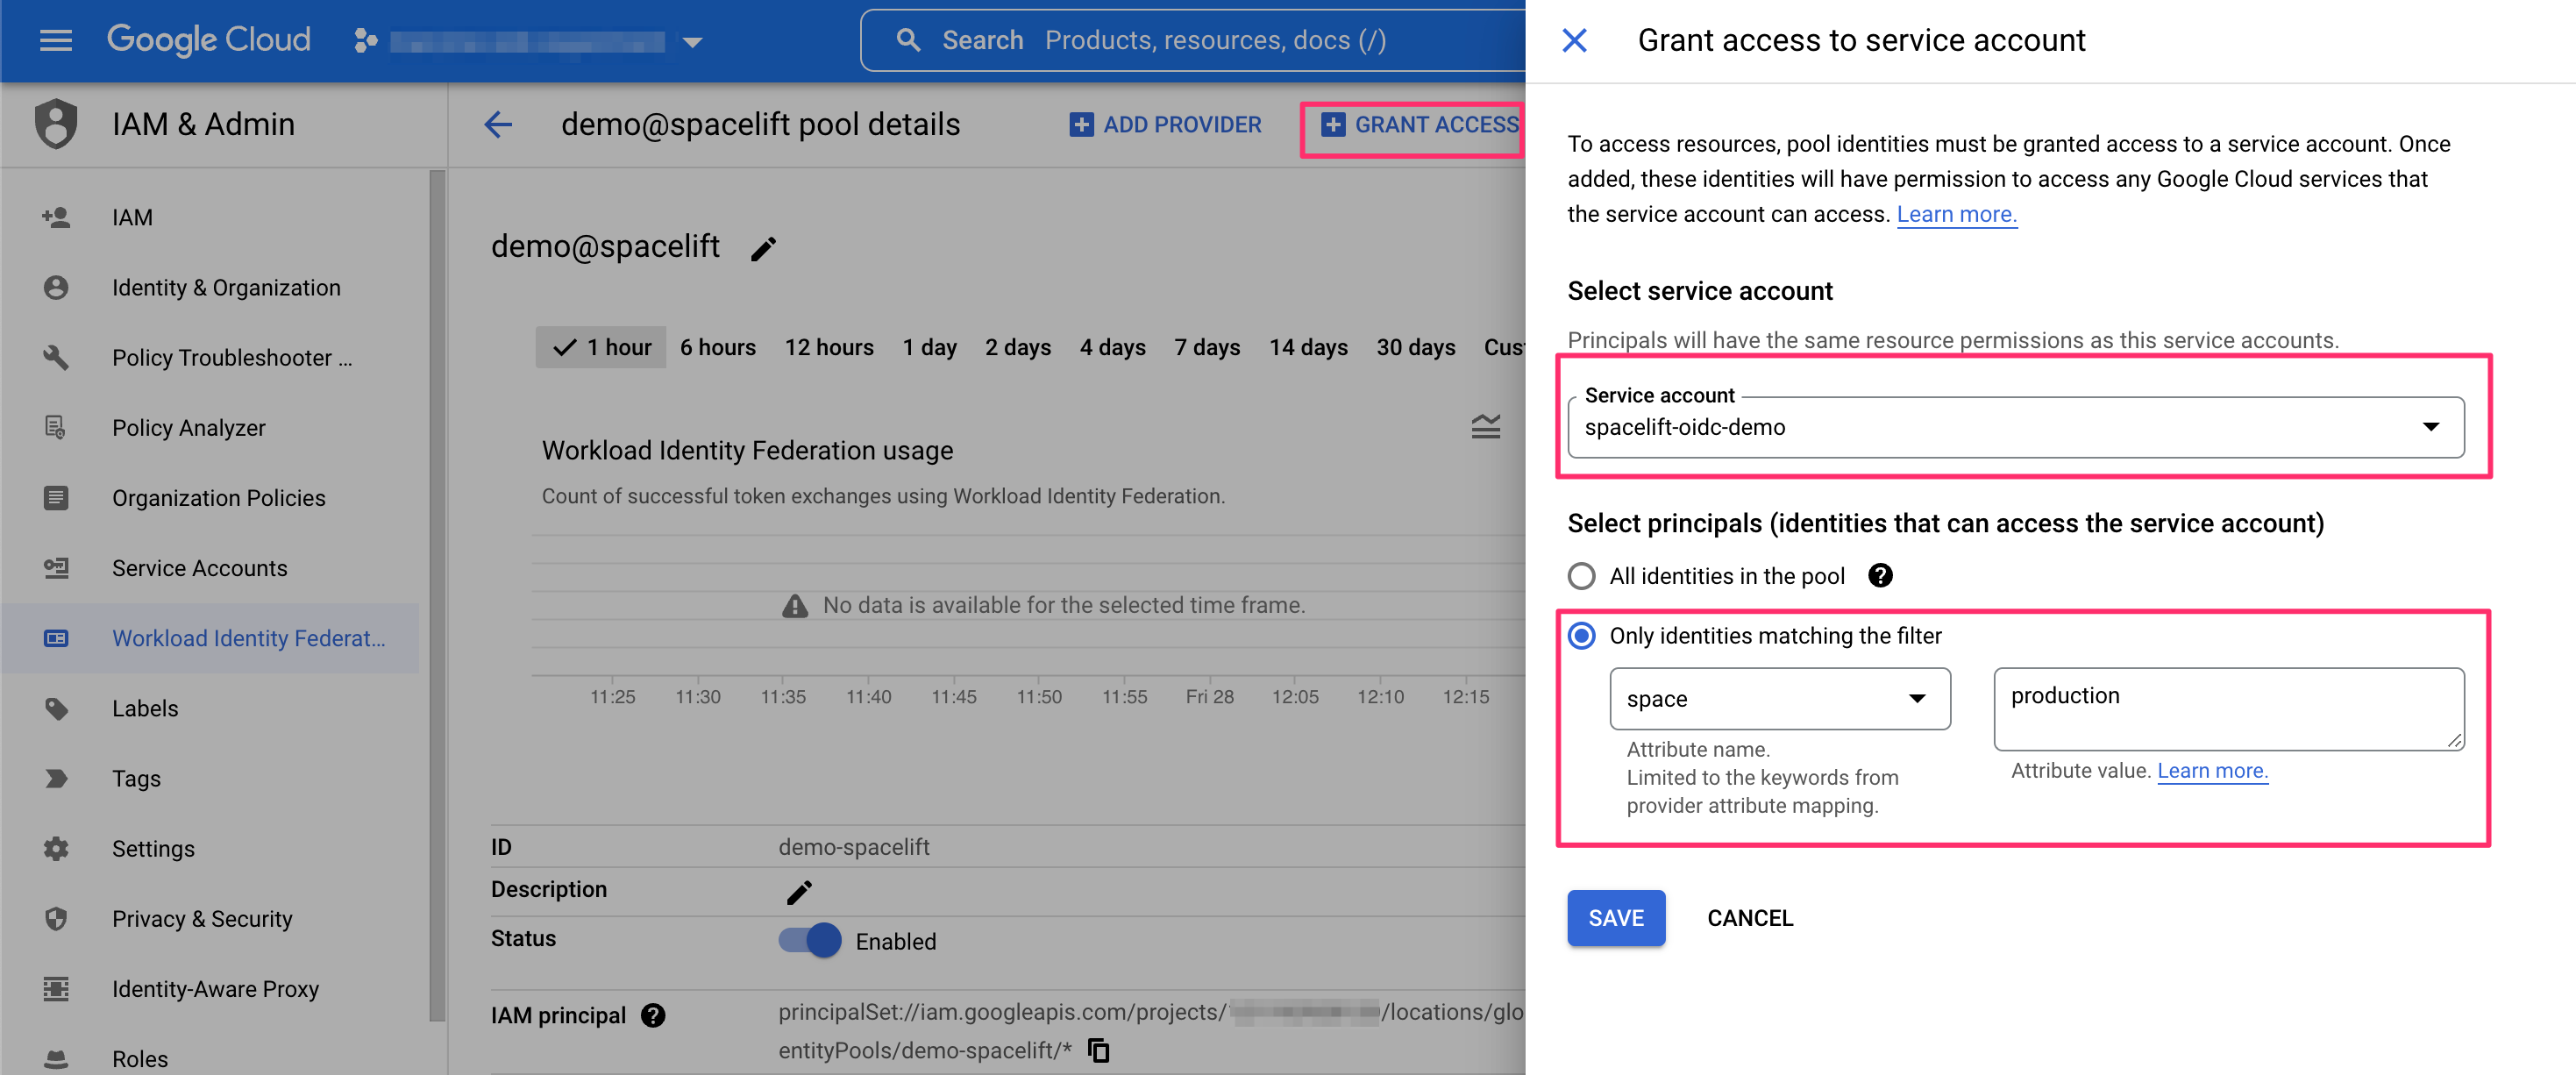
Last but not least, we will want to grant the workload identity pool the ability to impersonate the service account we will be using. Assuming we already have a service account, let's allow any token claiming to originate from the production space in our Spacelift account to impersonate it:
Configuring the Terraform Provider»
Once the Spacelift-GCP OIDC integration is set up, the Google Cloud Terraform provider can be configured without the need for any static credentials. You will however want to provide a configuration file telling the provider how to authenticate. The configuration file can be created manually or generated by the gcloud utility and would look like this:
1 2 3 4 5 6 7 8 9 10 11 12 13 | |
Your Spacelift run needs to have access to this file, so you can check it in (there's nothing secret here), mount it on a stack or mount it in a context that is then attached to the stack. Note that you will also need to tell the provider how to find this configuration file. This bit is nicely documented in the Google Cloud Terraform provider docs. And here is an example of us using a Spacelift context to mount the file and configure the provider to be attached to an arbitrary number of stacks:
Azure»
Configuring workload identity federation»
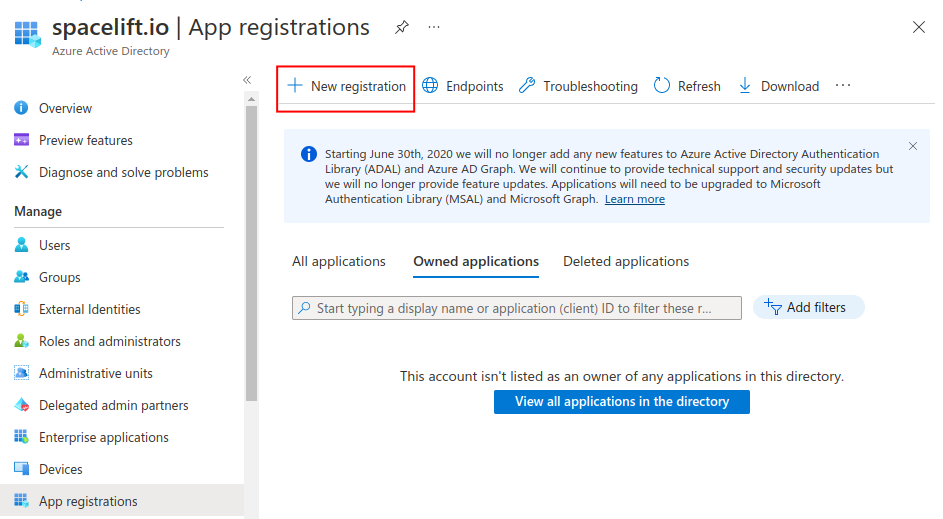
In order to enable Spacelift runs to access Azure resources, you need to set up Spacelift as a valid identity provider for your account. This is done using workload identity federation. The set up process involves creating an App Registration, and then adding federated credentials that tell Azure which Spacelift runs should be able to use which App Registrations. This process can be completed via the Azure Portal, Azure CLI or Terraform. For illustrative purposes we will use the Azure Portal.
The first step is to go to the Azure AD section of the Azure Portal, go to App registrations, and then click on the New registration button:
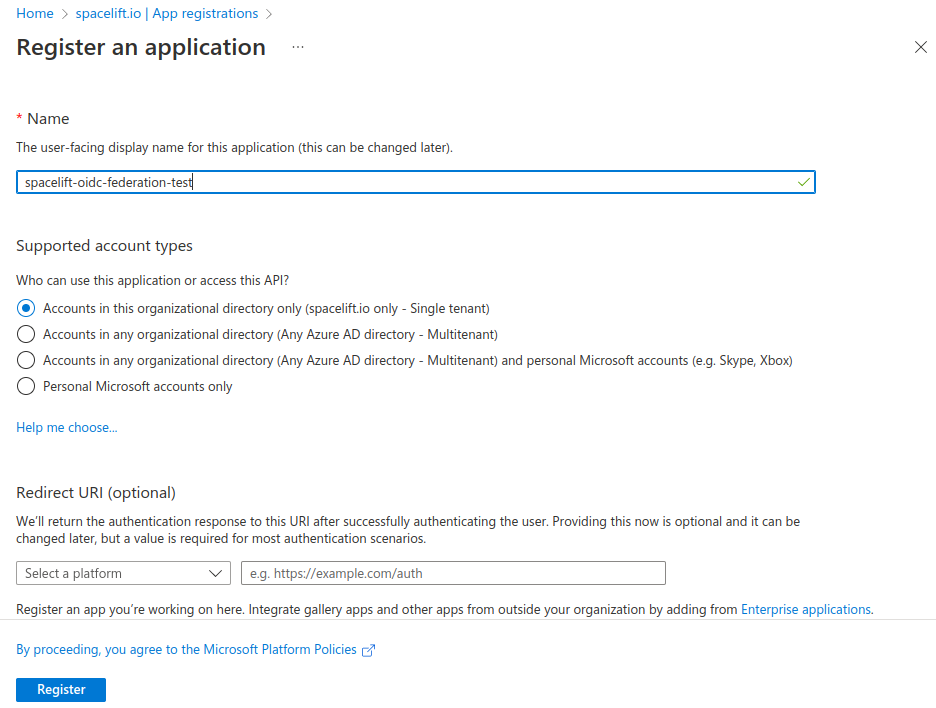
Specify a name for your registration, select the Accounts in this organizational directory only option, and click on the Register button:
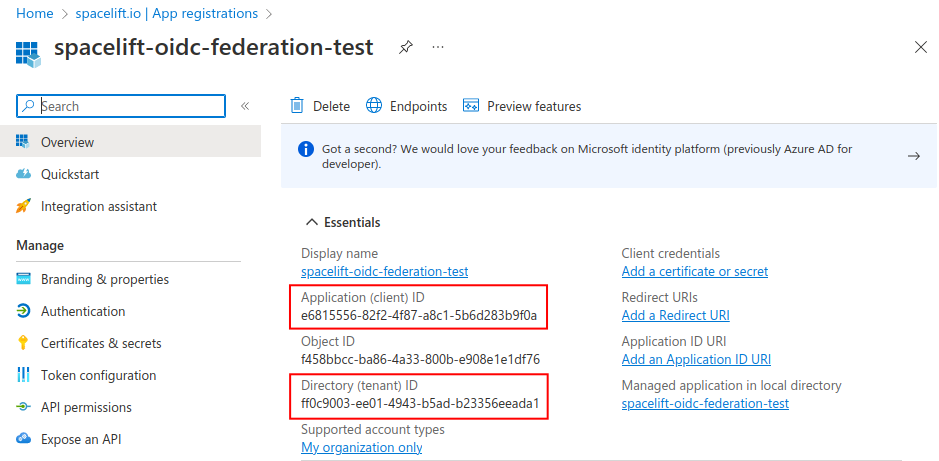
On the overview page, take a note of the Application (client) ID and Directory (tenant) ID - you will need them later when configuring the Terraform provider.
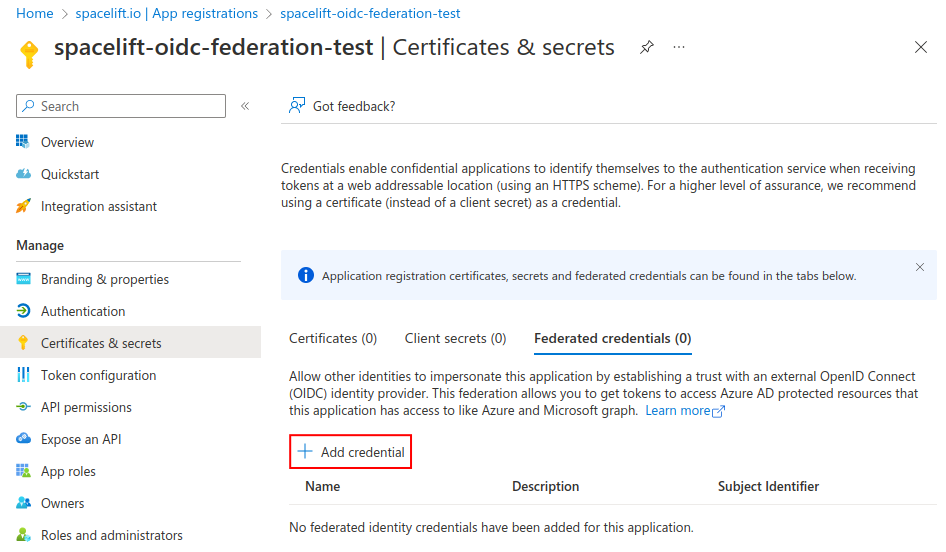
Next, go to the Certificates & secrets section, select the Federated credentials tab and click on the Add credential button:
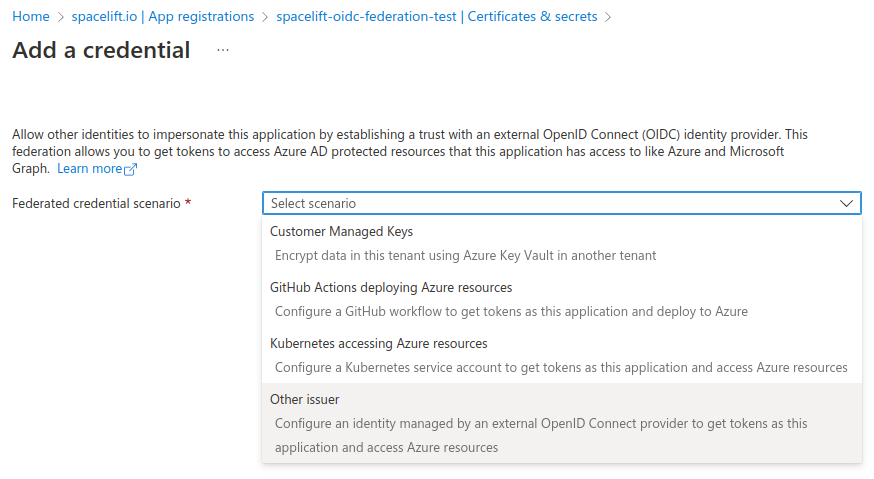
On the next screen, choose Other issuer as the Federated credential scenario:
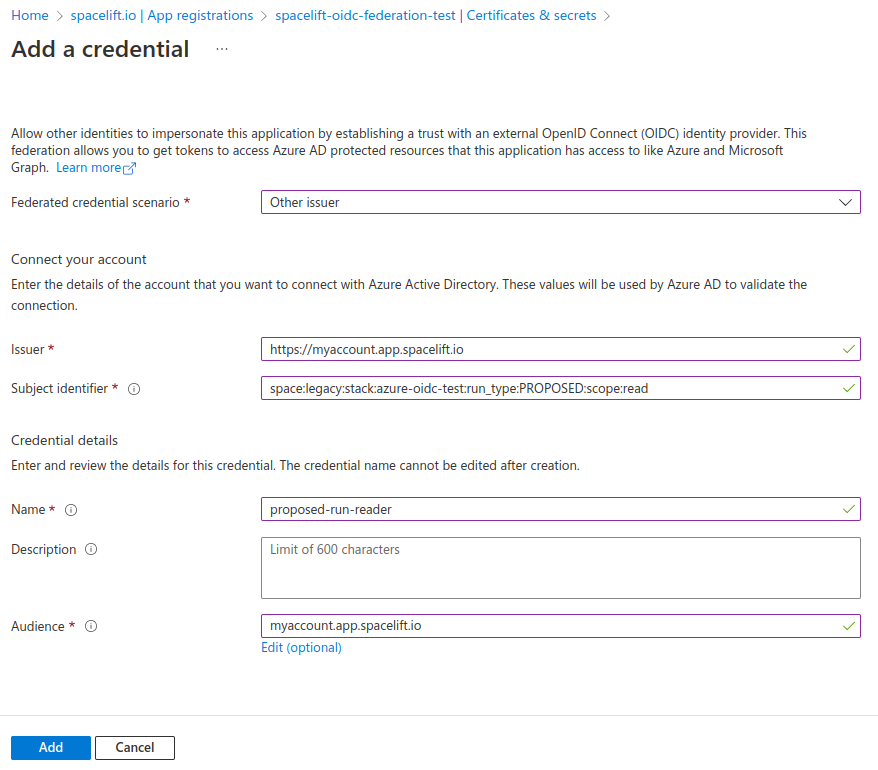
The next step is to configure the trust relationship between Spacelift and Azure. In order to do this, we need to fill out the following pieces of information:
- Issuer - the URL of your Spacelift account, for example
https://myaccount.app.spacelift.io. - Subject identifier - the subject that a token must contain to be able to get credentials for your App. This uses the format mentioned in the Standard claims section.
- Name - a name for this credential.
- Audience - the hostname of your Spacelift account, for example
myaccount.app.spacelift.io.
Take a look at the following screenshot for an example allowing a proposed run to use our App:
Workload federation in Azure requires the subject claim of the OIDC token to exactly match the federated credential, and doesn't allow wildcards. Because of this you will need to repeat the same process and add a number of different federated credentials in order to support all the different types of runs for your Stack or module. For example for a stack called azure-oidc-test in the legacy space you need to add credentials for the following subjects:
1 2 3 4 5 | |
And for a module called my-module in the development space you need to add the following:
1 2 | |
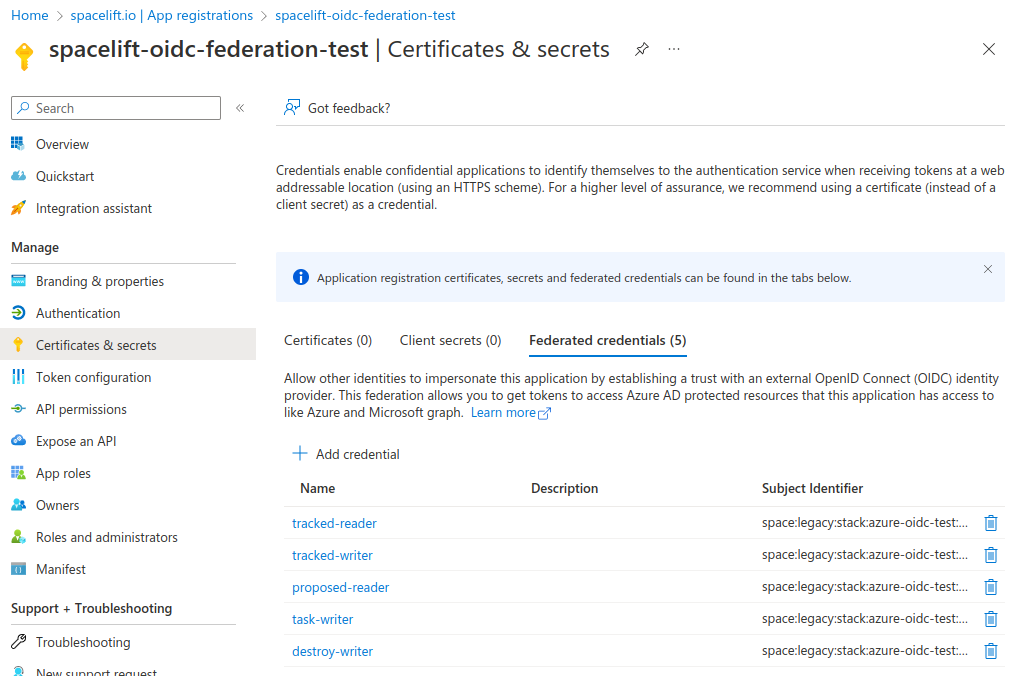
After adding all the credentials for a stack, it should look something like this:
Info
Please see the Standard claims section for more information about the subject format.
Configuring the Terraform Provider»
Once workload identity federation is set up, the AzureRM provider can be configured without the need for any static credentials. To do this, enable the use_oidc feature of the provider, and use the oidc_token_file_path setting to tell the provider where to find the token:
1 2 3 4 5 | |
Next, add the following environment variables to your stack:
ARM_CLIENT_ID- the client ID of the App registration created in the previous section.ARM_TENANT_ID- the tenant ID of the App registration created in the previous section.ARM_SUBSCRIPTION_ID- the ID of the Azure subscription you want to use.
Info
Note - before you can use your App registration to manage Azure resources, you need to assign the correct RBAC permissions to it.
Vault»
Configuring Spacelift as an Identity Provider»
In order to enable Spacelift runs to access Vault, you need to set up Spacelift as a valid identity provider for your Vault instance. This is done using Vault's OIDC auth method. The set up process involves creating a role in Vault that tells Vault which Spacelift runs should be able to access which Vault secrets. This process can be completed via the Vault CLI or Terraform. For illustrative purposes we will use the Vault CLI.
If you haven't enabled the JWT auth method in your Vault instance, you need to do so first. To do this, run the following command:
1 | |
In the next step, we need to add configuration for your Spacelift account as an identity provider. To do this, run the following command:
1 2 3 | |
The bound_issuer parameter is the URL of your Spacelift account which is used as the issuer claim in the OIDC token you receive from Spacelift. The oidc_discovery_url parameter is the URL of the OIDC discovery endpoint for your Spacelift account, which is in this case identical to the bound_issuer parameter.
Next, you will need to create a policy that will be used to determine which Spacelift runs can access which Vault secrets. For example, the following policy allows all Spacelift runs to read any secret in the secrets/preprod path:
1 2 3 4 5 | |
Last but not least, you will need to create a role that binds the policy to the identity provider. The following command creates a role called infra-preprod that binds the infra-preprod policy to the JWT identity provider:
1 2 3 4 5 6 7 8 9 10 | |
The bound_audiences parameter is the hostname of your Spacelift account, which is used as the audience claim in the OIDC token you receive from Spacelift. The bound_claims parameter is a JSON object that contains the claims that the OIDC token must contain in order to be able to access the Vault secrets. How you scope this will very much depend on your use case. In the above example, only runs belonging to a stack or module in the space claim can assume "infra-preprod" Vault role. You can refer to this document to see the available standard and custom claims presented by the Spacelift OIDC token.
Configuring the Terraform Provider»
Once the Vault setup is complete, you need to configure the Terraform Vault provider to use the Spacelift OIDC JWT token to assume a particular role. To do this, you will provide the auth_login_jwt configuration block to the provider, and set the role parameter to the name of the role you created in the previous section:
1 2 3 4 5 6 7 | |
Next, set the TERRAFORM_VAULT_AUTH_JWT environment variable to ${SPACELIFT_OIDC_TOKEN}, either directly on your stack, or on one of the attached contexts. This approach uses interpolation to dynamically set the value of the variable the provider is looking for to the value of the environment variable that Spacelift provides.